5分钟上手亚马逊云科技AWS核心云开发/云架构知识 - 创建高可用EC2服务器
CSDN 2024-08-31 16:07:03 阅读 81
简介:
小李哥从今天开始将开启全新亚马逊云科技AWS云计算知识学习系列,适用于任何无云计算或者亚马逊云科技技术背景的开发者,让大家0基础5分钟通过这篇文章就能完全学会亚马逊云科技一个经典的服务开发架构。
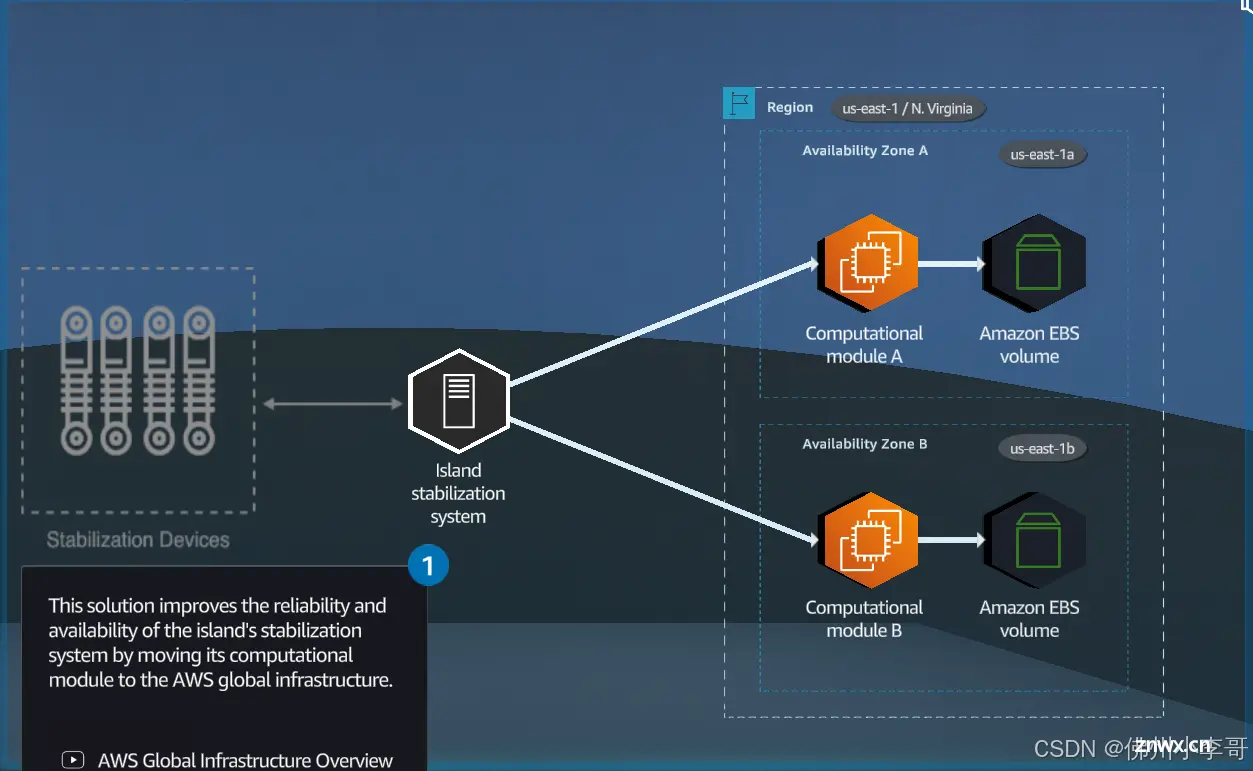
我将每天介绍一个基于亚马逊云科技AWS云计算平台的全球前沿云开发/架构技术基础解决方案,帮助大家快速了解国际上最热门的云计算平台亚马逊云科技AWS最佳实践,并应用到自己的日常工作里。本次我将介绍如何在亚马逊云科技上创建双区高可用的EC2服务器,提供可扩展和安全的后端API服务器解决方案。本方案架构图如下:
方案所需基础知识
什么是 Amazon EC2?
Amazon Elastic Compute Cloud(简称 EC2)是 Amazon Web Services(AWS)提供的一项灵活的云计算服务。它允许用户在云中轻松启动、配置和管理虚拟服务器(称为实例),从而可以根据需要动态扩展计算资源。
什么是高可用?
高可用(High Availability,简称 HA)指的是系统在面临硬件故障、软件错误或其他潜在问题时,仍能提供正常服务的能力。高可用系统通常通过冗余设计和故障自动恢复机制,来最小化服务中断时间,确保系统持续可靠地运行。
创建高可用系统的优点
业务连续性:
高可用系统通过冗余设计和自动故障恢复,确保系统在遇到故障时仍能正常运行,减少业务中断时间,保持业务连续性。
提高客户满意度:
高可用系统能提供稳定可靠的服务,减少因系统故障导致的停机时间,从而提高客户满意度和用户体验。
降低停机成本:
系统停机可能导致直接和间接的经济损失,高可用系统通过减少停机时间,降低因停机带来的成本。
增强系统弹性:
高可用系统具有更强的弹性和恢复能力,能够快速应对和恢复各种故障,提高系统的整体可靠性。
本方案包括的内容:
如何在亚马逊云科技上创建EC2服务器
为EC2服务器添加服务器启动Bash脚本
项目搭建具体步骤:
1. 打开亚马逊云科技控制台,打开EC2服务
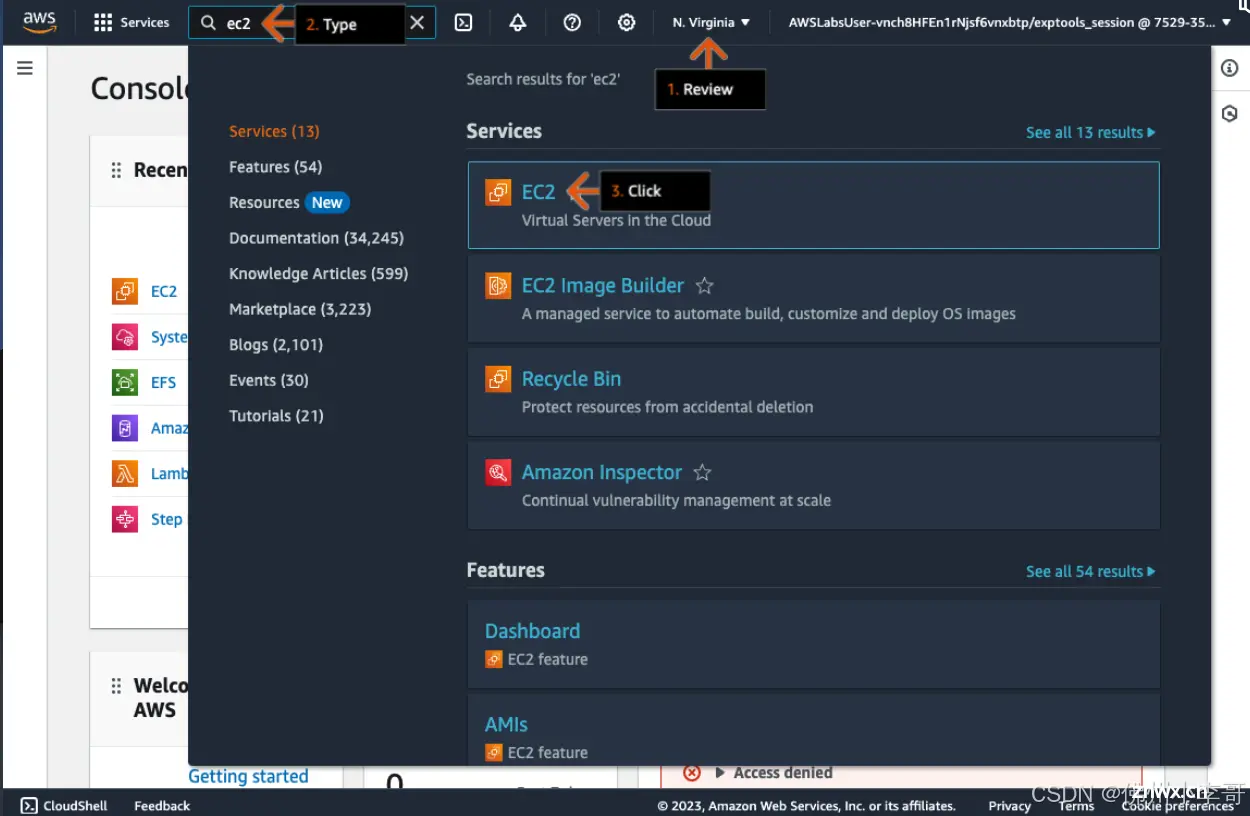
2. 点击Launch Instance创建EC2

3. 将EC2起一个别名“webserver01”,选择操作系统Amazon Linux,镜像为“Amazon Linux 2 AMI”,选择实例类型t2.micro


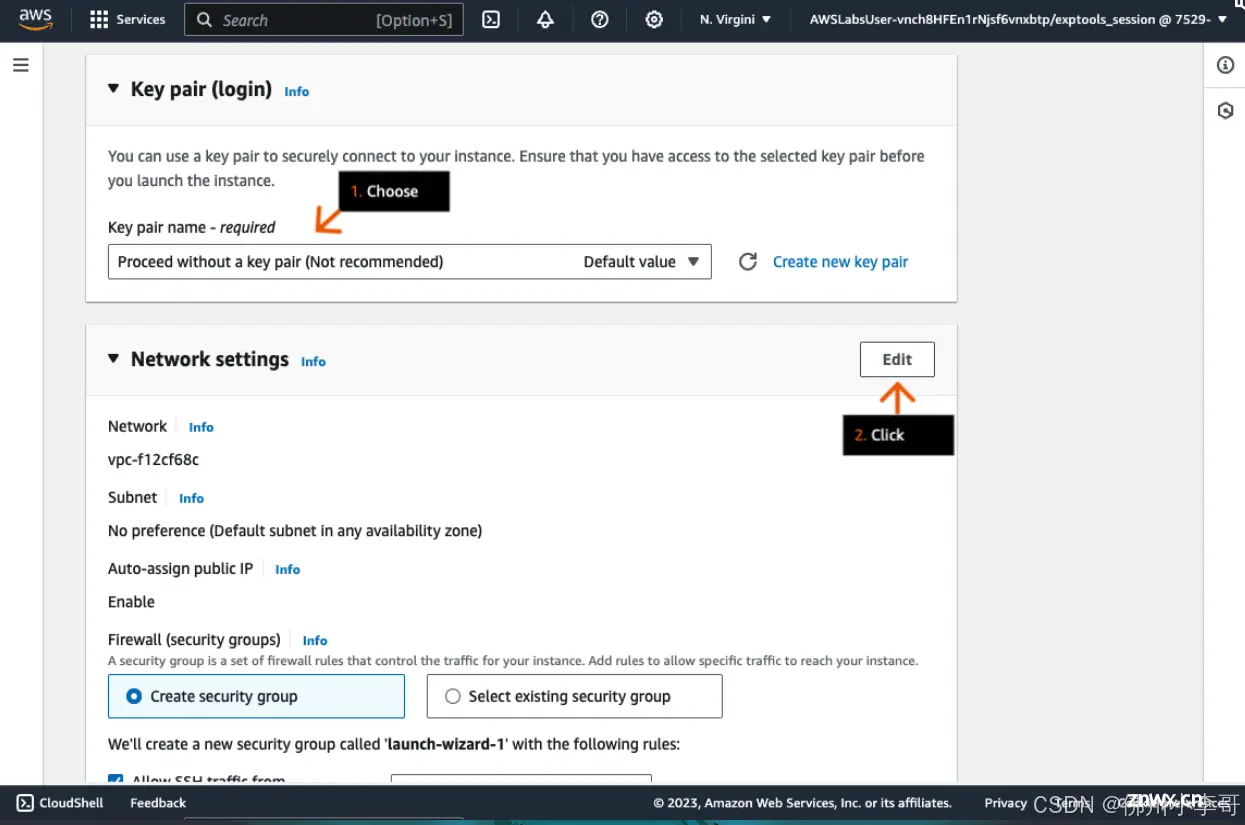
4. 在Key Pair中配置SSH key,并在网络配置中点击Edit配置VPC。
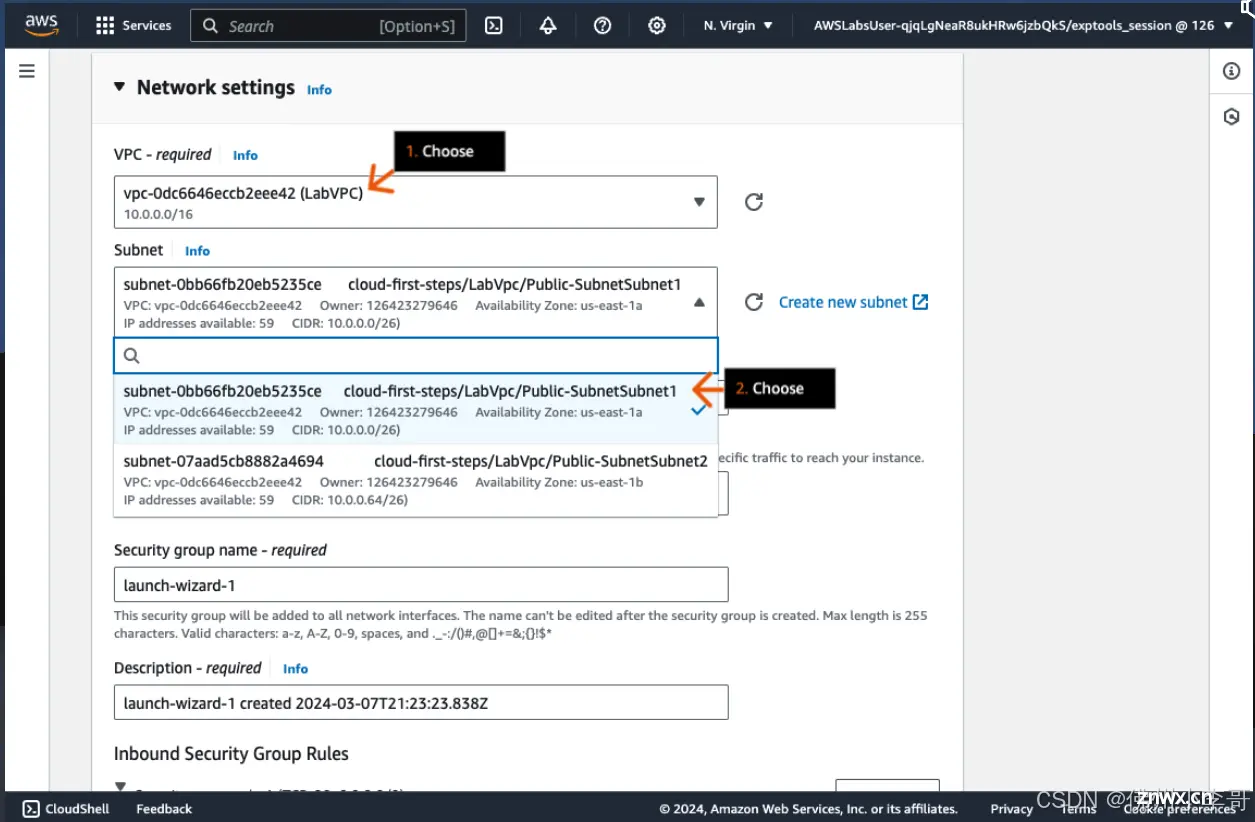
5. 我们选择我们创建EC2的VPC网络环境和对应子网
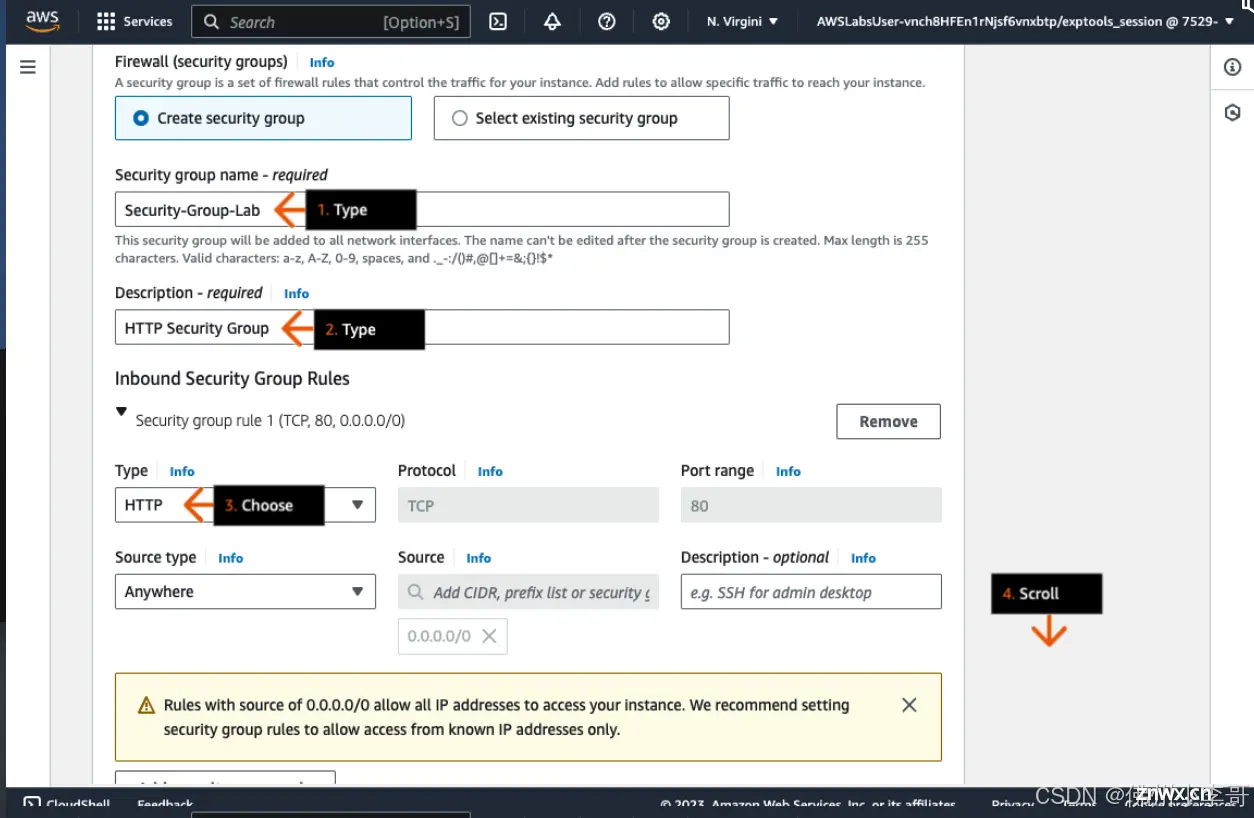
6. 接下来我们为EC2服务器添加安全组防火墙,命名“security-group-lab”,并添加入网端口HTTP 80,允许HTTP流量访问EC2。
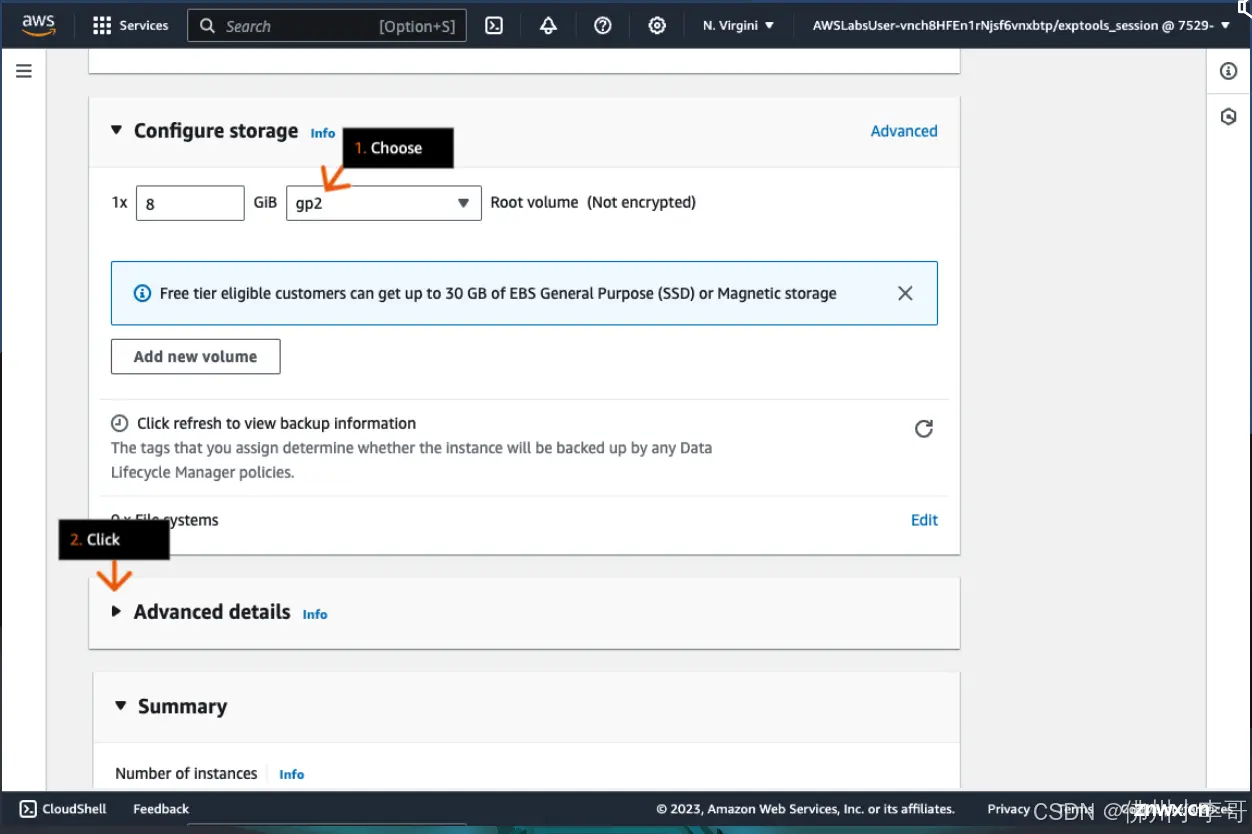
7. 为EC2添加8GB存储, 存储类型为gp2(最新的版本为gp3)
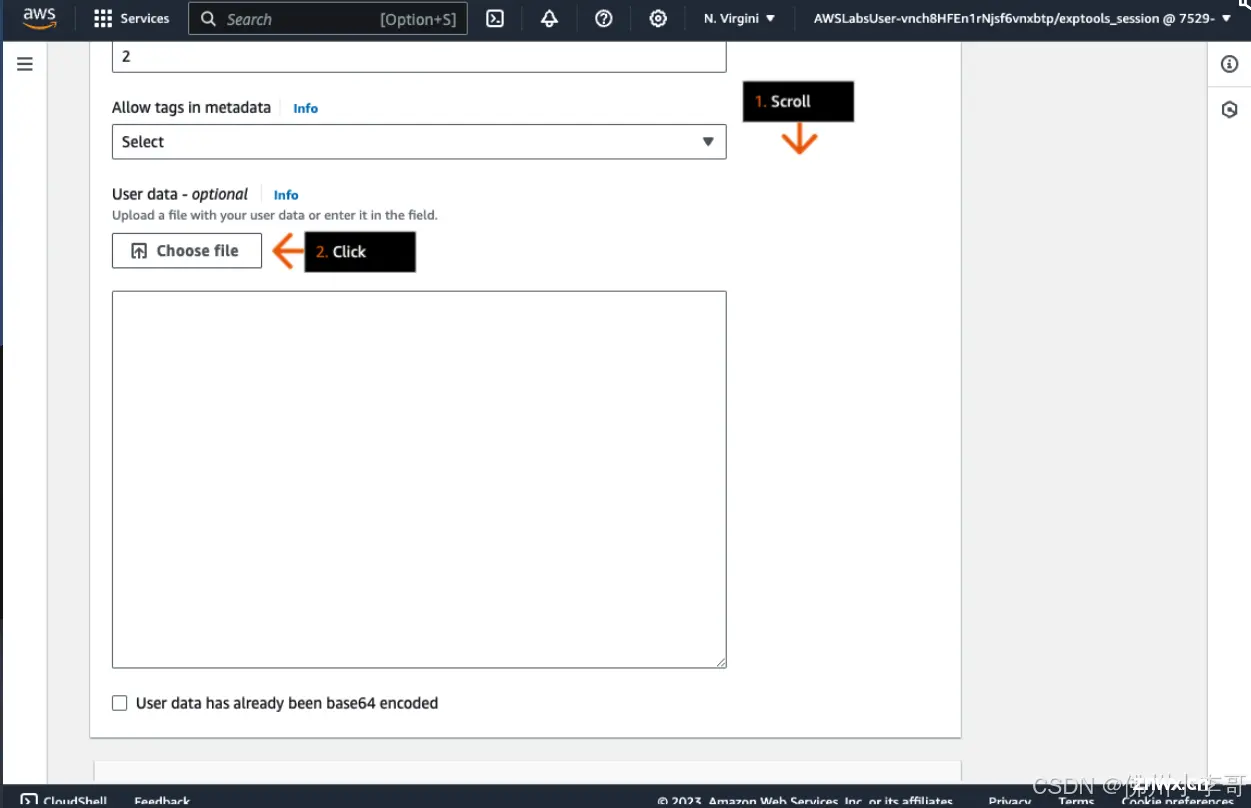
8. 我们编写一个开启启动脚本,用户启动网页服务器和前端网页,命名为user-data
<code>#!/bin/bash
sudo yum update -y
sudo yum install -y httpd
sudo yum install -y git
export TOKEN=`curl -X PUT "http://169.254.169.254/latest/api/token" -H "X-aws-ec2-metadata-token-ttl-seconds: 21600"`
export META_INST_ID=`curl http://169.254.169.254/latest/meta-data/instance-id -H "X-aws-ec2-metadata-token: $TOKEN"`
export META_INST_TYPE=`curl http://169.254.169.254/latest/meta-data/instance-type -H "X-aws-ec2-metadata-token: $TOKEN"`
export META_INST_AZ=`curl http://169.254.169.254/latest/meta-data/placement/availability-zone -H "X-aws-ec2-metadata-token: $TOKEN"`
cd /var/www/html
echo "<!DOCTYPE html>" >> index.html
echo "<html lang="en">" >> index.htmlcode>
echo "<head>" >> index.html
echo " <meta charset="UTF-8">" >> index.htmlcode>
echo " <meta name="viewport" content="width=device-width, initial-scale=1.0">" >> index.htmlcode>
echo " <style>" >> index.html
echo " @import url('https://fonts.googleapis.com/css?family=Open+Sans&display=swap');" >> index.html
echo " html {" >> index.html
echo " position: relative;" >> index.html
echo " overflow-x: hidden !important;" >> index.html
echo " }" >> index.html
echo " * {" >> index.html
echo " box-sizing: border-box;" >> index.html
echo " }" >> index.html
echo " body {" >> index.html
echo " font-family: 'Open Sans', sans-serif;" >> index.html
echo " color: #324e63;" >> index.html
echo " }" >> index.html
echo " .wrapper {" >> index.html
echo " width: 100%;" >> index.html
echo " width: 100%;" >> index.html
echo " height: auto;" >> index.html
echo " min-height: 90vh;" >> index.html
echo " padding: 50px 20px;" >> index.html
echo " padding-top: 100px;" >> index.html
echo " display: flex;" >> index.html
echo " }" >> index.html
echo " .instance-card {" >> index.html
echo " width: 100%;" >> index.html
echo " min-height: 380px;" >> index.html
echo " margin: auto;" >> index.html
echo " box-shadow: 12px 12px 2px 1px rgba(13, 28, 39, 0.4);" >> index.html
echo " background: #fff;" >> index.html
echo " border-radius: 15px;" >> index.html
echo " border-width: 1px;" >> index.html
echo " max-width: 500px;" >> index.html
echo " position: relative;" >> index.html
echo " border: thin groove #9c83ff;" >> index.html
echo " }" >> index.html
echo " .instance-card__cnt {" >> index.html
echo " margin-top: 35px;" >> index.html
echo " text-align: center;" >> index.html
echo " padding: 0 20px;" >> index.html
echo " padding-bottom: 40px;" >> index.html
echo " transition: all .3s;" >> index.html
echo " }" >> index.html
echo " .instance-card__name {" >> index.html
echo " font-weight: 700;" >> index.html
echo " font-size: 24px;" >> index.html
echo " color: #6944ff;" >> index.html
echo " margin-bottom: 15px;" >> index.html
echo " }" >> index.html
echo " .instance-card-inf__item {" >> index.html
echo " padding: 10px 35px;" >> index.html
echo " min-width: 150px;" >> index.html
echo " }" >> index.html
echo " .instance-card-inf__title {" >> index.html
echo " font-weight: 700;" >> index.html
echo " font-size: 27px;" >> index.html
echo " color: #324e63;" >> index.html
echo " }" >> index.html
echo " .instance-card-inf__txt {" >> index.html
echo " font-weight: 500;" >> index.html
echo " margin-top: 7px;" >> index.html
echo " }" >> index.html
echo " </style>" >> index.html
echo " <title>Amazon EC2 Status</title>" >> index.html
echo "</head>" >> index.html
echo "<body>" >> index.html
echo " <div class="wrapper">" >> index.htmlcode>
echo " <div class="instance-card">" >> index.htmlcode>
echo " <div class="instance-card__cnt">" >> index.htmlcode>
echo " <div class="instance-card__name">Your EC2 Instance is running!</div>" >> index.htmlcode>
echo " <div class="instance-card-inf">" >> index.htmlcode>
echo " <div class="instance-card-inf__item">" >> index.htmlcode>
echo " <div class="instance-card-inf__txt">Instance Id</div>" >> index.htmlcode>
echo " <div class="instance-card-inf__title">" $META_INST_ID "</div>" >> index.htmlcode>
echo " </div>" >> index.html
echo " <div class="instance-card-inf__item">" >> index.htmlcode>
echo " <div class="instance-card-inf__txt">Instance Type</div>" >> index.htmlcode>
echo " <div class="instance-card-inf__title">" $META_INST_TYPE "</div>" >> index.htmlcode>
echo " </div>" >> index.html
echo " <div class="instance-card-inf__item">" >> index.htmlcode>
echo " <div class="instance-card-inf__txt">Availability zone</div>" >> index.htmlcode>
echo " <div class="instance-card-inf__title">" $META_INST_AZ "</div>" >> index.htmlcode>
echo " </div>" >> index.html
echo " </div>" >> index.html
echo " </div>" >> index.html
echo " </div>" >> index.html
echo "</body>" >> index.html
echo "</html>" >> index.html
sudo service httpd start
9. 接下来我们为EC2配置开机启动脚本,点击"Choose File",上传我们刚写的Bash脚本,最后保持其他默认配置,点击创建。
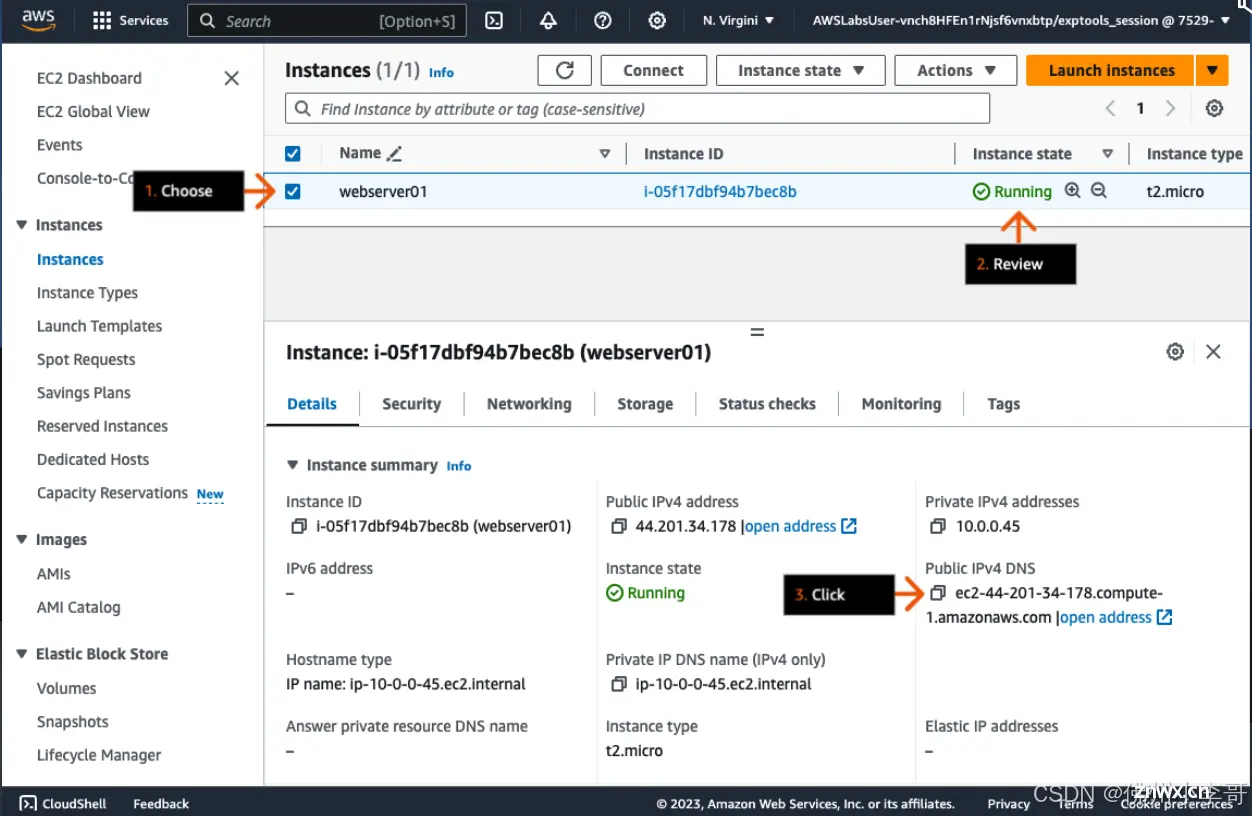
10. 我们再点击EC2服务器中的Public IPv4 DNS URL,在浏览器打开后就可以看到EC2服务器上的网页了
如果我们需要建立高可以用的EC2服务器,需要前端加载Load Balancer负载均衡器服务,后端建立2个以上的EC2服务器轮询接收负载均衡器发来的请求,未来小李哥会进行更深入的介绍。
以上就是在亚马逊云科技上创建双区高可用的EC2服务器的全部步骤。欢迎大家关注0基础5分钟上手AWS系列,未来获取更多国际前沿的AWS云开发/云架构方案!
上一篇: [Algorithm] BEVformer 源码细节学习&&ubuntu20.04下的环境配置&&目标跑起开源代码&&论文学习笔记
下一篇: 树莓派Raspberry Pi 5系列 -- 硬件篇第四章 -- 树莓派5 安装烧录ubuntu24.04操作系统
本文标签
声明
本文内容仅代表作者观点,或转载于其他网站,本站不以此文作为商业用途
如有涉及侵权,请联系本站进行删除
转载本站原创文章,请注明来源及作者。