YOLOv5改进实战 | 更换主干网络Backbone(一)之轻量化网络Ghostnet
w94ghz 2024-06-27 15:07:03 阅读 52

前言
轻量化网络设计是一种针对移动设备等资源受限环境的深度学习模型设计方法。下面是一些常见的轻量化网络设计方法:
网络剪枝:移除神经网络中冗余的连接和参数,以达到模型压缩和加速的目的。分组卷积:将卷积操作分解为若干个较小的卷积操作,并将它们分别作用于输入的不同通道,从而减少计算量。深度可分离卷积:将标准卷积分解成深度卷积和逐点卷积两个步骤,使得在大部分情况下可以大幅减少计算量。跨层连接:通过跨越多个层级的连接方式来增加神经网络的深度和复杂性,同时减少了需要训练的参数数量。模块化设计:将神经网络分解为多个可重复使用的模块,以提高模型的可调节性和适应性。
传统的YOLOv5系列中,Backbone采用的是较为复杂的C3网络结构,这使得模型计算量大幅度的增加,检测速度较慢,应用受限,在某些真实的应用场景如移动或者嵌入式设备,如此大而复杂的模型时难以被应用的。为了解决这个问题,本章节通过采用Ghostnet轻量化主干网络作为Backbone的基础结构,从而在保证检测性能的同时,将网络结构精简到最小,大大减小了模型的参数量和计算量。
目录
一、Ghostnet二、代码实现2.1 无需修改common.py和yolo.py文件2.2 yolov5s-ghost-backbone.yaml2.3 模型验证2.4 模型训练2.5 模型对比
三、总结
一、Ghostnet
2020 CVPR 论文链接:GhostNet: More Features from Cheap Operations
Pytorch code:ghostnet_pytorch
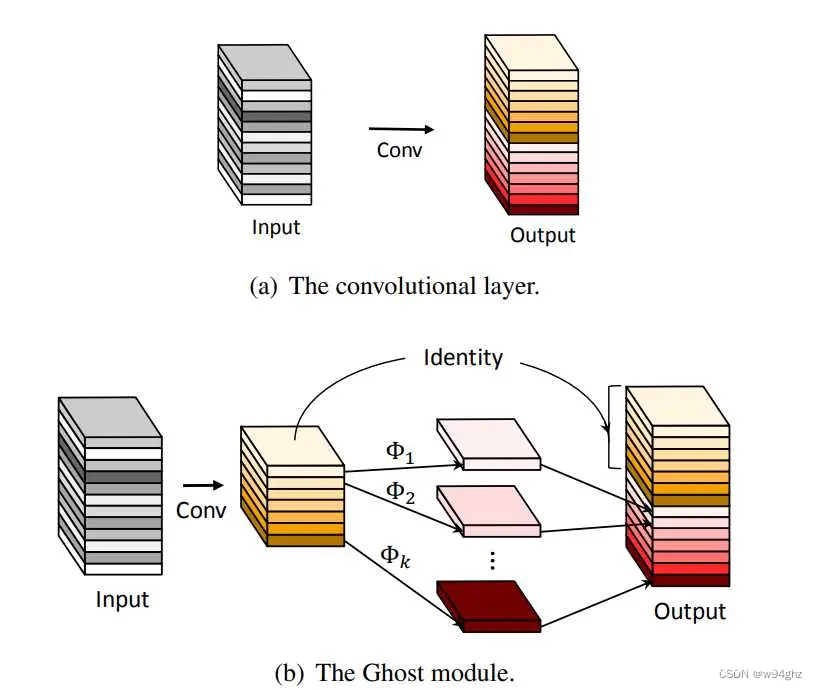
轻量级神经网络Ghostnet是专门为移动设备上的应用而设计的,由Ghost bottleneck搭建而成,而Ghost bottleneck通过Ghost模块堆叠。Ghost 模块是一种新颖的即插即用模块。Ghost 模块设计的初衷是使用更少的参数来生成更多特征图 (generate more features by using fewer parameters)。在ImageNet分类任务,GhostNet在相似计算量情况下Top-1正确率达75.7%,高于MobileNetV3的75.2%。

GhostConv
class GhostConv(nn.Module):
# Ghost Convolution https://github.com/huawei-noah/ghostnet
def __init__(self, c1, c2, k=1, s=1, g=1, act=True): # ch_in, ch_out, kernel, stride, groups
super(GhostConv, self).__init__()
c_ = c2 // 2 # hidden channels
self.cv1 = Conv(c1, c_, k, s, None, g, act)
self.cv2 = Conv(c_, c_, 5, 1, None, c_, act)
def forward(self, x):
y = self.cv1(x)
return torch.cat([y, self.cv2(y)], 1)
Ghost Bottleneck
class GhostBottleneck(nn.Module):
# Ghost Bottleneck https://github.com/huawei-noah/ghostnet
def __init__(self, c1, c2, k=3, s=1): # ch_in, ch_out, kernel, stride
super().__init__()
c_ = c2 // 2
self.conv = nn.Sequential(
GhostConv(c1, c_, 1, 1), # pw
DWConv(c_, c_, k, s, act=False) if s == 2 else nn.Identity(), # dw
GhostConv(c_, c2, 1, 1, act=False)) # pw-linear
self.shortcut = nn.Sequential(DWConv(c1, c1, k, s, act=False), Conv(c1, c2, 1, 1,
act=False)) if s == 2 else nn.Identity()
def forward(self, x):
return self.conv(x) + self.shortcut(x)
C3Ghost
class C3Ghost(C3):
# C3 module with GhostBottleneck()
def __init__(self, c1, c2, n=1, shortcut=True, g=1, e=0.5):
super().__init__(c1, c2, n, shortcut, g, e)
c_ = int(c2 * e) # hidden channels
self.m = nn.Sequential(*(GhostBottleneck(c_, c_) for _ in range(n)))
二、代码实现
2.1 无需修改common.py和yolo.py文件
YOLOv5-7.0最新版已经添加了GhostConv、Ghost Bottleneck、C3Ghost三个模块,可以说是很方便了。甚至在models/yolo.py文件中已经注册这三个模块。所以我们无需做任何修改,只需修改yaml文件。
if m in {
Conv, GhostConv, Bottleneck, GhostBottleneck, SPP, SPPF, DWConv, MixConv2d, Focus, CrossConv,
BottleneckCSP, C3, C3TR, C3SPP, C3Ghost, nn.ConvTranspose2d, DWConvTranspose2d, C3x}:
c1, c2 = ch[f], args[0]
if c2 != no: # if not output
c2 = make_divisible(c2 * gw, 8)
args = [c1, c2, *args[1:]]
if m in { BottleneckCSP, C3, C3TR, C3Ghost, C3x}:
args.insert(2, n) # number of repeats
n = 1
2.2 yolov5s-ghost-backbone.yaml
细心的小伙伴可能会发现在models/hub文件夹下已经有yolov5s-ghost.yaml配置文件,不过官方给的是将整个网络的Conv和C3模块替换成了GhostConv和C3Ghost。这里我们只替换Backbone中的Conv和C3模块,当然两者哪个效果更好,需要各位去实测一番。
# YOLOv5 🚀 by Ultralytics, AGPL-3.0 license
# Parameters
nc: 80 # number of classes
depth_multiple: 0.33 # model depth multiple
width_multiple: 0.50 # layer channel multiple
anchors:
- [10,13, 16,30, 33,23] # P3/8
- [30,61, 62,45, 59,119] # P4/16
- [116,90, 156,198, 373,326] # P5/32
# YOLOv5 v6.0 backbone
backbone:
# [from, number, module, args]
[[-1, 1, Conv, [64, 6, 2, 2]], # 0-P1/2
[-1, 1, GhostConv, [128, 3, 2]], # 1-P2/4
[-1, 3, C3Ghost, [128]],
[-1, 1, GhostConv, [256, 3, 2]], # 3-P3/8
[-1, 6, C3Ghost, [256]],
[-1, 1, GhostConv, [512, 3, 2]], # 5-P4/16
[-1, 9, C3Ghost, [512]],
[-1, 1, GhostConv, [1024, 3, 2]], # 7-P5/32
[-1, 3, C3Ghost, [1024]],
[-1, 1, SPPF, [1024, 5]], # 9
]
# YOLOv5 v6.0 head
head:
[[-1, 1, Conv, [512, 1, 1]],
[-1, 1, nn.Upsample, [None, 2, 'nearest']],
[[-1, 6], 1, Concat, [1]], # cat backbone P4
[-1, 3, C3, [512, False]], # 13
[-1, 1, Conv, [256, 1, 1]],
[-1, 1, nn.Upsample, [None, 2, 'nearest']],
[[-1, 4], 1, Concat, [1]], # cat backbone P3
[-1, 3, C3, [256, False]], # 17 (P3/8-small)
[-1, 1, Conv, [256, 3, 2]],
[[-1, 14], 1, Concat, [1]], # cat head P4
[-1, 3, C3, [512, False]], # 20 (P4/16-medium)
[-1, 1, Conv, [512, 3, 2]],
[[-1, 10], 1, Concat, [1]], # cat head P5
[-1, 3, C3, [1024, False]], # 23 (P5/32-large)
[[17, 20, 23], 1, Detect, [nc, anchors]], # Detect(P3, P4, P5)
]
2.3 模型验证
python models/yolo.py --cfg models/yolov5s-ghost-backbone.yaml --line-profile
YOLOv5s-ghost-backbone summary: 321 layers, 5301141 parameters, 5301141 gradients, 11.4 GFLOPs
2.4 模型训练
python train.py --cfg models/yolov5s-ghost-backbone.yaml --name yolov5s-ghost-backbone
2.5 模型对比
模型参数量和计算量对比(运行train.py文件的结果,以自己实测为主,仅供参考)
| 模型 | 参数量(parameters) | 计算量(GFLOPs) |
|---|---|---|
| YOLOv5s | 7033114 | 16.0 |
| YOLOv5s-Ghost | 3695330(↓47.46%) | 8.2(↓48.75%) |
| YOLOv5s-Ghost-Backbone(本章) | 5098866(↓27.50%) | 10.8(↓32.5%) |
三、总结
模型的训练具有很大的随机性,您可能需要点运气和更多的训练次数才能达到最高的 mAP。

上一篇: 详细介绍windows自带Hyper-V安装虚拟机(windows11 / ubuntu22 / macos12)
下一篇: 2024最新 Jenkins + Docker实战教程(七)- Jenkins实现远程传输和自动部署
本文标签
声明
本文内容仅代表作者观点,或转载于其他网站,本站不以此文作为商业用途
如有涉及侵权,请联系本站进行删除
转载本站原创文章,请注明来源及作者。