Segment-anything学习到微调系列3_SAM微调decoder
ManekiNeko2021 2024-09-06 15:31:01 阅读 95
前言
本系列文章是博主在工作中使用SAM模型时的学习笔记,包含三部分:
SAM初步理解,简单介绍模型框架,不涉及细节和代码SAM细节理解,对各模块结合代码进一步分析SAM微调实例,原始代码涉及隐私,此部分使用公开的VOC2007数据集,Point和Box作为提示进行mask decoder微调讲解
本篇是第3部分,基于voc2007数据集对SAM decoder进行微调。代码已上传至github finetune_segment_anything_tutorial,如果对你有帮助请点个Star,感谢。
此前讲过,以ViT_B为基础的SAM权重是375M,其中prompt encoder只有32.8k,mask decoder是16.3M(4.35%),剩余则是image encoder,image encoder是非常大的,一般不对它进行微调,预训练的已经够好了,除非是类似医疗影像这种非常规数据,预训练数据中没有,效果会比较差,才会对image encoder也进行微调,所以此处只针对decoder进行微调。
微调效果
基于point prompt
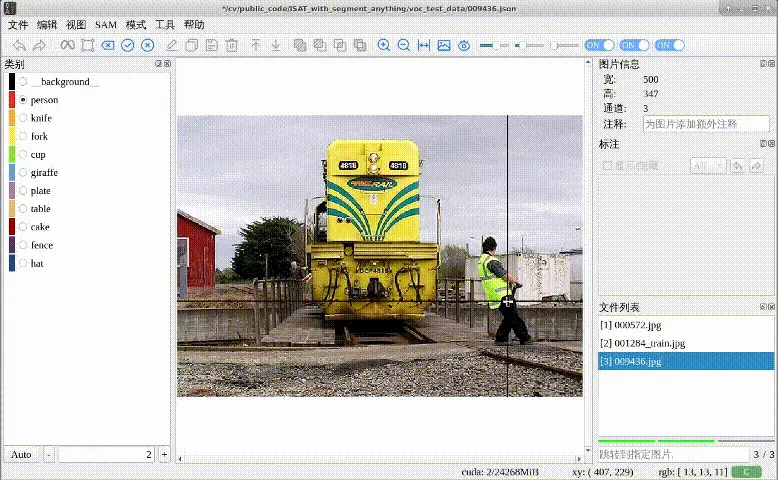
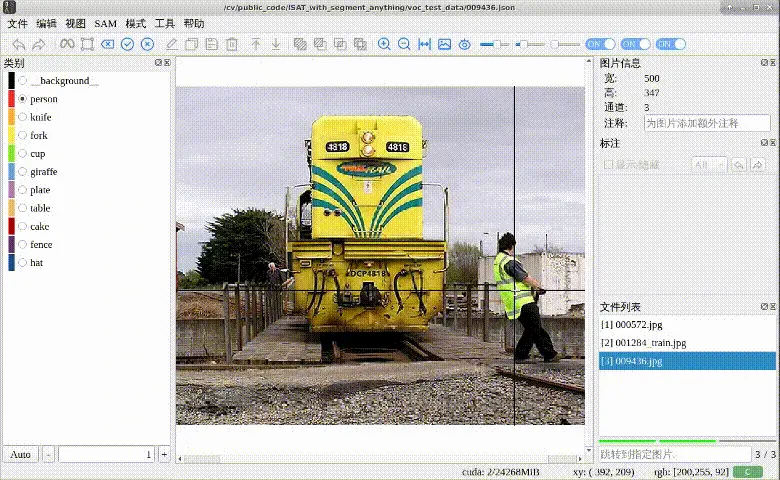
这部分是只针对point作为提示的微调,借助了ISAT_with_segment_anything这个用SAM做自动标注的工具来进行一个效果比对,可以看出来微调前,需要点击多次多个点才能分割得较好,微调后点击一下就能分割出对应类别
微调前
微调后
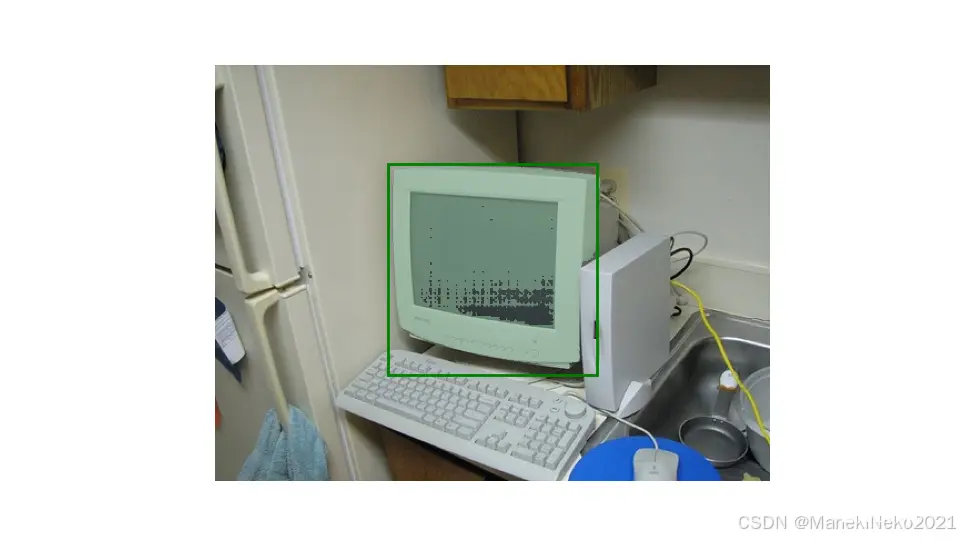
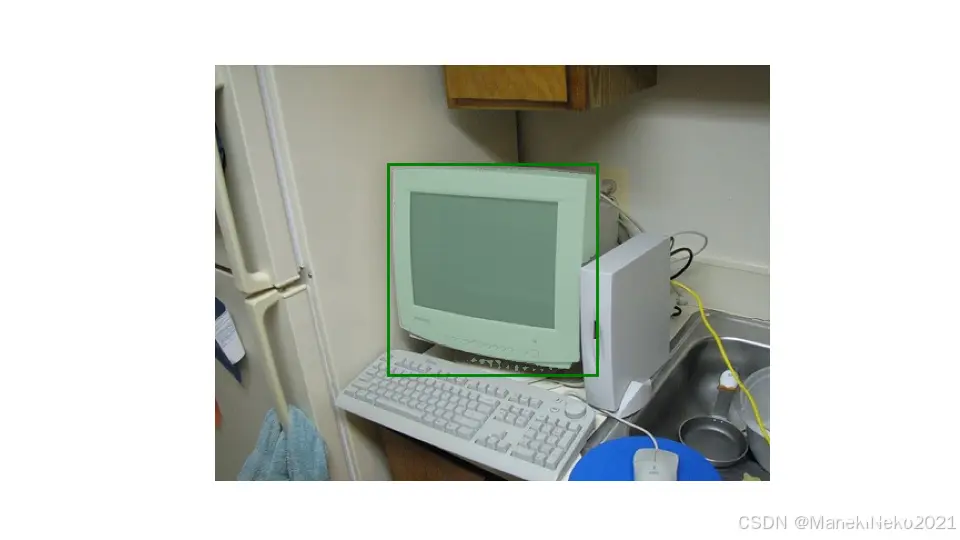
基于box prompt
这部分加入了box作为提示的微调
微调前
微调后
代码部分
数据读取
使用的是VOC2007分割数据集,总共632张图片(412train_val,210test),一共20个类别,加上背景类一共21,标签是png格式,像素值代表物体类别,同时所有物体mask的外轮廓值是255,训练时会忽略,原始数据集如下目录构造(github上的代码中data_example只是示例,只有几张图),训练使用的是SegmentationObject中的标签:
<code>## VOCdevkit/VOC2007
├── Annotations
├── ImageSets
│ ├── Layout
│ ├── Main
│ └── Segmentation
├── JPEGImages
├── SegmentationClass
└── SegmentationObject
CustomDataset的代码按如上目录结构读取对应数据,根据ImageSets/Segmentation目录下的txt_name指定训练的文件名字,然后读取对应图片和标签,有以下几点注意:
分割标签使用PIL读取,像素值就是对应类别,255是外轮廓会忽略;如果使用opencv读取图片,需要根据RGB值去platte表中看对应类别image和gt都是按numpy array塞进batch中,后面丢给sam会转为tensor;voc2007中每张图片大小是不一致的,目前就按batch=1处理gt的channel是1,后面需要转为one-hot的形式
class CustomDataset(Dataset):
def __init__(self, VOCdevkit_path, txt_name="train.txt", transform=None):code>
self.VOCdevkit_path = VOCdevkit_path
with open(os.path.join(VOCdevkit_path, f"VOC2007/ImageSets/Segmentation/{txt_name}"), "r") as f:
file_names = f.readlines()
self.file_names = [name.strip() for name in file_names]
self.image_dir = os.path.join(self.VOCdevkit_path, "VOC2007/JPEGImages")
self.image_files = [f"{self.image_dir}/{name}.jpg" for name in self.file_names]
self.gt_dir = os.path.join(self.VOCdevkit_path, "VOC2007/SegmentationObject")
self.gt_files = [f"{self.gt_dir}/{name}.png" for name in self.file_names]
def __len__(self):
return len(self.file_names)
def __getitem__(self, idx):
image_path = self.image_files[idx]
image_name = image_path.split("/")[-1]
gt_path = self.gt_files[idx]
image = cv2.imread(image_path)
image = image[..., ::-1] ## RGB to BGR
image = np.ascontiguousarray(image)
gt = Image.open(gt_path)
gt = np.array(gt, dtype='uint8')code>
gt = np.ascontiguousarray(gt)
return image, gt, image_name
@staticmethod
def custom_collate(batch):
""" DataLoader中collate_fn,
图像和gt都用numpy格式,后面会重新转tensor
"""
images = []
seg_labels = []
images_name = []
for image, gt, image_name in batch:
images.append(image)
seg_labels.append(gt)
images_name.append(image_name)
images = np.array(images)
seg_labels = np.array(seg_labels)
return images, seg_labels, images_name
图像预处理
取得图像后,直接使用SamPredictor中的预处理方式,会将图片按最长边resized到1024x1024,然后计算image_embedding,这部分很耗时,所以每张图只计算一次,会将结果缓存起来需要的时候直接调用。使用"with torch.no_grad()"保证image encoder部分不需要梯度更新,冻结对应权重
model_transform = ResizeLongestSide(sam.image_encoder.img_size)
for epoch in range(num_epochs):
epoch_loss = 0
for idx, (images, gts, image_names) in enumerate(tqdm(dataloader)):
valid_classes = [] ## voc 0,255 are ignored
for i in range(images.shape[0]):
image = images[i] # h,w,c np.uint8 rgb
original_size = image.shape[:2] ## h,w
input_size = model_transform.get_preprocess_shape(image.shape[0], image.shape[1],
sam.image_encoder.img_size) ##h,w
gt = gts[i].copy() #h,w labels [0,1,2,..., classes-1]
gt_classes = np.unique(gt) ##masks classes: [0, 1, 2, 3, 4, 7]
image_name = image_names[i]
predictions = []
## freeze image encoder
with torch.no_grad():
# gt_channel = gt[:, :, cls]
predictor.set_image(image, "RGB")
image_embedding = predictor.get_image_embedding()
Prompt生成
从mask中随机选取一定数量的前景点和背景点,此处默认1个前景点和1个背景点,数量多的话一般保持2:1的比例较好。
mask_value就是对应的类别id,去mask中找出像素值等于类别id的点坐标,然后随机选取点就行。此处还会根据mask算外接矩形(实际上直接读取图片对应的xml标签文件也行),用于后续基于box prompt的finetune。
def get_random_prompts(mask, mask_value, foreground_nums=1, background_nums=1):
# Find the indices (coordinates) of the foreground pixels
foreground_indices = np.argwhere(mask == mask_value)
ymin, xmin= foreground_indices.min(axis=0)
ymax, xmax = foreground_indices.max(axis=0)
bbox = np.array([xmin, ymin, xmax, ymax])
if foreground_indices.shape[0] < foreground_nums:
foreground_nums = foreground_indices.shape[0]
background_nums = int(0.5 * foreground_indices.shape[0])
background_indices = np.argwhere(mask != mask_value)
## random select
foreground_points = foreground_indices[
np.random.choice(foreground_indices.shape[0], foreground_nums, replace=False)]
background_points = background_indices[
np.random.choice(background_indices.shape[0], background_nums, replace=False)]
## 坐标点是(y,x),输入给网络应该是(x,y),需要翻一下顺序
foreground_points = foreground_points[:, ::-1]
background_points = background_points[:, ::-1]
return (foreground_points, background_points), bbox
得到的prompt是一些点的坐标,坐标的x,y是基于原图的,但进入SAM的图片会resized到1024x1024,所以点坐标也需要resize,对应如下代码
all_points = np.concatenate((foreground_points, background_points), axis=0)
all_points = np.array(all_points)
point_labels = np.array([1] * foreground_points.shape[0] + [0] * background_points.shape[0], dtype=int)
## image resized to 1024, points also
all_points = model_transform.apply_coords(all_points, original_size)
all_points = torch.as_tensor(all_points, dtype=torch.float, device=device)
point_labels = torch.as_tensor(point_labels, dtype=torch.float, device=device)
all_points, point_labels = all_points[None, :, :], point_labels[None, :]
points = (all_points, point_labels)
if not box_prompt:
box_torch=None
else:
## preprocess bbox
box = model_transform.apply_boxes(bbox, original_size)
box_torch = torch.as_tensor(box, dtype=torch.float, device=device)
box_torch = box_torch[None, :]
微调代码中可以指定基于哪种prompt进行微调,如果是point和box同时都开,会按一定概率舍弃point或box以取得更好的泛化性(不然推理时只有point或只有box作为prompt效果可能不太好)。最后经过prompt_encoder得到sparse_embeddings, dense_embeddings。
## if both, random drop one for better generalization ability
if point_box and np.random.random()<0.5:
if np.random.random()<0.25:
points = None
elif np.random.random()>0.75:
box_torch = None
## freeze prompt encoder
with torch.no_grad():
sparse_embeddings, dense_embeddings = sam.prompt_encoder(
points = points,
boxes = box_torch,
# masks=mask_predictions,
masks=None,
)
Mask预测
mask decoder这部分不需要冻结,直接调用mask_decoder推理就行,这里进行了两次mask预测,第一次先预测3个层级的mask然后选出得分最高的一个,将这个mask作为一个mask prompt,并与point prompt、box_prompt一起丢进prompt_encoder得到新的sparse_embeddings, dense_embeddings,再进行第二次mask预测,这次只预测一个mask。相当于先得到粗糙的mask,然后再精修。最后经过后处理nms等得到和原图大小一样的预测mask,一个物体对应一张mask,将多个mask叠起来就得到这张图所有的预测结果predictions。
## predicted masks, three level
mask_predictions, scores = sam.mask_decoder(
image_embeddings=image_embedding.to(device),
image_pe=sam.prompt_encoder.get_dense_pe(),
sparse_prompt_embeddings=sparse_embeddings,
dense_prompt_embeddings=dense_embeddings,
multimask_output=True,
)
# Choose the model's best mask
mask_input = mask_predictions[:, torch.argmax(scores),...].unsqueeze(1)
with torch.no_grad():
sparse_embeddings, dense_embeddings = sam.prompt_encoder(
points=points,
boxes=box_torch,
masks=mask_input,
)
## predict a better mask, only one mask
mask_predictions, scores = sam.mask_decoder(
image_embeddings=image_embedding.to(device),
image_pe=sam.prompt_encoder.get_dense_pe(),
sparse_prompt_embeddings=sparse_embeddings,
dense_prompt_embeddings=dense_embeddings,
multimask_output=False,
)
best_mask = sam.postprocess_masks(mask_predictions, input_size, original_size)
predictions.append(best_mask)
Loss计算
代码中loss用的是BCELoss加DiceLoss,需要gt和pred的shape一致,都为BxCxHxW的形式,pred是经过sigmoid后的值。
因此需要将gt转为one-hot的形式,即将(batch_size, 1, h, w)转为(batch_size, c, h, w),c是gt_classes中有的类别个数,即图片中有多少个实例类别。
def mask2one_hot(label, gt_classes):
"""
label: 标签图像 # (batch_size, 1, h, w)
num_classes: 分类类别数
"""
current_label = label.squeeze(1) # (batch_size, 1, h, w) ---> (batch_size, h, w)
batch_size, h, w = current_label.shape[0], current_label.shape[1], current_label.shape[2]
one_hots = []
for cls in gt_classes:
if isinstance(cls, torch.Tensor):
cls = cls.item()
tmplate = torch.zeros(batch_size, h, w) # (batch_size, h, w)
tmplate[current_label == cls] = 1
tmplate = tmplate.view(batch_size, 1, h, w) # (batch_size, h, w) --> (batch_size, 1, h, w)
one_hots.append(tmplate)
onehot = torch.cat(one_hots, dim=1)
return onehot
另外BCE接受的pred值是logit形式,所以需要将predictions用sigmoid处理,后续loss计算对应如下代码
gts = torch.from_numpy(gts).unsqueeze(1) ## BxHxW ---> Bx1xHxW
gts_onehot = mask2one_hot(gts, valid_classes)
gts_onehot = gts_onehot.to(device)
predictions = torch.sigmoid(predictions)
# #loss = seg_loss(predictions, gts_onehot)
loss = BCEseg(predictions, gts_onehot)
loss_dice = soft_dice_loss(predictions, gts_onehot, smooth = 1e-5, activation='none')code>
loss = loss + loss_dice
权重保存
optimizer默认是AdamW,scheduler是CosineAnnealingLR,这些可以自己修改。最后保存的权重只保存当前loss最小的,而且只保存decoder部分的权重,可以按需修改
if epoch_loss < best_loss:
best_loss = epoch_loss
mask_decoder_weighs = sam.mask_decoder.state_dict()
mask_decoder_weighs = { f"mask_decoder.{ k}": v for k,v in mask_decoder_weighs.items() }
torch.save(mask_decoder_weighs, os.path.join(save_dir, f'sam_decoder_fintune_{ str(epoch+1)}_pointbox_monai.pth'))
print("Saving weights, epoch: ", epoch+1)
全系列完,感谢阅读…
声明
本文内容仅代表作者观点,或转载于其他网站,本站不以此文作为商业用途
如有涉及侵权,请联系本站进行删除
转载本站原创文章,请注明来源及作者。