使用c#制作一个小型桌面程序
莱茶荼菜 2024-10-06 15:35:04 阅读 69
封装dll
首先使用visual stdio 创建Dll新项目,然后属性管理器导入自己的工程属性表(如果没有可以参考visual stdio 如何配置opencv等其他环境)
创建完成后 系统会自动生成一些文件,其中 pch.cpp 先不要修改,pch.h中先导入自己需要用到的库,下面是我的代码
pch.h
<code>#pragma once
#include <opencv2/opencv.hpp>
#include <opencv2/dnn.hpp>
#include <iostream>
#include <string>
现在编写我们的接口代码,我封装的是resnet18的代码:
首先添加源文件ResNetDll.cpp:
ResNetDll.cpp
#include "pch.h"
#include "ResNetDll.h"
// 全局变量,用于存储模型路径和图像路径
static std::string g_imagePath;
static std::string g_modelPath;
// 图像预处理函数
cv::Mat transformImage(const std::string& imagePath) { -- -->
cv::Mat image = cv::imread(imagePath);
if (image.empty()) {
throw std::runtime_error("Failed to load image.");
}
cv::Mat resizedImage;
cv::resize(image, resizedImage, cv::Size(224, 224));
cv::Mat floatImage;
resizedImage.convertTo(floatImage, CV_32F, 1.0 / 255.0);
cv::Mat normalizedImage;
cv::Scalar mean(0.485, 0.456, 0.406);
cv::Scalar stdDev(0.229, 0.224, 0.225);
cv::subtract(floatImage, mean, normalizedImage);
cv::divide(normalizedImage, stdDev, normalizedImage);
// 从 BGR 转换到 RGB
cv::Mat rgbImage;
cv::cvtColor(normalizedImage, rgbImage, cv::COLOR_BGR2RGB);
return rgbImage;
}
// 推理函数
const char* run_inference() {
static std::string result;
try {
// 加载 ONNX 模型
cv::dnn::Net net = cv::dnn::readNetFromONNX(g_modelPath);
if (net.empty()) {
result = "Failed to load the model.";
return result.c_str();
}
// 预处理图像
cv::Mat rgbImage = transformImage(g_imagePath);
// 创建 blob 并设置为网络输入
cv::Mat blob = cv::dnn::blobFromImage(rgbImage, 1.0, cv::Size(224, 224), cv::Scalar(), true, false);
net.setInput(blob);
// 执行推理
cv::Mat output = net.forward();
// 处理输出
cv::Mat prob = output.reshape(1, 1); // 变换成 1D 张量
cv::Point classIdPoint;
double confidence;
// 用来找到矩阵或图像中元素的最小值和最大值,以及它们所在的位置
cv::minMaxLoc(prob, 0, &confidence, 0, &classIdPoint);
int classId = classIdPoint.x;
// 根据预测结果返回相应的标签
result = "Predicted Class ID: " + std::to_string(classId) + " with confidence: " + std::to_string(confidence);
return result.c_str();
}
catch (const std::exception& e) {
result = "Error occurred during inference: " + std::string(e.what());
return result.c_str();
}
}
// DLL 暴露的函数,用于设置图像路径
extern "C" RESNETDLL_API void set_image_path(const char* imagePath) {
g_imagePath = imagePath;
}
// DLL 暴露的函数,用于设置模型路径
extern "C" RESNETDLL_API void set_model_path(const char* modelPath) {
g_modelPath = modelPath;
}
// DLL 暴露的函数,运行推理
extern "C" RESNETDLL_API const char* run_resnet() {
return run_inference();
}
ResNetDll.h:
#pragma once
#ifdef RESNETDLL_EXPORTS
#define RESNETDLL_API __declspec(dllexport)
#else
#define RESNETDLL_API __declspec(dllimport)
#endif
extern "C" {
// 设置图像路径
RESNETDLL_API void set_image_path(const char* imagePath);
// 设置模型路径
RESNETDLL_API void set_model_path(const char* modelPath);
// 运行推理
RESNETDLL_API const char* run_resnet();
}
点击生成dll,就封装成了windows动态库
制作Demo
创建.NET Framework新项目,将之前生成的dll放在Demo文件夹的bin ->debug或是 release中(看你自己用的什么模式),
新建NativeMethods.cs 这个文件用于 导入 dll中的接口函数或类
我的代码如下
NativeMethods.cs
using System;
using System.Runtime.InteropServices;
namespace ResNetApp
{
public static class NativeMethods
{
// 导入 DLL 中的 set_image_path 函数
[DllImport("ResNetDll.dll", CallingConvention = CallingConvention.Cdecl)]
public static extern void set_image_path(string imagePath);
// 导入 DLL 中的 set_model_path 函数
[DllImport("ResNetDll.dll", CallingConvention = CallingConvention.Cdecl)]
public static extern void set_model_path(string modelPath);
// 导入 DLL 中的 run_resnet 函数
[DllImport("ResNetDll.dll", CallingConvention = CallingConvention.Cdecl)]
public static extern IntPtr run_resnet();
}
}
然后在窗口中拉入你想要的控件,这是我的窗口布局
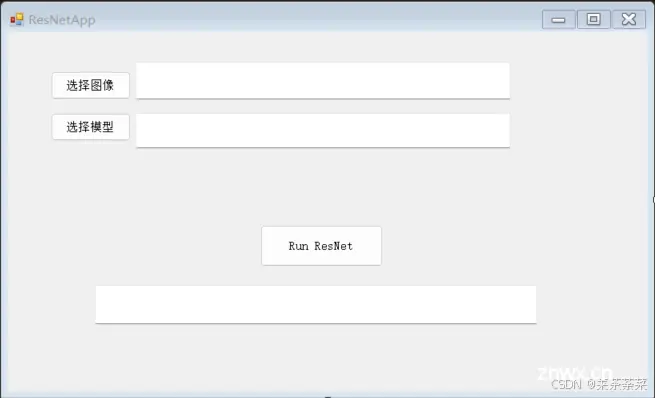
布局完了之后会自动生成Form1.Designer.cs 的窗口设计代码,点击控件按F4 还可以修改他们的属性
Form1.cs
这个代码 编写你想要每个控件实现的功能:
<code>using System;
using System.ComponentModel;
using System.Runtime.InteropServices;
using System.Windows.Forms;
namespace ResNetApp
{ -- -->
public partial class Form1 : Form
{
public Form1()
{
InitializeComponent();
}
private void buttonSelectImage_Click(object sender, EventArgs e)
{
OpenFileDialog openFileDialog = new OpenFileDialog();
openFileDialog.Filter = "图像文件|*.bmp;*.jpg;*.jpeg;*.png";
if (openFileDialog.ShowDialog() == DialogResult.OK)
{
textBoxImagePath.Text = openFileDialog.FileName; // 显示选择的图像路径
}
}
private void buttonSelectModel_Click(object sender, EventArgs e)
{
OpenFileDialog openFileDialog = new OpenFileDialog();
openFileDialog.Filter = "ONNX 模型文件|*.onnx";
if (openFileDialog.ShowDialog() == DialogResult.OK)
{
textBoxModelPath.Text = openFileDialog.FileName; // 显示选择的模型路径
}
}
private void button1_Click(object sender, EventArgs e)
{
try
{
string imagePath = textBoxImagePath.Text;
string modelPath = textBoxModelPath.Text;
if (string.IsNullOrEmpty(imagePath) || string.IsNullOrEmpty(modelPath))
{
textBox1.Text = "请选择图像和模型路径。";
return;
}
textBox1.Text = "开始运行 ResNet ...";
// 设置图像路径和模型路径
NativeMethods.set_image_path(imagePath);
NativeMethods.set_model_path(modelPath);
// 调用 DLL 执行推理
IntPtr resultPtr = NativeMethods.run_resnet();
// 将返回的指针转换为字符串
string result = Marshal.PtrToStringAnsi(resultPtr);
// 显示结果
textBox1.Text = result;
}
catch (Exception ex)
{
textBox1.Text = "错误: " + ex.Message;
}
}
}
}
Program.cs
我们还需要一个入口主程序
using System;
using System.Collections.Generic;
using System.Linq;
using System.Threading.Tasks;
using System.Windows.Forms;
namespace ResNetApp
{
static class Program
{
/// <summary>
/// 应用程序的主入口点。
/// </summary>
[STAThread]
static void Main()
{
Application.EnableVisualStyles();
Application.SetCompatibleTextRenderingDefault(false);
Application.Run(new Form1());
}
}
}
完成之后点击生成 就可以在bin中出现的你的.exe文件咯,是不是很简单呀~[狗头]
声明
本文内容仅代表作者观点,或转载于其他网站,本站不以此文作为商业用途
如有涉及侵权,请联系本站进行删除
转载本站原创文章,请注明来源及作者。