vue2项目中使用videojs,超级详细篇幅。
飞天的毛毛虫 2024-08-24 17:33:02 阅读 61
最近写了一个关于video标签预览视频的项目,后端是根据直播拉流的形式给前端一个播放地址,前端需要实现兼容不同格式(m3u8,flv等)并做到在线预览时要根据分屏不同,实现多个窗口同时播放不同视频的功能;视频回放要做到根据后端返回的时刻进行播放而且需要自定义进度条实现精确到分钟级别的切换选择回放。话不多说开始整活。
🎇 videojs官网:Video.js API docs
✨ videojs民间API:快速使用 - video.js 中文文档 (英文不好的跟我来)
💻 番外篇:再忙也别忘了LeetCode
文目录
目录
一、说了半天具体是要实现什么效果呢?来请看大屏幕
二、直播视频画面主要功能逻辑及代码实现(以下是片段代码示例不全哈,仅供思路参考)
1.引入工具库(版本号对应尽量按照我这个来哈,避免未知api不兼容)
2.分屏模式的逻辑及代码(时间仓促没有对视频进行模块化封装,后期有时间了补一个。)
3.实例化视频方法
4.自定义功能按钮(暂停播放,全屏非全屏,截屏,录制视频)
三、回放视频画面主要功能逻辑及代码实现(以下是片段代码示例不全哈,仅供思路参考)
1.自定义进度条(按照我这个业务逻辑有个大前提啊,回放时间是按照一天24小时来计算的)
结语
前言
在网上冲浪了好久虽然关于使用videojs的文章很多也很有技术含量,但是由于它的版本比较多不同的版本有些api不兼容,导致有些想当然的功能就是实现起来困难重重,而且我这个需求是要保证多个窗口同时直播网上案例更是少之又少,所以来吧,自己搞一个试试呀。
一、说了半天具体是要实现什么效果呢?来请看大屏幕
1、多个分屏直播视频效果-CSDN直播 2、回放视频模块的效果演示-CSDN直播
看完效果视频总的来说开发内容主要分为以下几点(个人认为哈,大佬可以有不同看法和建议)
1、自定义分屏效果,其中包含1X1,2X2,3X3和4X4四种模式效果(其实道理一样nXn都行)。
2、使用videojs进行实例化视频并预览播放出画面
3、自定义功能按钮,由于video自带的control功能不好看(领导说的哈),索性直接自定义开发了,其中最麻烦的要数回放视频的自定义进度条了(根据屏幕尺寸和dom尺寸以及一天当中固定不变的24小时进行的转化计算)。
4、自定义报错页面,同理,video自带的长得不好看(领导说的哈)。
5、实现截图和录制任意一个分屏窗口视频的功能(纯前端实现,不考虑性能哈)
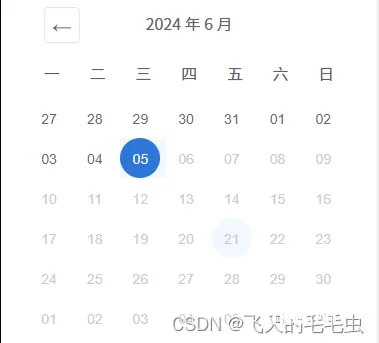
6、其他自定义组件(自己实现的+魔改的elementui+抄袭(不对应该是借鉴)道友的)
展示下魔改el-calendar日历组件的效果(日历组件(el-calendar)禁用自定义日期范围_el-calendar禁用某些日期-CSDN博客)😜
展示下自定义加载错误时的效果哈(个人感觉没有好看到那里去😅)

展示下自定义多选框选择下拉框效果哈(单独一篇文章分享)😜

展示下自定义树形选择拉框效果哈(单独一篇文章分享)😜
二、直播视频画面主要功能逻辑及代码实现(以下是片段代码示例不全哈,仅供思路参考)
1.引入工具库(版本号对应尽量按照我这个来哈,避免未知api不兼容)
主要工具如下(示例):
<code>"video.js": "^7.21.6", //使用videojs的前提
"videojs-contrib-hls": "^5.15.0", //支持.m3u8格式视频流
"videojs-flvjs-es6": "^1.0.1", //支持.flv格式视频流
"flv.js": "^1.6.2", //支持.flv格式视频流
"recordrtc": "^5.6.2", //录制视频的工具
"moment": "^2.30.1", //时间格式转换的工具
2.分屏模式的逻辑及代码(时间仓促没有对视频进行模块化封装,后期有时间了补一个。)
思路:dom结构直接一个大盒子包裹所有视频有关的dom,然后在大盒子上根据不同的分屏模式提前写好样式,最后对照着不同分屏模式的选择class的新增和移除进行结合。
主要代码如下(示例):
<template>
<div ref="myBoxRef" class="online-right1">code>
<div
v-for="index in num"code>
:key="index + '1'"code>
@click="handleClick(index)"code>
:class="['sameGo', g_index == index - 1 ? 'videoActiveGo' : '']"code>
>
<video
:id="`myPlayer${index}`"code>
ref="myPlayerRef"code>
class="video-js vjs-default-skin"code>
muted
>
</div>
</div>
</template>
<script>
export default {
data() {
return {
// 视频的数据
num: 4, //窗口模式(1,4,9,16)
myPlayerArr: [], //videojs实例数组
videoArr: [], //需要实例化的视频数组
g_index: 0, //当分屏前模式下的当前窗口号(自上而下,自左而右算)
lastNum: 1, //保存上一次分屏的模式
};
},
methods:{
// 用来控制窗口样式
changeNum(e) {
this.$nextTick(() => {
this.num = e;
});
this.controlFlag = false;
if (this.g_index) {
// 将当前索引恢复到真实的索引
this.g_index--;
}
if (this.lastNum > e) {
// 从大到小
if (this.videoArr.length > e) {
this.videoArr = this.videoArr.slice(0, e);
this.handleDestroy(e);
}
if (this.isVideoShow.length > e) {
this.isVideoShow = this.isVideoShow.slice(0, e);
this.isCloseBtn = this.isCloseBtn.slice(0, e);
}
// this.videoArr.splice(e, this.videoArr.length - e);
if (this.g_index >= e - 1) {
// 当前索引大于即将要切换到的模式下的视频数,索引从0开始
this.g_index = 0;
} else {
if (!this.videoArr.length) {
this.g_index = 0;
} else {
// 当前索引小于即将要切换到的模式下的视频数,索引++
this.g_index++;
}
}
} else {
// 从小到大
if (this.lastNum <= this.videoArr.length) {
// 如果当前模式已满,切换到更多视频模式下时从第一个空缺视频的位置开始
this.g_index = this.lastNum;
} else {
if (!this.videoArr.length) {
this.g_index = 0;
} else {
//如果当前索引大于等于上次模式视频数量,也就是视频数量从小到大时。当前索引++
this.g_index++;
}
}
}
//上述代码是区分出来选择操作之后的分屏模式需要数据的逻辑,以下才是实现不同模式分屏的class
与dom的结合
this.lastNum = e;
if (e == 4) {
this.$refs.myBoxRef.classList.remove(...this.$refs.myBoxRef.classList);
this.$refs.myBoxRef.classList.add("online-right4");
} else if (e == 9) {
this.$refs.myBoxRef.classList.remove(...this.$refs.myBoxRef.classList);
this.$refs.myBoxRef.classList.add("online-right9");
} else if (e == 16) {
this.$refs.myBoxRef.classList.remove(...this.$refs.myBoxRef.classList);
this.$refs.myBoxRef.classList.add("online-right16");
} else {
this.$refs.myBoxRef.classList.remove(...this.$refs.myBoxRef.classList);
this.$refs.myBoxRef.classList.add("online-right1");
}
},
}
}
</script>
<style scoped lang="scss">code>
//这里简单对1x1和4x4的样式进行展示,其他都类似
.online-right1 {
width: 100%;
height: calc(100% - 40px);
box-sizing: border-box;
background: #000000;
border-radius: 4px;
display: flex;
align-content: flex-start;
flex-wrap: wrap;
.sameGo {
position: relative;
border: 1px solid white;
box-sizing: border-box;
width: 100%;
height: 100%;
.video-js {
width: 100%;
height: 100%;
::v-deep .vjs-tech {
object-fit: fill !important;
}
}
// 一个屏
.video-title {
z-index: 1000; //需要比自定义错误样式大
position: absolute;
bottom: 0;
height: 64px;
width: 100%;
background-color: rgba(0, 0, 0, 0.5);
display: flex;
justify-content: flex-end;
align-content: center;
.r-t {
display: flex;
align-items: center;
img {
width: 36px;
height: 36px;
margin-right: 22px;
cursor: pointer;
}
}
}
}
.videoActiveGo {
z-index: 10;
border: 1px solid yellow !important;
}
}
.online-right4 {
height: calc(100% - 40px);
width: 100%;
box-sizing: border-box;
background: #000000;
border-radius: 4px;
display: flex;
align-content: flex-start;
flex-wrap: wrap;
.sameGo {
position: relative;
border: 1px solid white;
box-sizing: border-box;
width: 50%;
height: 50%;
.video-close {
cursor: pointer;
position: absolute;
z-index: 1000; //大于报错的页面
top: 5px;
right: 8px;
width: 23px;
height: 23px;
border-radius: 50%;
display: flex;
justify-content: center;
align-items: center;
background-color: rgba($color: #ffffff, $alpha: 0.6);
}
.video-js {
width: 100%;
height: 100%;
::v-deep .vjs-tech {
object-fit: fill !important;
}
}
// 四个屏幕的优化
.video-title {
z-index: 1000; //需要比自定义错误样式大
position: absolute;
bottom: 0;
height: 40px;
width: 100%;
background-color: rgba(0, 0, 0, 0.5);
display: flex;
justify-content: flex-end;
align-content: center;
.r-t {
display: flex;
align-items: center;
img {
width: 24px;
height: 24px;
margin-right: 15px;
cursor: pointer;
}
}
}
.video-black {
z-index: 1000; //覆盖掉所有功能按钮
display: none;
width: 100%;
height: 100%;
position: absolute;
top: 0;
background-color: rgba(0, 0, 0, 1);
}
}
.videoActiveGo {
z-index: 10;
border: 1px solid yellow !important;
}
}
</style>
3.实例化视频方法
思路:使用ref选中video标签,然后进行videojs的实例操作,其中使用videojs.hooks("beforeerror", function (player, err) {}) 钩子在视频加载错误处理错误之前进行自定义错误效果的处理,这个方法切记是个全局方法如果同一个项目中使用的话要进行隔离,否则会影响另一处使用改钩子的地方,比如单页面应用可以用router来隔离一下。
主要代码如下(示例):
<script>
export default {
data: (){
return {
myPlayerArr: [],
videoArr: [],
streamType: "video/x-flv",
}
},
methods: {
// 初始化视频(实例化哪个视频就对应视频数组中哪个视频的下标)
initVideo(i) {
let that = this; // 避免引用方法中的this同vue自身this的指向混乱
let options = { // videojs的简单配置
autoplay: true,
notSupportedMessage: false,
controls: false,
preload: "auto",
techOrder: ["html5", "flvjs"], // 用来兼容不同格式的视频流(主要是m3u8和flv)
html5: {
vhs: { withCredentials: true }, // 貌似是hls换成了vhs
},
flvjs: {
mediaDataSource: {
cors: true,
withCredentials: false,
},
},
sources: [
{
src: this.videoArr[i]?.url,
// src: this.linURL,
type: this.streamType, // 定义好的视频流格式
},
],
};
that.myPlayerArr[i] = videojs(that.$refs.myPlayerRef[i], options);
videojs.hooks("beforeerror", function (player, err) {
if (that.$route.path == "/onlineVideo") {
var id = player.id_.replace("myPlayer", "");
document.querySelector("#videotool_" + id).style.display = "flex";
var playerId = player.id_;
// 加载中样式
document.querySelector(
"#" + playerId + " .vjs-loading-spinner"
).style.display = "block";
document.querySelector("#videoBox_" + id).style.display = "none";
// 加载失败样式
setTimeout(() => {
document.querySelector(
"#" + playerId + " .vjs-loading-spinner"
).style.display = "none";
if (err && err.message) {
document.querySelector("#videoBox_" + id).style.display = "block";
document.querySelector("#videotool_" + id).style.display = "none";
}
}, 500);
}
return null;
});
console.log(that.myPlayerArr[i].src(), "很重要需要看看");
that.isVideoShow[i] = true;
that.isCloseBtn[i] = true;
that.$forceUpdate(); // 为了更新功能按钮的操作状态,目前只能这样,希望道友可以优化优化
},
// 销毁无用的video实例解决资源
handleDestroy(start) {
let currentStart = 0;
if (start) {
currentStart = start;
}
if (this.myPlayerArr.length) {
for (let i = currentStart; i < this.myPlayerArr.length; i++) {
if (this.myPlayerArr[i]) {
this.myPlayerArr[i].dispose();
this.myPlayerArr[i] = null;
}
}
}
},
},
// 一定要记得销毁不然会卡到崩溃
beforeDestroy() {
this.handleDestroy();
setTimeout(() => {
this.myPlayerArr = [];
}, 1000);
},
}
</script>
<style scoped lang="scss">code>
// 自定义加载错误样式
.vjs-error-display {
display: none;
}
.custom-error-message {
display: none;
position: absolute;
top: 50%;
left: 50%;
transform: translateX(-50%) translateY(-50%);
height: 50px;
width: 158px;
z-index: 999; //不能高于关闭按钮操作之后的层级
color: #fff;
background: url("../../../assets/video/caution.png");
background-size: 50px 50px;
background-repeat: no-repeat;
padding-left: 56px;
padding-top: 15px;
}
</style>
4.自定义功能按钮(暂停播放,全屏非全屏,截屏,录制视频)
思路:videojs自身携带的功能按钮不做赘述了,主要是利用canvas实现截图以及canvas和第三方工具recordrtc实现录制视频,关键是要找到想要操作的正在播放视频的video标签,然后根根据canvas进行视频帧的抓取和连续绘制。
主要代码如下(示例):
4.1 在工程化的入口中加载recordrtc方法
// 为了方便直接在main.js入口文件中引入并挂在recordrtc
import RecordRTC from "recordrtc";
Vue.prototype.$recordRTC = RecordRTC;
4.2 截屏实现
export default {
methods:{
// 截图
handleScreenshot(index) {
let i = index - 1;
let name = this.videoArr[i].videoName;
const fileType = "png";
// 找到需要截图的video标签
// video 实列
const video = this.myPlayerArr[i].el().querySelector("video");
const canvas = document.createElement("canvas");
canvas.width = video.videoWidth;
canvas.height = video.videoHeight;
// 图片大小和视频分辨率一致
canvas
.getContext("2d")
.drawImage(video, 0, 0, canvas.width, canvas.height);
// canvas中video中取一帧图片并转成dataURL
const strDataURL = canvas.toDataURL("image/" + fileType);
let arr = strDataURL.split(","),
mime = arr[0].match(/:(.*?);/)[1],
bstr = atob(arr[1]),
n = bstr.length,
u8arr = new Uint8Array(n);
while (n--) {
u8arr[n] = bstr.charCodeAt(n);
}
const blob = new Blob([u8arr], {
type: mime,
});
const url = window.URL.createObjectURL(blob);
this.downloadFile(url, fileType, name);
},
// 下载方法
downloadFile: function (blob, fileType, name) {
const a = document.createElement("a");
a.style.display = "none";
a.href = blob;
let time = new Date().getTime();
time = moment(time).format("YYYY-MM-DD_HHmmss"); //用了momentjs
a.download = `${name}_${time}.${fileType}`;
document.body.appendChild(a);
a.click();
setTimeout(function () {
document.body.removeChild(a);
window.URL.revokeObjectURL(blob);
}, 1000);
},
}
}
4.3 屏幕录制的实现
export default {
data(){
return{
videoArr: [],
isRecorder: [], //录制按钮
recorderFlag: "", //录制的视频实例
animationFrame: null, //录制影像
}
},
methods:{
// 开始录制
handleRecording(index) {
let i = index - 1;
let name = this.videoArr[i].videoName;
this.isRecorder[i] = !this.isRecorder[i];
this.$forceUpdate(); // 为了改变功能按钮的图标状态,目前还没有好的方法,暂时牺牲性能
this.transcribe(i, name);
},
transcribe(i, name) {
const fileType = "mp4";
if (this.isRecorder[i]) {
if (!this.canvas) this.canvas = document.createElement("canvas");
this.recorderFlag = this.$recordRTC(this.canvas, {
type: "canvas",
});
this.recorderFlag.startRecording();
this.drawMedia(i);
} else {
this.recorderFlag.stopRecording(() => {
const url = window.URL.createObjectURL(this.recorderFlag.getBlob());
this.downloadFile(url, fileType, name);
cancelAnimationFrame(this.animationFrame);
this.canvas = null;
this.animationFrame = null;
});
}
},
// 刷新canvas
drawMedia(i) {
const ctx = this.canvas.getContext("2d");
// 找到需要截图的video标签
const video = this.myPlayerArr[i].el().querySelector("video");
this.canvas.setAttribute("width", video.videoWidth);
this.canvas.setAttribute("height", video.videoHeight);
ctx.drawImage(video, 0, 0, video.videoWidth, video.videoHeight);
// requestAnimationFrame 根据电脑显示帧数进行循环
this.animationFrame = requestAnimationFrame(() => this.drawMedia(i));
},
// 下载方法(通用)
downloadFile: function (blob, fileType, name) {
const a = document.createElement("a");
a.style.display = "none";
a.href = blob;
let time = new Date().getTime();
time = moment(time).format("YYYY-MM-DD_HHmmss"); //用了momentjs
a.download = `${name}_${time}.${fileType}`;
document.body.appendChild(a);
a.click();
setTimeout(function () {
document.body.removeChild(a);
window.URL.revokeObjectURL(blob);
}, 1000);
},
}
}
三、回放视频画面主要功能逻辑及代码实现(以下是片段代码示例不全哈,仅供思路参考)
概述:视频的初始化啥的同上,主要是自定义进度条的实现以及魔改el-calendar(为了领导的需求,求放过啊)
1.自定义进度条(按照我这个业务逻辑有个大前提啊,回放时间是按照一天24小时来计算的)
主要代码如下(示例):
<template>
<div>
<!-- 自定义进度条 -->
<div ref="videoLineBoxRef" class="video-line">code>
<ul class="same-btn" v-for="i in 24" :key="i + 'a'">code>
<el-tooltip
effect="dark"code>
placement="top"code>
:content="showTime.slice(0, 5)"code>
>
<li
@mousemove="handleMousemove($event)"code>
@click="handleClick(i)"code>
:class="['li-btn', { active: i <= activeFlag }]"code>
>
{ { i }}
</li>
</el-tooltip>
</ul>
</div>
<!-- 右侧日历和标签 -->
<div ref="videoOtherBoxRef">code>
</div>
</div>
</template>
<script>
export default {
data() {
return {
startTime: "", // 根据进度条要变化的
endTime: "", // 根据进度条要变化的
myPlayerBack: "",
activeFlag: 0,
leftScreen: 0, // 进度条开始的位置
//进度条结束的位置(通过紧挨着的右边的元素获取,越紧越精确,当然也有其他方式)
rightScreen: 0,
rangeScreen: 0, // 通过以上两个数据算出进度条的长度
queryTime: 0, // 转化给给接口的
showTime: "", // 页面展示用的
}
},
watch: {
// 日历数据
rangeTime: {
handler(newVal, oldVal) {
this.iftimeLine = false;
this.nowdata = formatDate2(newVal);
const today = new Date();
today.setHours(0, 0, 0, 0);
const selectedDate = new Date(newVal);
selectedDate.setHours(0, 0, 0, 0);
const isToday = selectedDate.getTime() === today.getTime();
this.ifnowday = isToday;
this.nowMonthFlag = selectedDate.getMonth() === today.getMonth();
this.queryTime = 0;
this.startTime = "";
if (this.videoId) {
if (isToday) {
//选择的是当天
this.activeFlag = this.getDay24;
const timer = new Date();
this.todayMaxHouer =
timer.getHours() < 10 ? "0" + timer.getHours() : timer.getHours();
} else {
// 选择的非当天
this.activeFlag = 24;
this.todayMaxHouer = 0;
}
this.playback();
this.getEventList();
}
},
deep: true,
immediate: true,
},
},
computed: {
// 当天00点
currentStart: {
get() {
return (
this.rangeTime.getFullYear() +
"-" +
("0" + (this.rangeTime.getMonth() + 1)).slice(-2) +
"-" +
("0" + this.rangeTime.getDate()).slice(-2) +
" " +
"00:00:00"
);
},
},
// 当天24点
currentEnd: {
get() {
return (
this.rangeTime.getFullYear() +
"-" +
("0" + (this.rangeTime.getMonth() + 1)).slice(-2) +
"-" +
("0" + this.rangeTime.getDate()).slice(-2) +
" " +
"23:59:59"
);
},
},
// 拿到当天已有的固定视频小时数据
getDay24: {
get() {
let start = +new Date(
new Date().getFullYear() +
"-" +
(new Date().getMonth() + 1) +
"-" +
new Date().getDate() +
" " +
"00:00:00"
);
let end = +new Date(
new Date().getFullYear() +
"-" +
(new Date().getMonth() + 1) +
"-" +
new Date().getDate() +
" " +
new Date().getHours() +
":" +
new Date().getMinutes() +
":" +
new Date().getSeconds()
);
let range = Math.floor((end - start) / (60 * 60 * 1000));
return range;
},
},
},
mounted() {
this.leftScreen = this.$refs.videoLineBoxRef.offsetLeft;
this.rightScreen = this.$refs.videoOtherBoxRef.offsetLeft;
this.rangeScreen = this.rightScreen - this.leftScreen;
},
methods:{
// 鼠标事件
handleMousemove(e) {
const range = (24 * 60) / this.rangeScreen; //移动一下代表的秒数
const rangeDiff = (e.clientX - this.leftScreen) * range;
this.queryTime = rangeDiff;
const hours = Math.floor(rangeDiff / 60);
const minutes = Math.floor(rangeDiff % 60);
this.showTime = `${hours.toString().padStart(2, "0")}:${minutes
.toString()
.padStart(2, "0")}`;
},
// 点击操作
async handleClick(i) {
this.iftimeLine = true;
if (!this.myPlayerBack) {
this.$message.warning("暂无回放视频");
return;
}
// 当天有回放并且点击的按钮在回放时间段内;
if (this.getDay24 && i <= this.getDay24) {
this.activeFlag = i;
if (this.ifnowday) {
this.startTime = this.nowdata + " " + this.showTime + ":00";
this.endTime = this.nowdata + " " + this.todayMaxHouer + ":00:00";
await this.playback();
} else {
this.startTime = this.nowdata + " " + this.showTime + ":00";
this.endTime = this.nowdata + " " + "23:59:59";
await this.playback();
}
} else {
this.$message.warning("该时间段暂无回放视频");
}
},
}
}
</script>
结语
总体实现了产品要求的大致功能,但周期短加上能力也有限,头一次处理这种视频相关的问题好多考虑不到位,比如更新视频功能按钮的状态时被迫使用了$forceUpdate(),再比如进度条这块没有实现根据屏幕响应式重新计算对应的长度,再比如封装组件的时候借用了elementui的框架二次改动等
总而言之,小子我初来乍到,大家多多关照还望能不吝赐教,让我也进步进步,谢谢
声明
本文内容仅代表作者观点,或转载于其他网站,本站不以此文作为商业用途
如有涉及侵权,请联系本站进行删除
转载本站原创文章,请注明来源及作者。