Java-web实现用户登录、注册功能
鳄鱼去数羊 2024-06-30 17:03:01 阅读 63
源码在资源里
目录
环境搭建数据库
用户登录需求分析代码实现编写UserMapper类编写User类编写loginServlet类编写login.html编写login.css
用户注册需求分析代码编写编写UserMapper类编写registerServlet类编写register.html编写register.css
编写SqlSessionFactory工具类项目总体架构运行展示案例图片
环境搭建
在编写代码之前,在pom.xml导入servlet、mybatis的依赖,导入tomcat插件。

数据库
用户登录
需求分析
在前端页面输入用户名和密码,点击登录,将数据提交给servlet。在servlet中编写程序,实现接收前端提交的用户名和密码。在servlet中通过Mybatis框架调用Mapper查询,返回结果封装成一个User对象并返回判断User对象是否为null,是null登录失败、不是null登录成功。
代码实现
编写UserMapper类
编写UserMapper提供根据用户名、密码查询用户数据方法方法
public interface UserMapper {
/**
*根据用户名 密码 查询用户
* @param username
* @param password
* @return
*/
@Select("select* from tb_user where username =#{username} and password = #{password}")
User select(@Param("username") String username, @Param("password") String password);
}
编写User类
编写User类
public class User {
private Integer id;
private String username;
private String password;
public void setId(Integer id) {
this.id = id;
}
public String getUsername() {
return username;
}
public void setUsername(String username) {
this.username = username;
}
public String getPassword() {
return password;
}
public void setPassword(String password) {
this.password = password;
}
@Override
public String toString() {
return "User{" +
"id=" + id +
", username='" + username + '\'' +
", password='" + password + '\'' +
'}';
}
}
编写loginServlet类
编写loginServlet类
@WebServlet("/loginServlet")
public class loginServlet extends HttpServlet {
@Override
protected void doGet(HttpServletRequest req, HttpServletResponse resp) throws ServletException, IOException {
//第一步:接收用户名、密码
String username;
username= req.getParameter("username");
String password;
password= req.getParameter("password");
byte[] bytes = username.getBytes(StandardCharsets.ISO_8859_1);
username = new String(bytes, StandardCharsets.UTF_8);
byte[] bytes1 = password.getBytes(StandardCharsets.ISO_8859_1);
password = new String(bytes1, StandardCharsets.UTF_8);
//第二步:调用Mybatis查询用户
//工具类SqlSessionFactoryUtil调用方法返回sqlSessionFactory
SqlSessionFactory sqlSessionFactory = SqlSessionFactoryUtil.getSqlSessionFactory();
// 获取sqlSession对象,执行sql
SqlSession sqlSession = sqlSessionFactory.openSession();
//获取UserMapper接口的代理对象
UserMapper mapper = sqlSession.getMapper(UserMapper.class);
//获取方法
User user = mapper.select(username, password);
sqlSession.close();
//获取字符的输出流 设置content-type
resp.setContentType("text/html;charset=utf-8");
PrintWriter writer = resp.getWriter();
//第三步:判断
if(user!=null){
//登陆成功
writer.write("登录成功");
}else {
//登录失败
writer.write("登录失败");
}
}
@Override
protected void doPost(HttpServletRequest req, HttpServletResponse resp) throws ServletException, IOException {
this.doGet(req, resp);
}
}
编写login.html
编写login.html
<!DOCTYPE html>
<html lang="en">
<head>
<meta charset="UTF-8">
<title>login</title>
<link href="css/login.css" rel="stylesheet">
</head>
<body>
<div id="loginDiv">
<form action="/Web-Demo/loginServlet" method="post" id="form">
<h1 id="loginMsg">LOGIN IN</h1>
<p>UserName:<input id="username" name="username" type="text"></p>
<p>PassWord:<input id="password" name="password" type="password"></p>
<div id="subDiv">
<input type="submit" class="button" value="login up">
<input type="reset" class="button" value="reset">
<a href="register.html">没有账号?点击注册</a>
</div>
</form>
</div>
</body>
</html>
编写login.css
编写login.css
* {
margin: 0;
padding: 0;
}
html {
height: 100%;
width: 100%;
overflow: hidden;
margin: 0;
padding: 0;
background: url(../imgs/BackGround.JPG) no-repeat 0px 0px;
background-repeat: no-repeat;
background-size: 100% 100%;
-moz-background-size: 100% 100%;
}
body {
display: flex;
align-items: center;
justify-content: center;
height: 100%;
}
#loginDiv {
width: 37%;
display: flex;
justify-content: center;
align-items: center;
height: 300px;
background-color: rgba(75, 81, 95, 0.3);
box-shadow: 7px 7px 17px rgba(52, 56, 66, 0.5);
border-radius: 5px;
}
#name_trip {
margin-left: 50px;
color: red;
}
p {
margin-top: 30px;
margin-left: 20px;
color: azure;
}
input {
margin-left: 15px;
border-radius: 5px;
border-style: hidden;
height: 30px;
width: 140px;
background-color: rgba(216, 191, 216, 0.5);
outline: none;
color: #f0edf3;
padding-left: 10px;
}
#username{
width: 200px;
}
#password{
width: 202px;
}
.button {
border-color: cornsilk;
background-color: rgba(100, 149, 237, .7);
color: aliceblue;
border-style: hidden;
border-radius: 5px;
width: 100px;
height: 31px;
font-size: 16px;
}
#subDiv {
text-align: center;
margin-top: 30px;
}
#loginMsg{
text-align: center;color: aliceblue;
}
用户注册
需求分析
在前端页面输入用户名和密码,点击注册,将数据提交给servlet。在servlet中编写程序,实现接收前端提交的用户名和密码。在servlet中通过Mybatis框架调用Mapper查询,返回结果封装成一个User对象并返回判断User对象是否为null,是null调用mapper添加用户、不是null代表用户已存在。
代码编写
编写UserMapper类
编写UserMapper提供根据用户名查询用户数据方法和添加用户方法
public interface UserMapper {
/**
* 根据用户名查询用户对象
* @param username
* @return
*/
@Select("select* from tb_user where username =#{username}")
User selectByUsername(String username);
/**
* 添加用户
*/
@Select("insert into tb_user values(null,#{username},#{password})")
void add(User user);
}
编写registerServlet类
@WebServlet("/registerServlet")
public class registerServlet extends HttpServlet {
@Override
protected void doGet(HttpServletRequest req, HttpServletResponse resp) throws ServletException, IOException {
//第一步:接收用户名、密码
String username;
String password;
username= req.getParameter("username");
password= req.getParameter("password");
byte[] bytes = username.getBytes(StandardCharsets.ISO_8859_1);
username = new String(bytes, StandardCharsets.UTF_8);
byte[] bytes1 = password.getBytes(StandardCharsets.ISO_8859_1);
password = new String(bytes1, StandardCharsets.UTF_8);
//封装用户对象
User user1 = new User();
user1.setUsername(username);
user1.setPassword(password);
//第二步:调用Mybatis查询用户
//加载Mybatis的核心配置文件
SqlSessionFactory sqlSessionFactory = SqlSessionFactoryUtil.getSqlSessionFactory();
// 获取sqlSession对象,执行sql
SqlSession sqlSession = sqlSessionFactory.openSession();
//获取UserMapper接口的代理对象
UserMapper mapper = sqlSession.getMapper(UserMapper.class);
//获取方法
User user = mapper.selectByUsername(username);
//获取字符的输出流 设置content-type
resp.setContentType("text/html;charset=utf-8");
PrintWriter writer = resp.getWriter();
//第三步:判断
if(user==null){
//用户名不存在,添加用户
mapper.add(user1);
//提交事务
sqlSession.commit();
sqlSession.close();
}else {
//用户存在,给出提示信息
writer.write("用户已存在");
}
}
@Override
protected void doPost(HttpServletRequest req, HttpServletResponse resp) throws ServletException, IOException {
this.doGet(req, resp);
}
}
编写register.html
采用正则表达式实现用户名不超过15个字符、密码在4~10个字符。采用上个案例的注册界面。
<!DOCTYPE html>
<html>
<head>
<meta charset="utf-8">
<title>欢迎注册</title>
<link rel = "stylesheet" href="css/register.css">
</head>
<body>
<div class = "form-div">
<div class="reg-content">
<h1>欢迎注册</h1>
<span>已有账号?</span>
<a href="login.html">登录</a>
</div>
<form id = "reg-form" action="/Web-Demo/registerServlet" method="post">
<table>
<tr>
<td>用户名:</td>
<td class="inputs">
<input type="text" name = "username" id="username"/>
<br>
<span id = "username_err" class="err_msg" style="display:none">用户名不符合规则</span>
</td>
</tr>
<tr>
<td>密码:</td>
<td class="inputs">
<input type="password" name = "password" id = "password"/>
<br>
<span id="password_err" class="err_msg" style="display: none">密码格式有误</span>
</td>
</tr>
</table>
<div class="buttons">
<input type = "submit" value="注册" id ="reg_btn" />
</div>
<br class="clear">
</form>
</div>
<script>
//验证用户名
var usernameInput = document.getElementById("username");
usernameInput.onblur = checkUser;
function checkUser(){
var username = usernameInput.value.trim();
//判断用户名是否符合规则:长度0~15 单词字符组成
var reg = /^\w{0,15}$/;
var flag= reg.test(username);
if(flag){
document.getElementById("username_err").style.display = "none";
}else{
document.getElementById("username_err").style.display = "";
}
return flag;
}
//验证密码
var passwordInput = document.getElementById("password");
passwordInput.onblur = checkPassword;
function checkPassword(){
var password = passwordInput.value.trim();
var reg = /^\w{4,10}$/;
var flag= reg.test(password);
if(flag){
document.getElementById("password_err").style.display = "none";
}else{
document.getElementById("password_err").style.display = "";
}
return flag;
}
</script>
</body>
</html>
编写register.css
* {
margin: 0;
padding: 0;
list-style-type: none;
}
.reg-content{
padding: 30px;
margin: 3px;
}
a, img {
border: 0;
}
body {
background-image: url("../imgs/BackGround.JPG") ;
no-repeat:center center fixed;
/*兼容浏览器版本*/
-webkit-background-size: cover;
-o-background-size: cover;
background-size: cover;
display: flex;
align-items: center;
justify-content: center;
height: 100%;
}
table {
border-collapse: collapse;
border-spacing: 0;
}
td, th {
padding: 0;
height: 90px;
}
.inputs{
vertical-align: top;
}
.clear {
clear: both;
}
.clear:before, .clear:after {
content: "";
display: table;
}
.clear:after {
clear: both;
}
.form-div {
background-color: rgba(255, 255, 255, 0.27);
border-radius: 10px;
border: 1px solid #aaa;
width: 424px;
margin-top: 150px;
margin-left:1050px;
padding: 30px 0 20px 0px;
font-size: 16px;
box-shadow: inset 0px 0px 10px rgba(255, 255, 255, 0.5), 0px 0px 15px rgba(75, 75, 75, 0.3);
text-align: left;
}
.form-div input[type="text"], .form-div input[type="password"], .form-div input[type="email"] {
width: 268px;
margin: 10px;
line-height: 20px;
font-size: 16px;
}
.form-div input[type="checkbox"] {
margin: 20px 0 20px 10px;
}
.form-div input[type="button"], .form-div input[type="submit"] {
margin: 10px 20px 0 0;
}
.form-div table {
margin: 0 auto;
text-align: right;
color: rgba(64, 64, 64, 1.00);
}
.form-div table img {
vertical-align: middle;
margin: 0 0 5px 0;
}
.footer {
color: rgba(64, 64, 64, 1.00);
font-size: 12px;
margin-top: 30px;
}
.form-div .buttons {
float: right;
}
input[type="text"], input[type="password"], input[type="email"] {
border-radius: 8px;
box-shadow: inset 0 2px 5px #eee;
padding: 10px;
border: 1px solid #D4D4D4;
color: #333333;
margin-top: 5px;
}
input[type="text"]:focus, input[type="password"]:focus, input[type="email"]:focus {
border: 1px solid #50afeb;
outline: none;
}
input[type="button"], input[type="submit"] {
padding: 7px 15px;
background-color: #3c6db0;
text-align: center;
border-radius: 5px;
overflow: hidden;
min-width: 80px;
border: none;
color: #FFF;
box-shadow: 1px 1px 1px rgba(75, 75, 75, 0.3);
}
input[type="button"]:hover, input[type="submit"]:hover {
background-color: #5a88c8;
}
input[type="button"]:active, input[type="submit"]:active {
background-color: #5a88c8;
}
.err_msg{
color: red;
padding-right: 170px;
}
#password_err,#tel_err{
padding-right: 195px;
}
#reg_btn{
margin-right:50px; width: 285px; height: 45px; margin-top:20px;
}
编写SqlSessionFactory工具类
在写Servlet的时候,因为需要使用Mybatis来完成数据库的操作,所
以对于Mybatis的基础操作就出现了些重复代码:
String resource = "mybatis-config.xml";
InputStream inputStream = Resources.getResourceAsStream(resource);
SqlSessionFactory sqlSessionFactory = new
SqlSessionFactoryBuilder().build(inputStream);
有了这些重复代码就会造成一些问题:
重复代码不利于后期的维护
SqlSessionFactory工厂类进行重复创建,资源消耗非常大但性能却非常低。
代码重复可以抽取工具类
对指定代码只需要执行一次可以使用静态代码块
对于静态代码块会随着类的加载而自动执行同时加载,只执行一次,就很好解决这一问题。
public class SqlSessionFactoryUtil {
//SqlSessionFactory工具类抽取
private static SqlSessionFactory sqlSessionFactory;
static {
//静态代码块会随着类的加载而加载 只执行一次
//加载Mybatis的核心配置文件
String resource = "mybatis-config.xml";
InputStream resourceAsStream = null;
try {
resourceAsStream = Resources.getResourceAsStream(resource);
} catch (IOException e) {
e.printStackTrace();
}
// 获取sqlSessionFactory对象
sqlSessionFactory = new SqlSessionFactoryBuilder().build(resourceAsStream);
}
public static SqlSessionFactory getSqlSessionFactory (){
return sqlSessionFactory;
}
}
工具类抽取以后,以后在对Mybatis的SqlSession进行操作的时候,就可以直接使用。
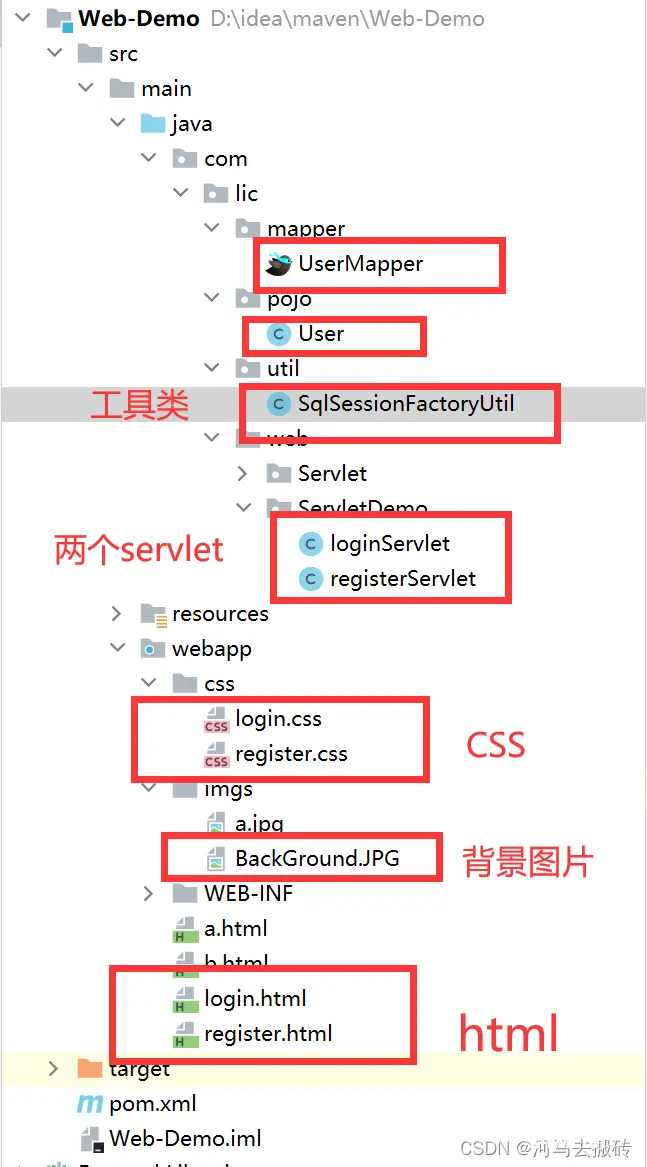
项目总体架构
运行展示
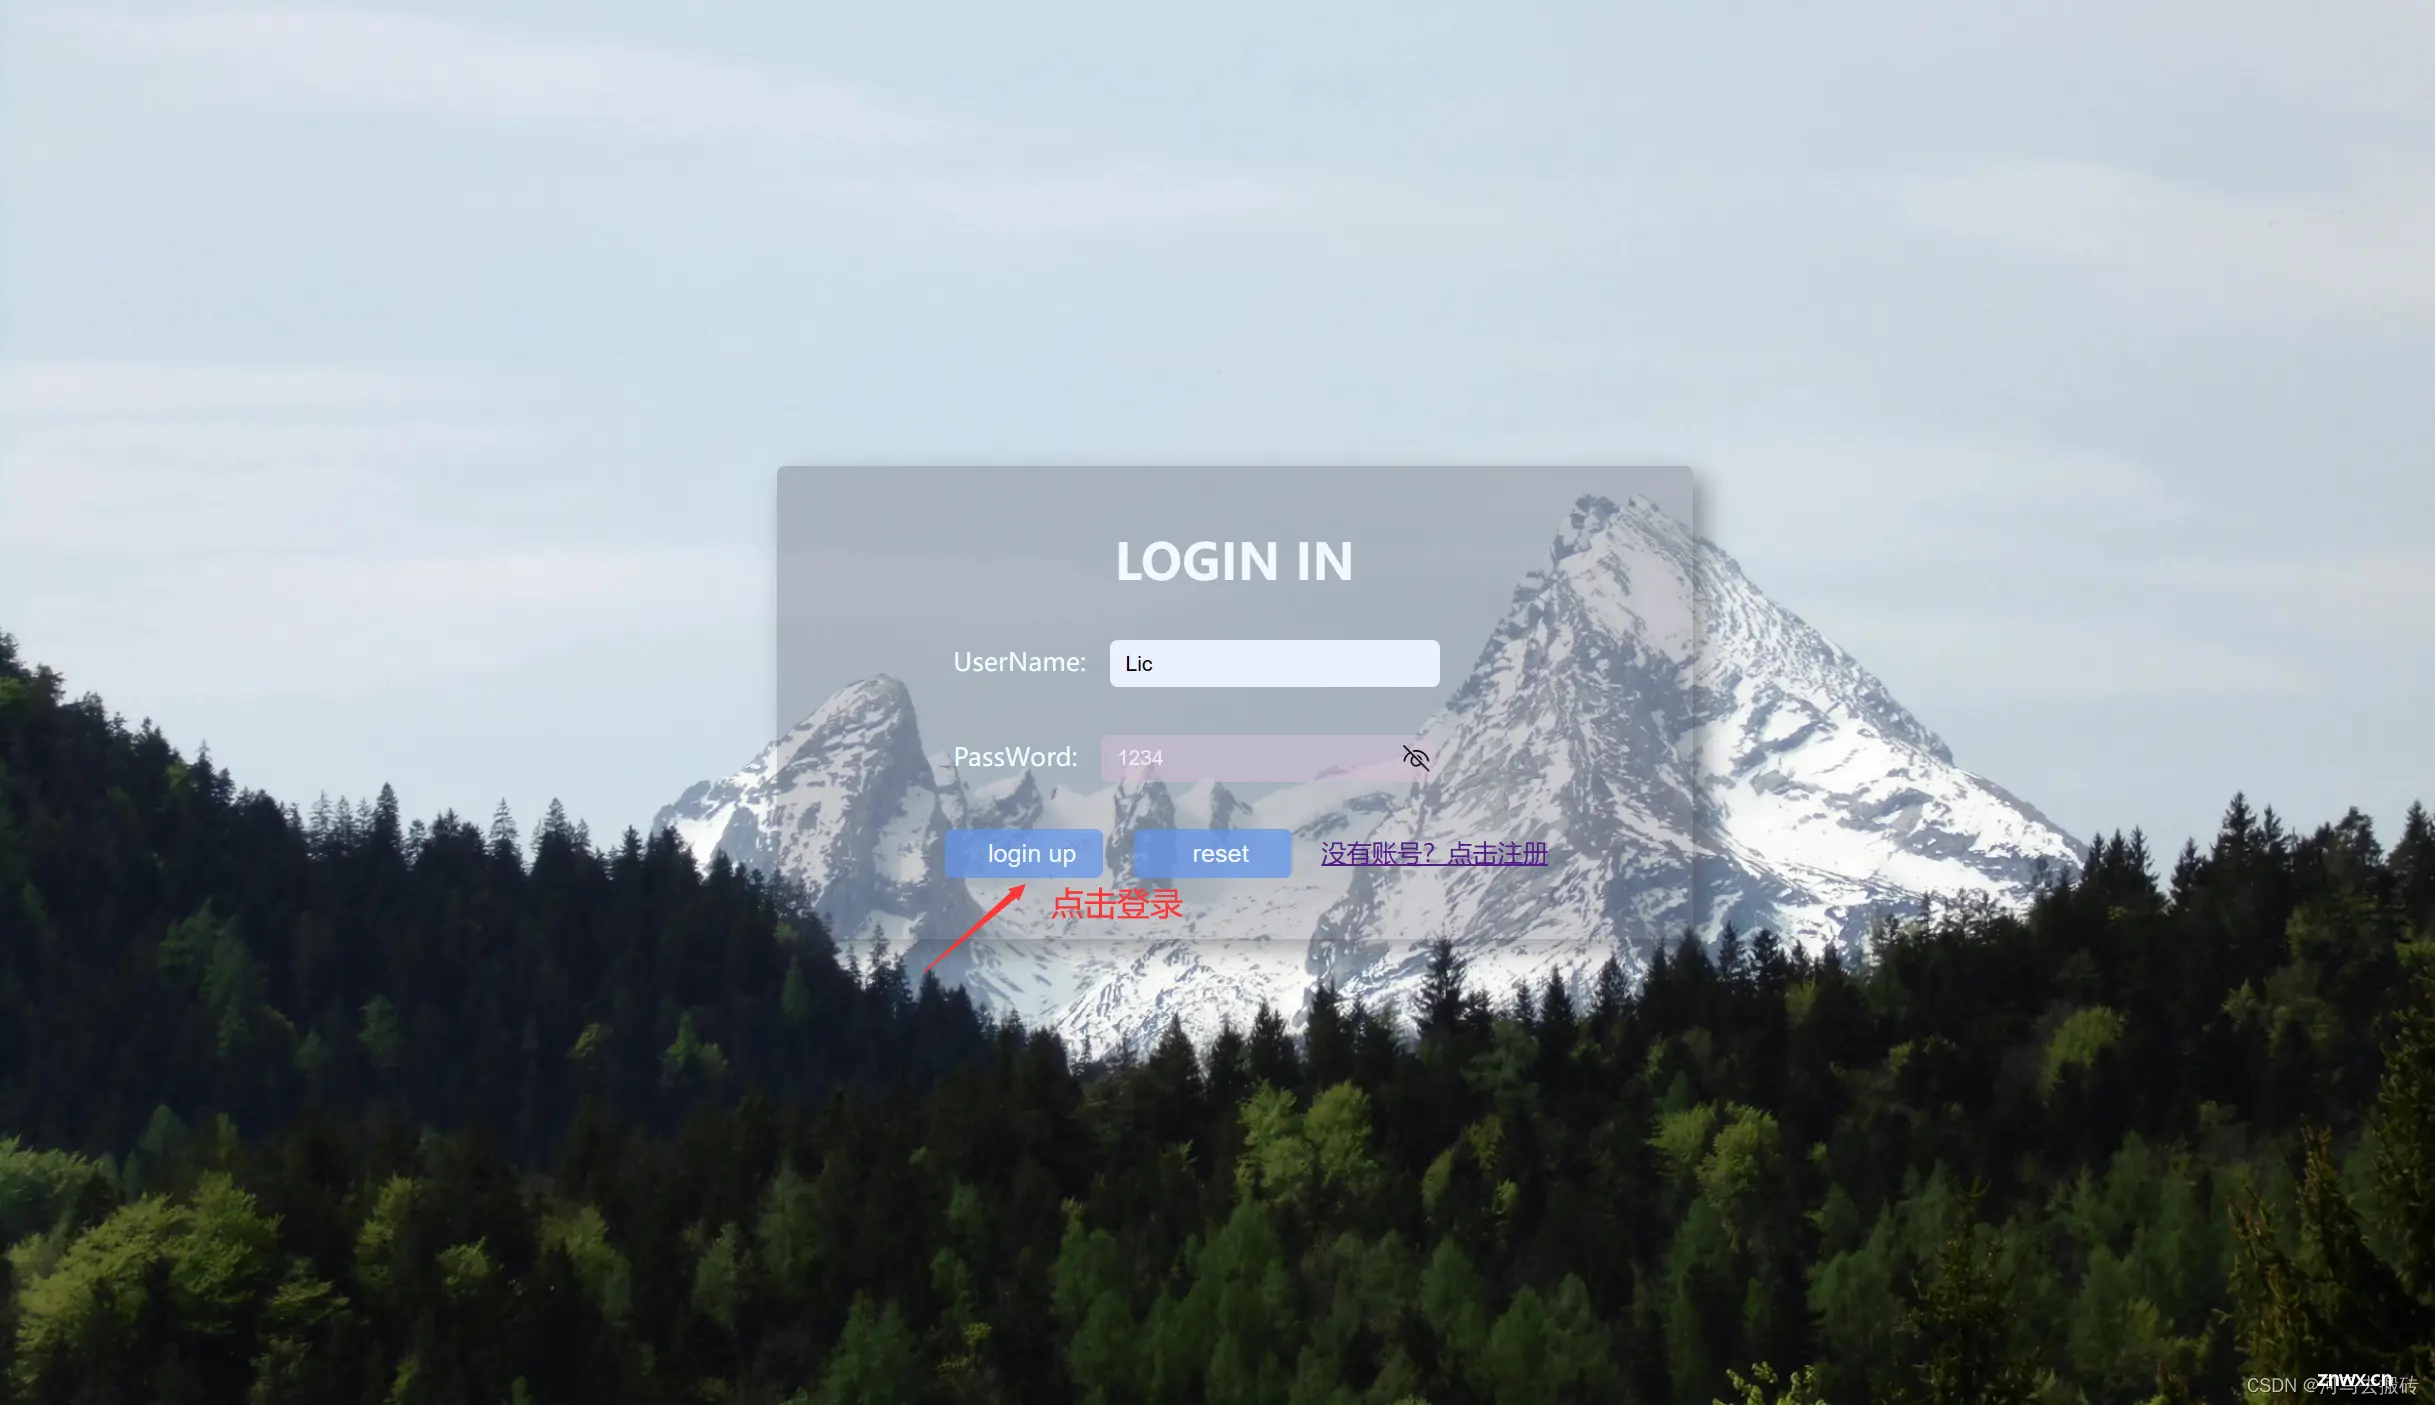
用户登录:
登录成功:

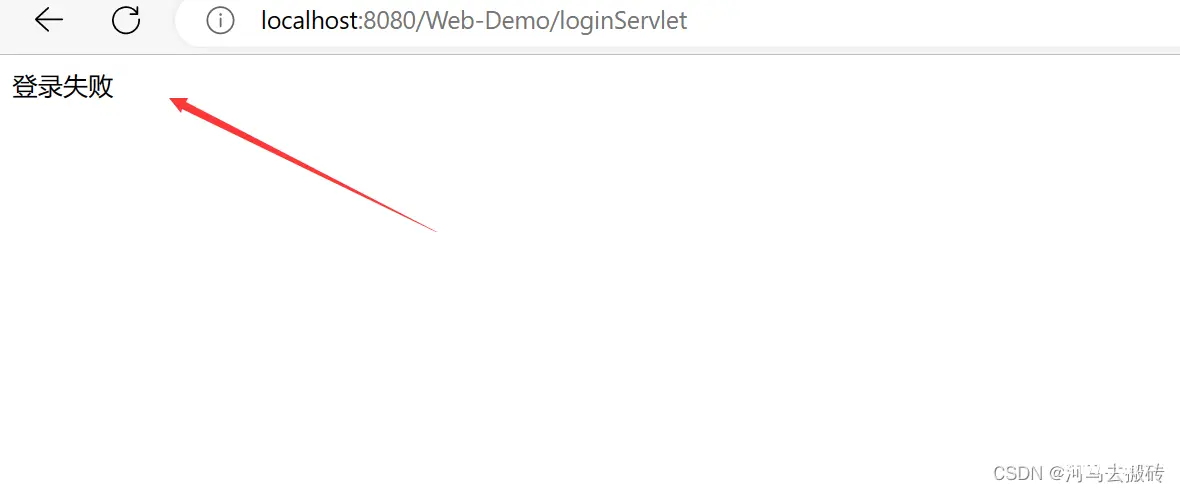
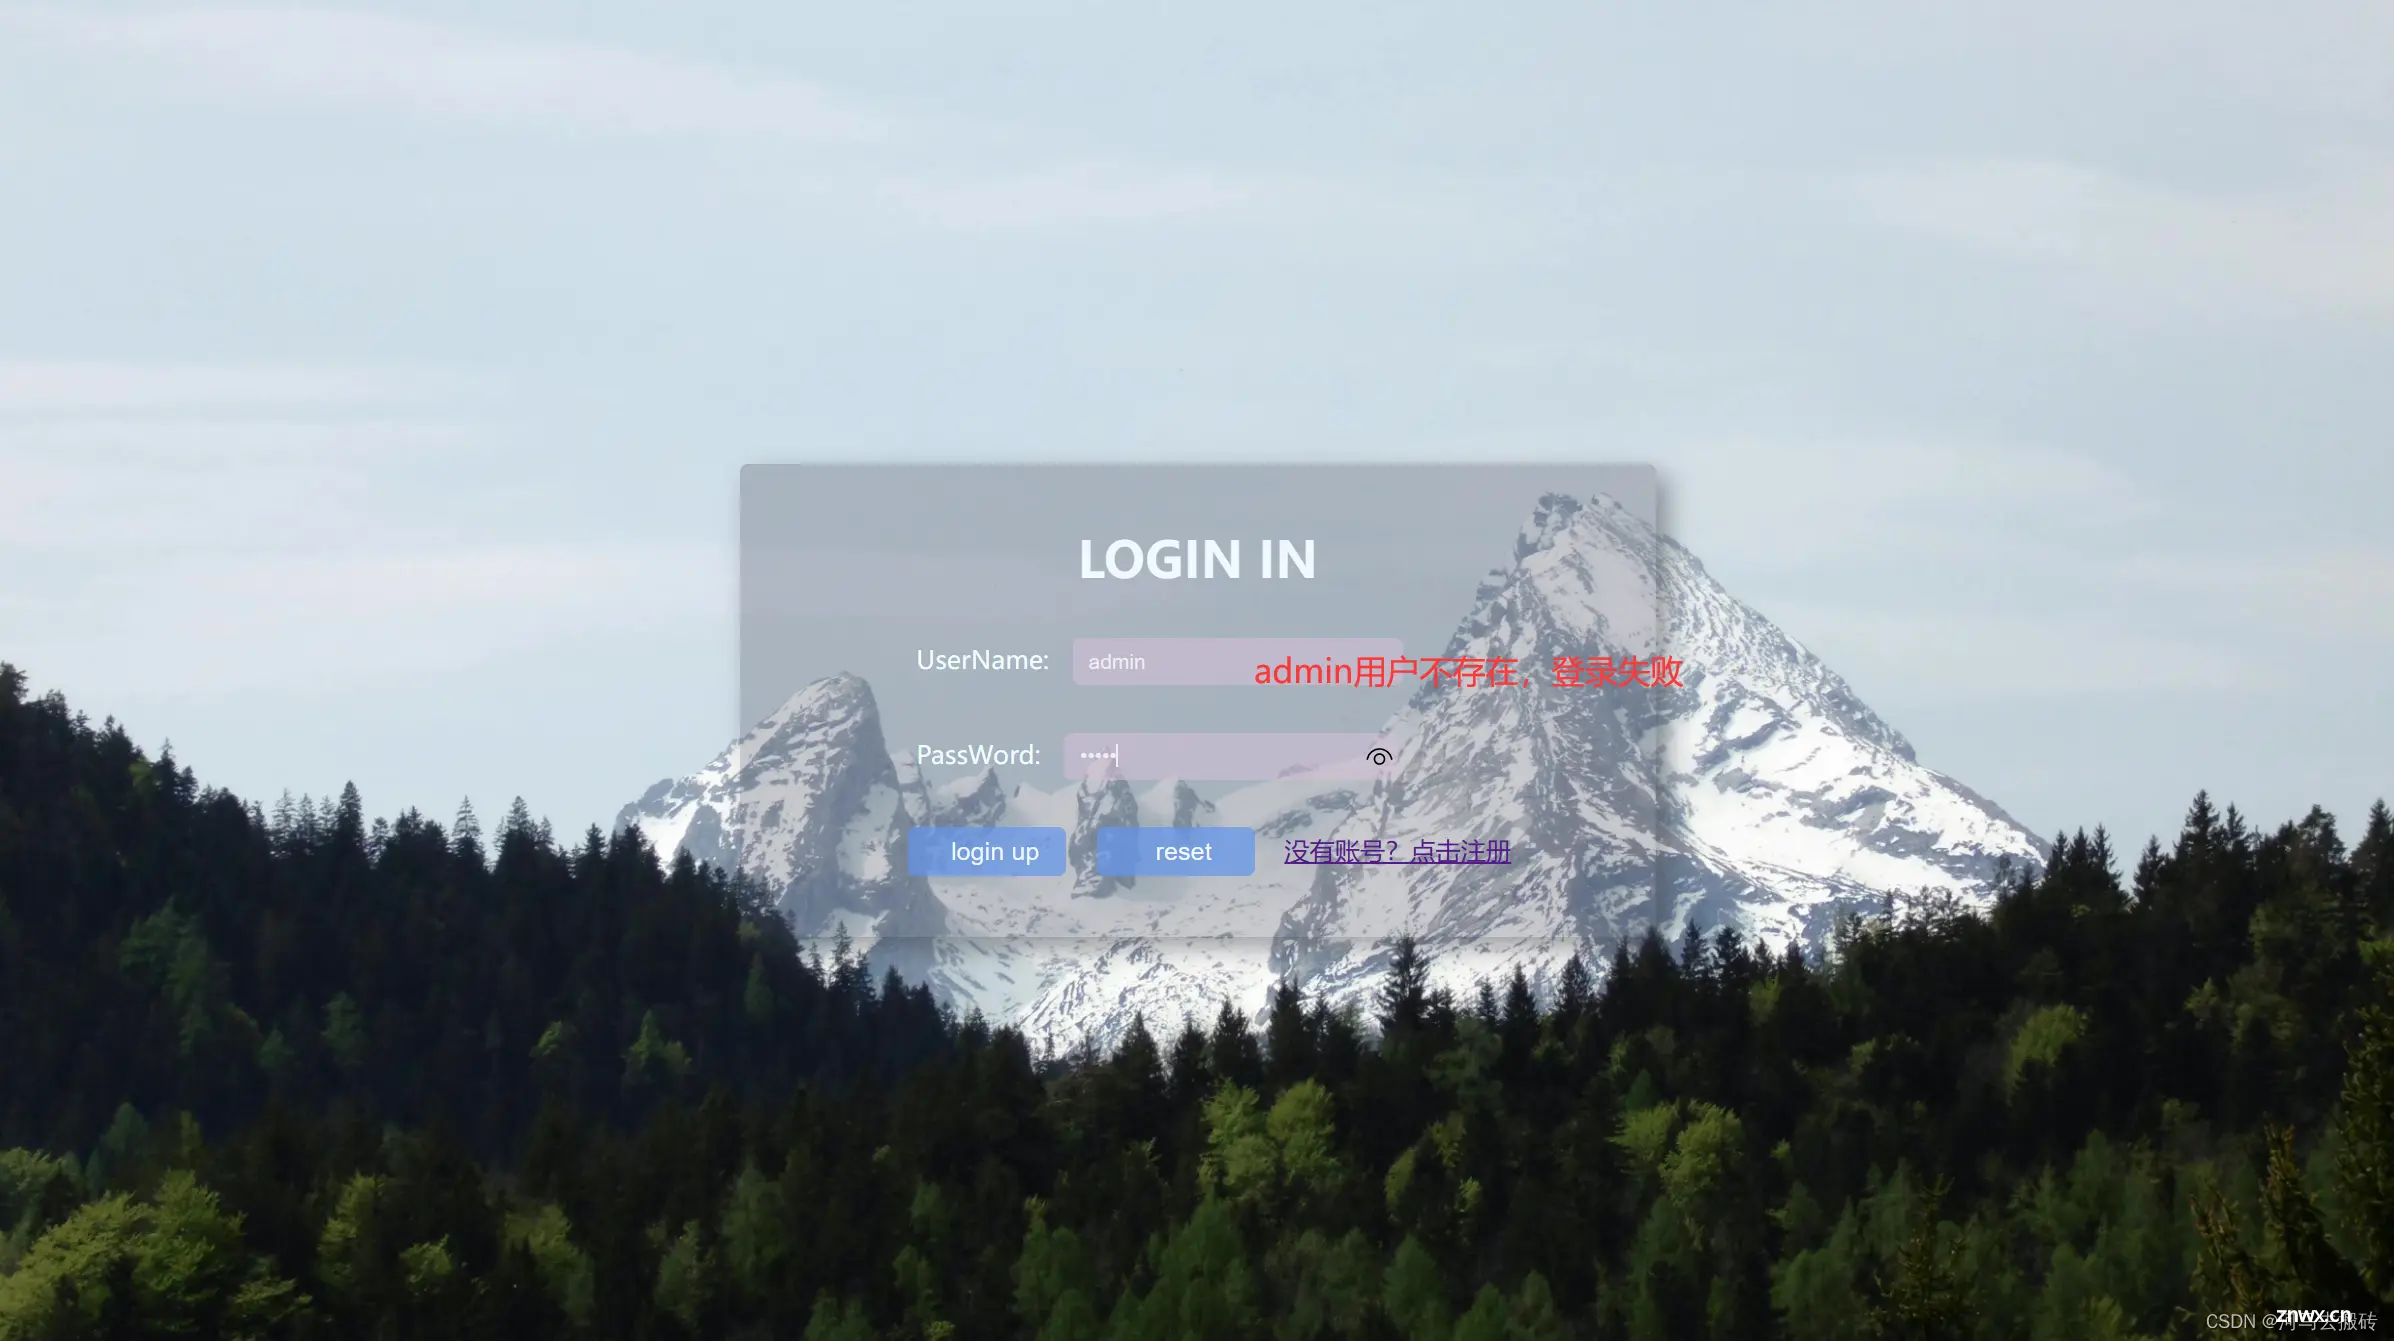
来一个登录失败的案例:admin用户不存在

登录失败:
注册admin用户:
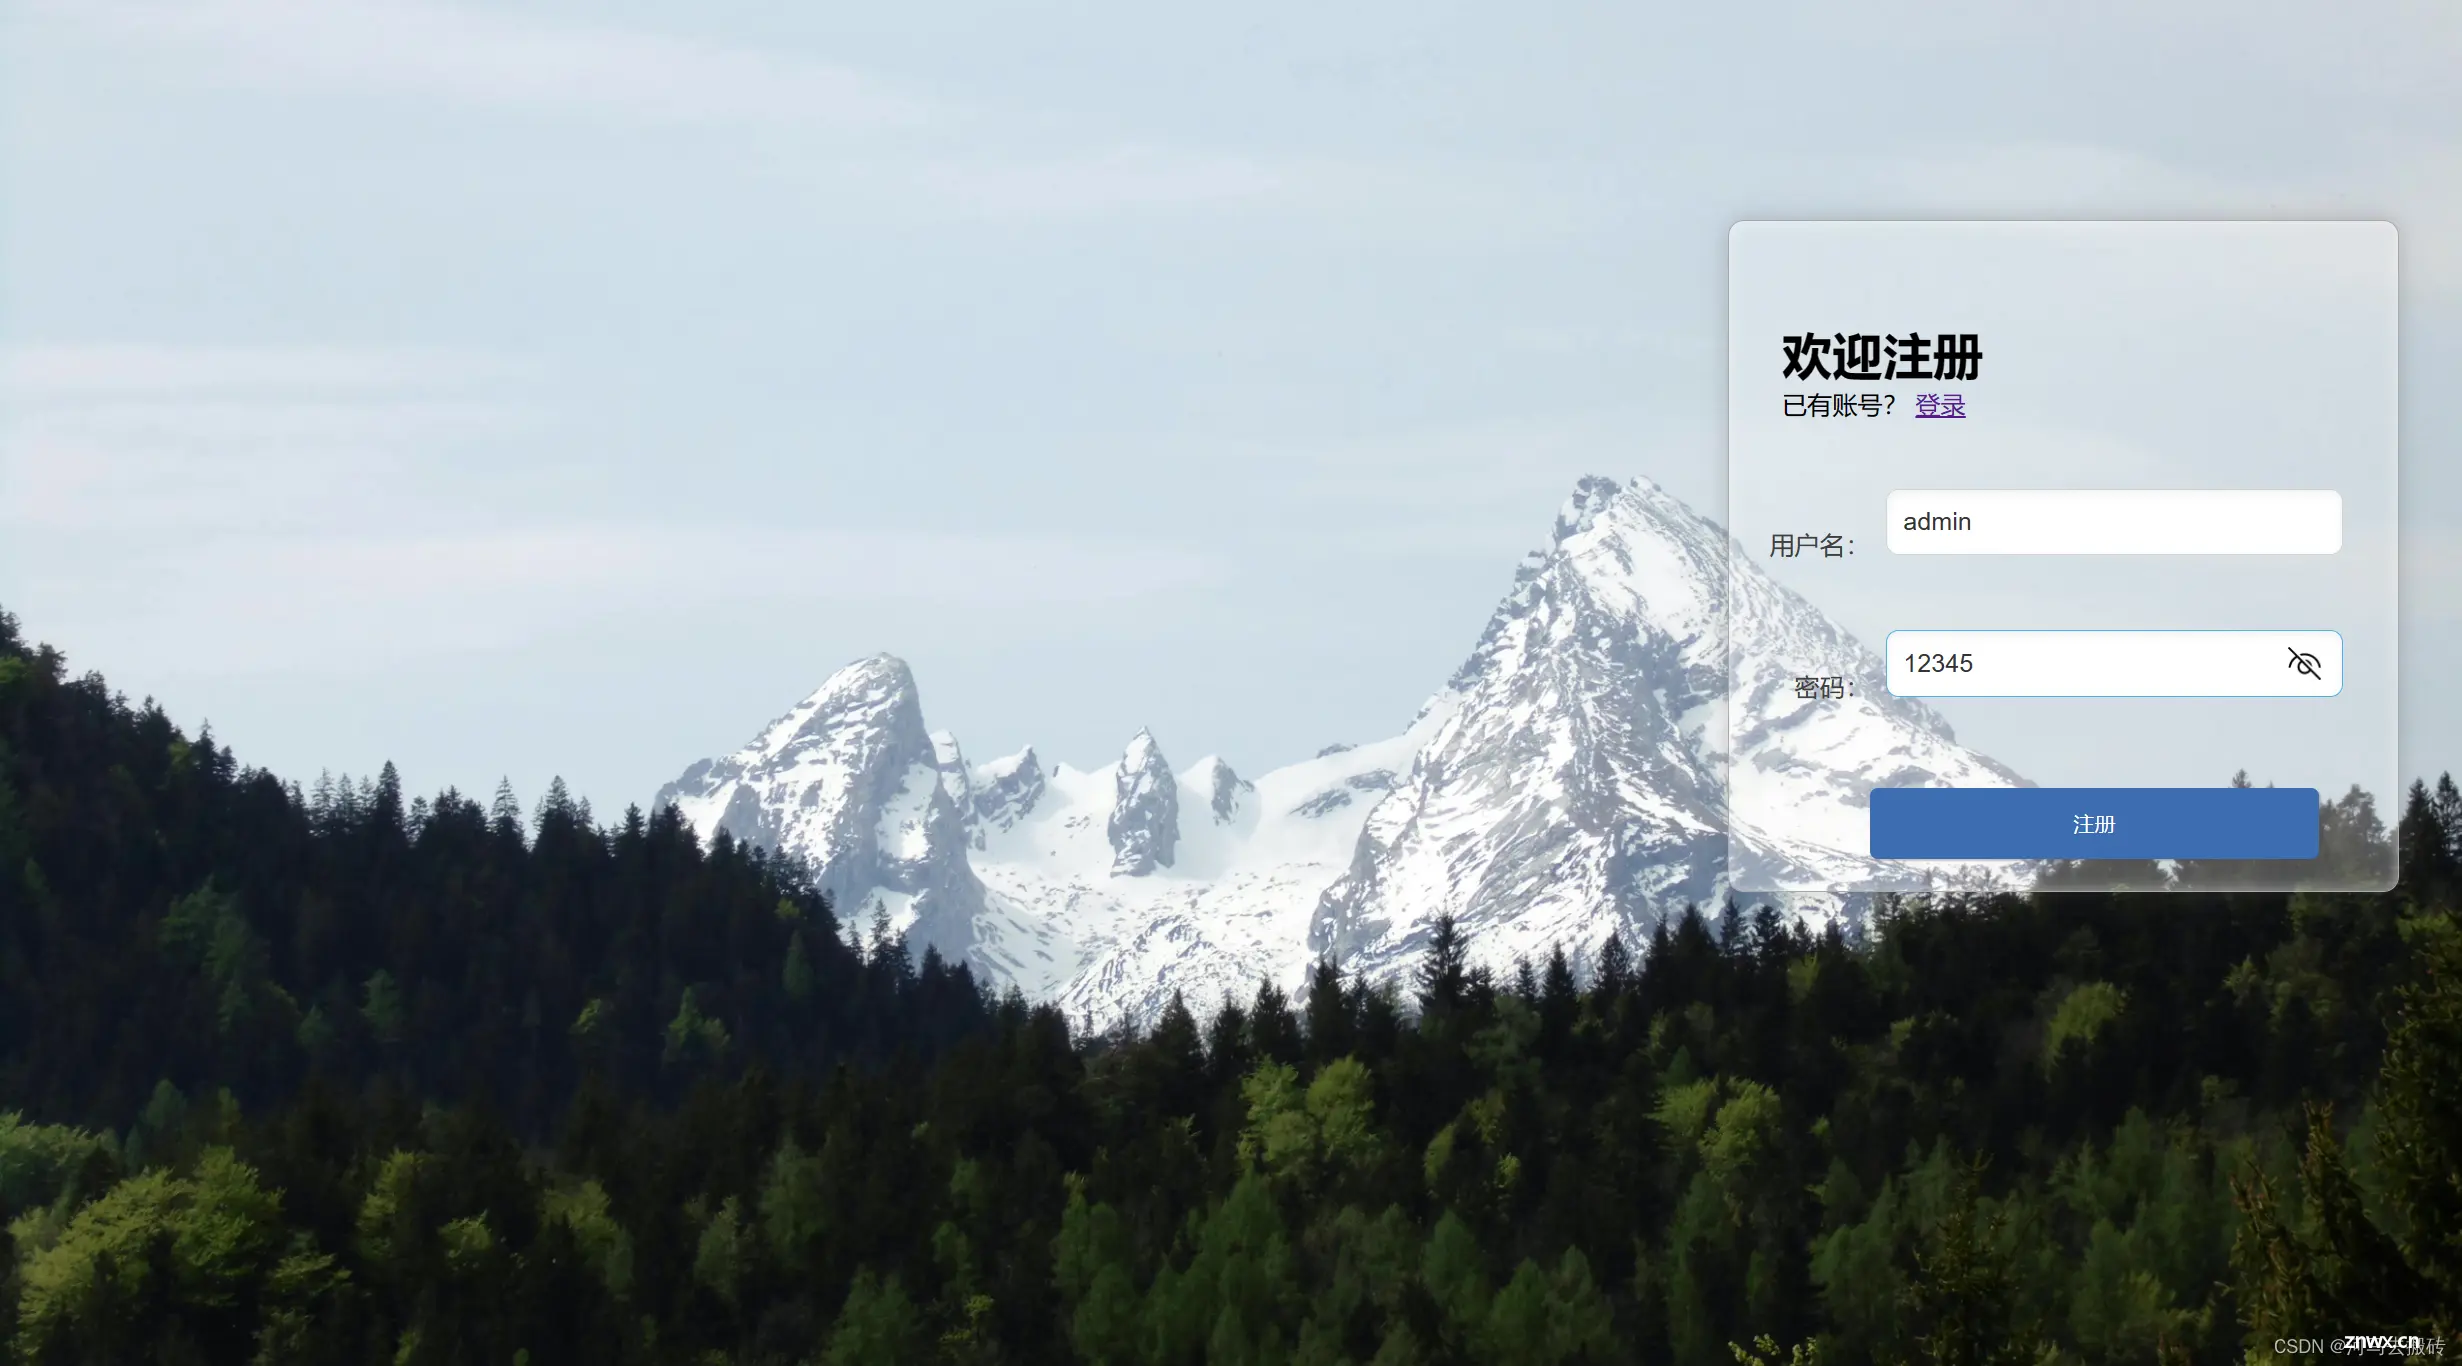
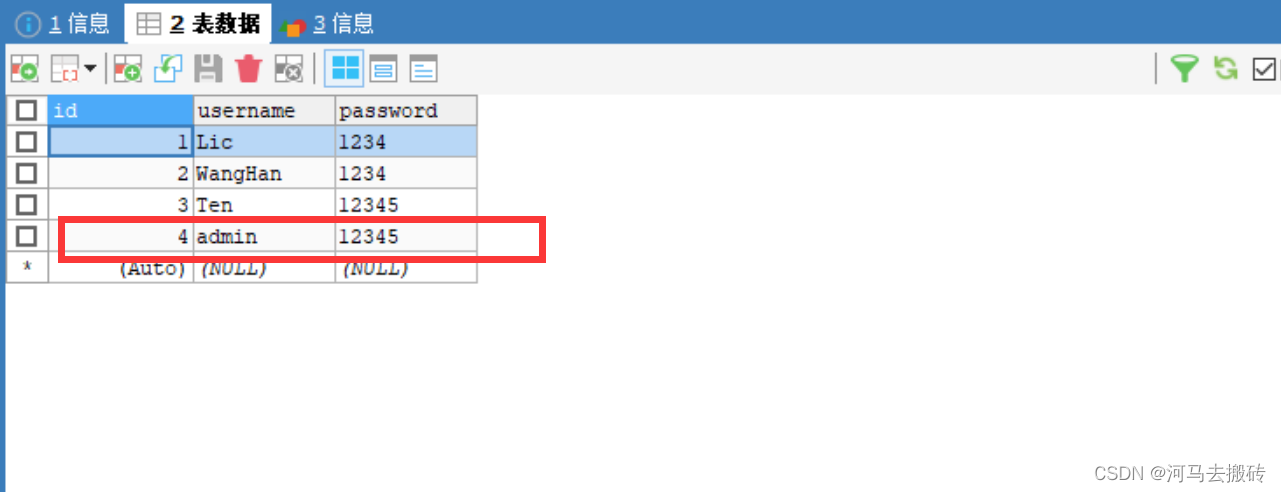
注册成功,后端数据库已写入admin用户数据
案例图片
漂亮~~
声明
本文内容仅代表作者观点,或转载于其他网站,本站不以此文作为商业用途
如有涉及侵权,请联系本站进行删除
转载本站原创文章,请注明来源及作者。