《通义千问AI落地—中》:前端实现
写完bug就找女朋友 2024-09-15 13:03:04 阅读 74
一、前言
本文源自微博客且已获授权,请尊重版权.
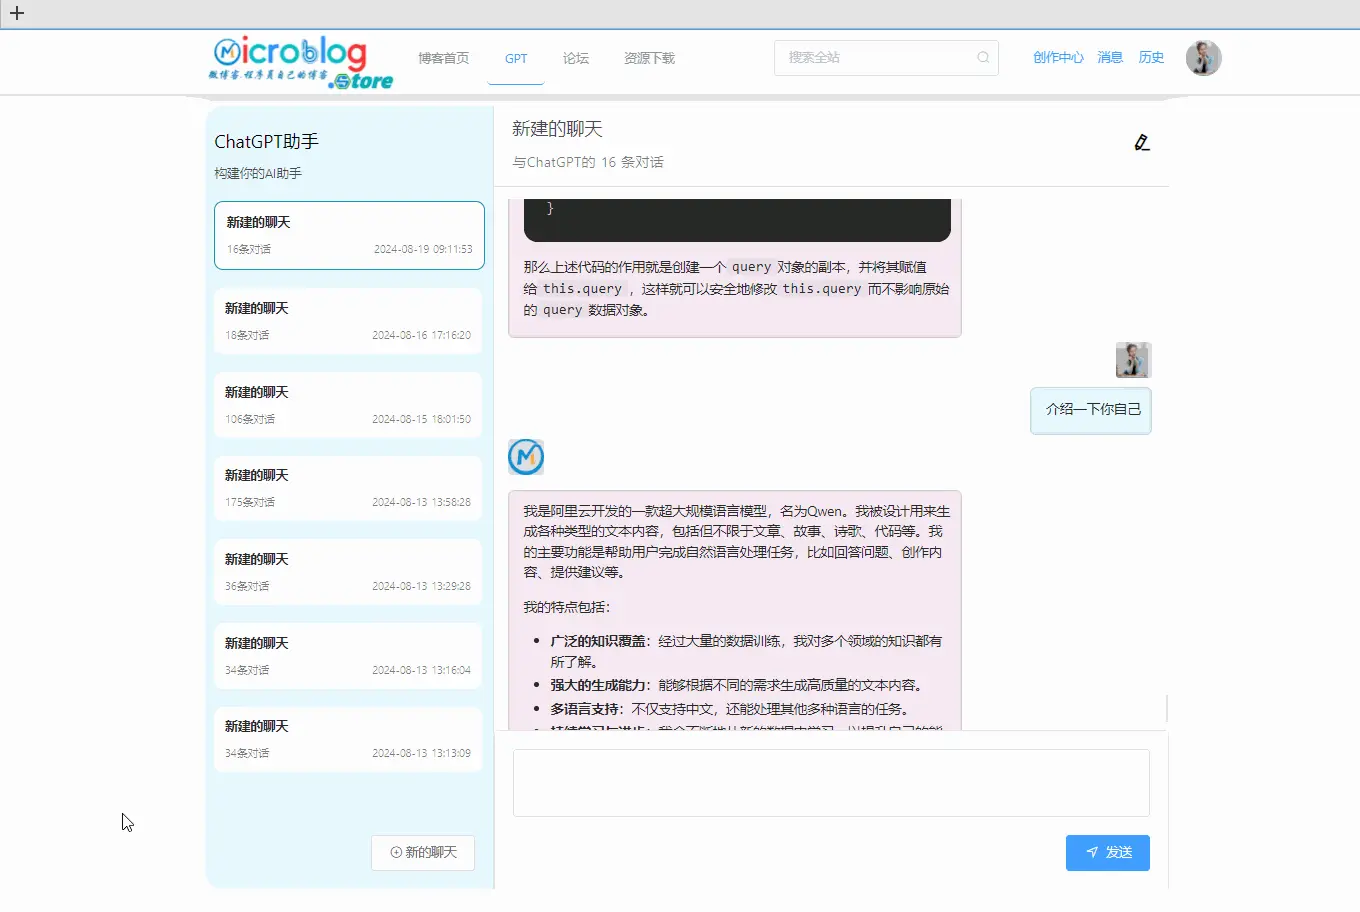
书接上文,上文中,我们介绍了<code>通义千问AI落地的后端接口。那么,接下来我们将继续介绍前端如何调用接口以及最后的效果;首先看效果:

上述就是落地到本微博客以后的页面效果,由于是基于落在现有项目之上,因此什么登录注册等基本功能都省去了,言归正传,下面我们将正式介绍通义千问AI落地的前端实现。
二、前端实现
2.1、前端依赖
前端所需依赖基本如下(<code>本项目前端是基于Nuxtjs的,这样又益与SSE,所以有nuxt相关依赖):
"dependencies": { -- -->
"@nuxtjs/axios": "^5.13.6",
"dayjs": "^1.11.12",
"element-ui": "^2.15.1",
"highlight.js": "^11.9.0", //代码高亮组件
"mavon-editor": "^2.10.4", //富文本展示
"nuxt": "^2.0.0",
"@stomp/stompjs": "^6.0.0", //
"ws": "^7.0.0" //websocket
}
2.2、页面布局
如上动图所示,前端项目主要是左右分布。其中,左侧负责管理各个session会话,包括激活会话、展示会话、删除会话等;
右侧则主要负责消息处理,包括消息收发、处理GPT生成的消息等。由于使用组件化开发,因此各个组件比较多,接下来的内容将采用 总-分 结构介绍。
2.2.1、主聊天页面
主聊天页面聚合了左侧的session管理和右侧的消息管理,内容如下:
<template>
<!-- 最外层页面于窗口同宽,使聊天面板居中 -->
<div class="home-view">code>
<!-- 整个聊天面板 -->
<div class="chat-panel">code>
<!-- 左侧的会话列表 -->
<div class="session-panel hidden-sm-and-down">code>
<div class="title">ChatGPT助手</div>code>
<div class="description">构建你的AI助手</div>code>
<div class="session-list">code>
<SessionItem
v-for="(session, index) in sessionList"code>
:key="session.id+index"code>
:active="session.id === activeSession.id"code>
:session="sessionList[index]"code>
class="session"code>
@click.native="sessionSwitch(session,index)"code>
@delete="deleteSession"code>
>
</SessionItem>
</div>
<div class="button-wrapper">code>
<div class="new-session">code>
<el-button @click="createSession">code>
<el-icon :size="15" class="el-icon-circle-plus-outline"></el-icon>code>
新的聊天
</el-button>
</div>
</div>
</div>
<!-- 右侧的消息记录 -->
<div class="message-panel">code>
<!-- 会话名称 -->
<div class="header">code>
<div class="front">code>
<div v-if="!isEdit" class="title">code>
<el-input style="font-size: 20px"code>
v-model="activeSession.topic"code>
@keyup.enter.native="editTopic()"code>
></el-input>
</div>
<div v-else class="title" style="margin-top: 6px;" @dblclick="editTopic()">code>
{ -- -->{ activeSession.topic }}
</div>
<div class="description">与ChatGPT的 { -- -->{ activeSession?.messageSize ?? 0 }} 条对话</div>code>
</div>
<!-- 尾部的编辑按钮 -->
<div class="rear">code>
<i v-if="isEdit" @click="editTopic" class="el-icon-edit rear-icon"></i>code>
<i v-else @click="editTopic" class="el-icon-check rear-icon"></i>code>
</div>
</div>
<el-divider></el-divider>
<div class="message-list" id="messageListId">code>
<!-- 过渡效果 -->
<transition-group name="list">code>
<message-row
v-for="(message, index) in activeSession.messages"code>
:key="message.id+`${index}`"code>
:message="message"code>
></message-row>
</transition-group>
</div>
<div class="toBottom" v-if="!this.isScrolledToBottom">code>
<el-tooltip class="item" effect="light" content="直达最新" placement="top-center">code>
<el-button class="el-icon-bottom bottom-icon" @click="toBottom"></el-button>code>
</el-tooltip>
</div>
<!-- 监听发送事件 -->
<MessageInput @send="sendMessage" :isSend="isSend"></MessageInput>code>
</div>
</div>
</div>
</template>
<script>
import MessageInput from '@/components/gpt/MessageInput'
import MessageRow from '@/components/gpt/MessageRow'
import SessionItem from "@/components/gpt/SessionItem";
import { -- -->Client} from "@stomp/stompjs";
import dayjs from "dayjs";
import { scrollToBottom} from '@/utils/CommonUtil'
export default {
name: 'gpt',
layout: 'gpt',
middleware: 'auth', //权限中间件,要求用户登录以后才能使用
components: {
MessageInput, MessageRow, SessionItem
},
created() {
this.loadChart();
},
mounted() {
this.handShake()
this.$nextTick(() => {
this.messageListEl = document.getElementById('messageListId');
if (this.messageListEl) {
this.messageListEl.addEventListener('scroll', this.onScroll);
}
});
},
beforeUnmount() {
this.closeClient();
},
beforeDestroy() {
if (this.messageListEl) {
this.messageListEl.removeEventListener('scroll', this.onScroll);
}
},
watch: {
activeSession(newVal) {
if (newVal) {
//确保dom加载完毕
this.$nextTick(() => {
this.toBottom();
});
}
},
},
data() {
return {
sessionList: [],
activeSession: {
topic: '',
messageSize:0
},
isEdit: true,
isSend: false,
client: null,
gptRes: {
content:''
},
userInfo: null,
activeTopic:null,
//消息计数
msgCount:false,
isScrolledToBottom: true,
messageListEl: null,
msgQueue:[], //收到的消息队列;先将后端返回的消息收集起来放在一个队列里面,一点点追加到页面显示,这样可以使消息显示更加平滑
interval:null,
lineCount:5
}
},
methods: {
async loadChart() {
//查询历史对话
const queryArr = {
query: {
userId: this.userInfo.uid
},
pageNum: 1,
pageSize: 7
};
let res = await this.$querySession(queryArr);
if (res.code === 20000) {
if (res.data.length > 0) {
this.activeSession = res.data[0]
res.data.forEach(item => this.sessionList.push(item))
this.activeTopic = this.activeSession.topic
return
}
}
let session = {
topic: "新建的聊天",
userId: this.userInfo.uid,
}
let resp = await this.$createSession(session)
if (resp.code === 20000) {
session.id = resp.data.id
}
session.updateDate = this.now()
session.createDate = this.now()
session.messages = []
this.sessionList.push(session)
this.activeSession = this.sessionList[0]
this.activeTopic = this.activeSession.topic
},
editTopic() {
this.isEdit = !this.isEdit
if (this.isEdit) {
if (this.activeTopic===this.activeSession.topic)
return
this.$updateSession(this.activeSession).then(() => {
this.activeSession.updateDate = this.now()
this.activeTopic = this.activeSession.topic
})
}
},
deleteSession(session) {
let index = this.sessionList.findIndex((value) => {
return value.id === session.id
})
this.sessionList.splice(index, 1)
if (this.sessionList.length > 0) {
this.activeSession = this.sessionList[0]
return
}
this.createSession()
},
sessionSwitch(session,index) {
if (!session) return
if (session.messages && session.messages.length > 0) {
this.activeSession = null
this.activeSession = session
this.toBottom()
return;
}
this.$getSessionById(session.id).then(resp => {
if (resp.code === 20000) {
this.activeSession = null
this.activeSession = resp.data
this.toBottom()
this.sessionList[index] = resp.data
this.sessionList[index].messageSize = session.messageSize
}
})
},
createSession() {
let time = this.now()
let chat = {
id: time.replaceAll(" ", ""),
createDate: time,
updateDate: time,
messageSize:0,
topic: "新建的聊天",
messages: []
}
this.activeSession = chat
//从聊天列表头部插入新建的元素
this.sessionList.unshift(chat)
this.createChatMessage(chat)
},
async createChatMessage(chat) {
let resp = await this.$createSession(chat)
if (resp.code === 20000) {
this.activeSession.id = resp.data.id
}
},
//socket握手
handShake() {
this.client = new Client({
//连接地址要加上项目跟地址
brokerURL: `${ process.env.socketURI}`,
onConnect: () => {
this.isSend = true
// 连接成功后订阅ChatGPT回复地址
this.client.subscribe('/user/queue/gpt', (message) => {
let msg = message.body
this.handleGPTMsg(msg)
})
}
})
// 发起连接
this.client.activate()
},
/**
* 处理GPT返回的消息
* @param msg
*/
handleGPTMsg(msg){
if (msg && msg !== '!$$---END---$$!'){
this.msgQueue.push(msg)
//设置定时器,每40毫秒取出一个队列元素,追加到页面显示,不要一下子把后端返回的内容全部追加到页面;使消息平滑显示
if (!this.interval){
this.interval = setInterval(()=>{
this.appendQueueToContent()
},40)
}
if (this.msgCount){
this.activeSession.messageSize+=1
this.msgCount = false
}
return;
}
if (msg === '!$$---END---$$!') {
clearTimeout(this.interval)
this.interval = null
//清理掉定时器以后,需要处理队列里面剩余的消息内容
this.handleLastMsgQueue()
}
},
/**
* 处理队列里面剩余的消息
*/
handleLastMsgQueue(){
while (this.msgQueue.length>0){
this.appendQueueToContent()
}
this.isSend = true
},
/**
* 将消息队列里面的消息取出一个字符追加到显示content
*/
appendQueueToContent() {
if (this.msgQueue.length <= 0) {
return
}
// 如果当前字符串还有字符未处理
const currentItem = this.msgQueue[0];
if (currentItem) {
// 取出当前字符串的第一个字符
const char = currentItem[0];
//不能频繁调用 到底部 函数
if (this.lineCount % 5 === 0) {
this.toBottom()
}
this.lineCount++
this.gptRes.content += char;
// 移除已处理的字符
this.msgQueue[0] = currentItem.slice(1);
// 如果当前字符串为空,则从队列中移除
if (this.msgQueue[0].length === 0) {
this.msgQueue.shift();
}
}
},
sendMessage(msg) {
this.buildMsg('user', msg)
let chatMessage = {
content: msg,
role: 'user',
sessionId: this.activeSession.id
}
try {
this.client.publish({
destination: '/ws/chat/send',
body: JSON.stringify(chatMessage)
})
} catch (e) {
console.log("socket connection error:{}", e)
this.handShake()
return
}
this.isSend = false
this.gptRes = {
role: 'assistant', content: '', createDate: this.now()
}
this.activeSession.messages.push(this.gptRes)
this.toBottom()
this.msgCount = true
this.activeSession.messageSize+=1
},
toBottom(){
scrollToBottom('messageListId')
},
buildMsg(_role, msg) {
let message = { role: _role, content: msg, createDate: this.now()}
this.activeSession.messages.push(message)
},
closeClient() {
try {
this.client.deactivate()
this.client = null
} catch (e) {
console.log(e)
}
},
now() {
return dayjs().format('YYYY-MM-DD HH:mm:ss');
},
onScroll(event) {
this.isScrolledToBottom = event.target.scrollHeight - event.target.scrollTop <= (event.target.clientHeight + 305);
},
},
async asyncData({ store, redirect}) {
const userId = store.state.userInfo && store.state.userInfo.uid
if (typeof userId == 'undefined' || userId == null || Object.is(userId, 'null')) {
return redirect("/");
}
return {
userInfo: store.state.userInfo
}
},
}
</script>
<style lang="scss" scoped>code>
.home-view { -- -->
display: flex;
justify-content:center;
margin-top: -80px;
.chat-panel {
display: flex;
border-radius: 20px;
background-color: white;
box-shadow: 0 0 20px 20px rgba(black, 0.05);
margin-top: 70px;
margin-right: 75px;
.session-panel {
width: 300px;
border-top-left-radius: 20px;
border-bottom-left-radius: 20px;
padding: 5px 10px 20px 10px;
position: relative;
border-right: 1px solid rgba(black, 0.07);
background-color: rgb(231, 248, 255);
/* 标题 */
.title {
margin-top: 20px;
font-size: 20px;
}
/* 描述*/
.description {
color: rgba(black, 0.7);
font-size: 14px;
margin-top: 10px;
}
.session-list {
.session {
/* 每个会话之间留一些间距 */
margin-top: 20px;
}
}
.button-wrapper {
/* session-panel是相对布局,这边的button-wrapper是相对它绝对布局 */
position: absolute;
bottom: 20px;
left: 0;
display: flex;
/* 让内部的按钮显示在右侧 */
justify-content: flex-end;
/* 宽度和session-panel一样宽*/
width: 100%;
/* 按钮于右侧边界留一些距离 */
.new-session {
margin-right: 20px;
}
}
}
/* 右侧消息记录面板*/
.message-panel {
width: 750px;
position: relative;
.header {
text-align: left;
padding: 5px 20px 0 20px;
display: flex;
/* 会话名称和编辑按钮在水平方向上分布左右两边 */
justify-content: space-between;
/* 前部的标题和消息条数 */
.front {
.title {
color: rgba(black, 0.7);
font-size: 20px;
::v-deep {
.el-input__inner {
padding: 0 !important;
}
}
}
.description {
margin-top: 10px;
color: rgba(black, 0.5);
}
}
/* 尾部的编辑和取消编辑按钮 */
.rear {
display: flex;
align-items: center;
.rear-icon {
font-size: 20px;
font-weight: bold;
}
}
}
.message-list {
height: 560px;
padding: 15px;
// 消息条数太多时,溢出部分滚动
overflow-y: scroll;
// 当切换聊天会话时,消息记录也随之切换的过渡效果
.list-enter-active,
.list-leave-active {
transition: all 0.5s ease;
}
.list-enter-from,
.list-leave-to {
opacity: 0;
transform: translateX(30px);
}
}
::v-deep{
.el-divider--horizontal {
margin: 14px 0;
}
}
}
}
}
::v-deep {
.mcb-main {
padding-top: 10px;
}
.mcb-footer{
display: none;
}
}
.message-input {
padding: 20px;
border-top: 1px solid rgba(black, 0.07);
border-left: 1px solid rgba(black, 0.07);
border-right: 1px solid rgba(black, 0.07);
border-top-right-radius: 5px;
border-top-left-radius: 5px;
}
.button-wrapper {
display: flex;
justify-content: flex-end;
margin-top: 20px;
}
.toBottom{
display: inline;
background-color: transparent;
position: absolute;
z-index: 999;
text-align: center;
width: 100%;
bottom: 175px;
}
.bottom-icon{
align-items: center;
background: #fff;
border: 1px solid rgba(0,0,0,.08);
border-radius: 50%;
bottom: 0;
box-shadow: 0 2px 8px 0 rgb(0 0 0 / 10%);
box-sizing: border-box;
cursor: pointer;
display: flex;
font-size: 20px;
height: 40px;
justify-content: center;
position: absolute;
right: 50%;
width: 40px;
z-index: 999;
}
.bottom-icon:hover {
color: #5dbdf5;
cursor: pointer;
border: 1px solid #5dbdf5;
}
</style>
我们来着重介绍一下以下三个函数:
/**
* 处理GPT返回的消息
* @param msg
*/
handleGPTMsg(msg){
if (msg && msg !== '!$$---END---$$!'){
this.msgQueue.push(msg)
//设置定时器,每40毫秒取出一个队列元素,追加到页面显示,不要一下子把后端返回的内容全部追加到页面;使消息平滑显示
if (!this.interval){
this.interval = setInterval(()=>{
this.appendQueueToContent()
},40)
}
if (this.msgCount){
this.activeSession.messageSize+=1
this.msgCount = false
}
return;
}
if (msg === '!$$---END---$$!') {
clearTimeout(this.interval)
this.interval = null
//清理掉定时器以后,需要处理队列里面剩余的消息内容
this.handleLastMsgQueue()
}
},
/**
* 处理队列里面剩余的消息
*/
handleLastMsgQueue(){
while (this.msgQueue.length>0){
this.appendQueueToContent()
}
this.isSend = true
},
/**
* 将消息队列里面的消息取出一个字符追加到显示content
*/
appendQueueToContent() {
if (this.msgQueue.length <= 0) {
return
}
// 如果当前字符串还有字符未处理
const currentItem = this.msgQueue[0];
if (currentItem) {
// 取出当前字符串的第一个字符
const char = currentItem[0];
//不能频繁调用 到底部 函数
if (this.lineCount % 5 === 0) {
this.toBottom()
}
this.lineCount++
this.gptRes.content += char;
// 移除已处理的字符
this.msgQueue[0] = currentItem.slice(1);
// 如果当前字符串为空,则从队列中移除
if (this.msgQueue[0].length === 0) {
this.msgQueue.shift();
}
}
}
handleGPTMsg 这个函数就是处理后端websocket传递过来的消息,其中,最主要的就是这里。在这里,我们设置了一个定时器,每40ms调用一次 appendQueueToContent函数,这个函数从消息队列的队头取出一个字符,把这个字符追加到页面组件上面显示,这样处理使得消息的显示更加平滑,而不是后端生成多少就一次性展示多少。
if (!this.interval){
this.interval = setInterval(()=>{
this.appendQueueToContent()
},40)
}
appendQueueToContent 这个函数就是负责从queue里面获取内容,然后追加到gptRes这个变量里面;并且将已经追加的内容从队列里面移除掉。handleLastMsgQueue 由于前后端处理消息的速度是不一样的,当后端发送生成结束标记(即 !$$---END---$$! )后,前端就需要以此为根据,删除定时器,否则我们没办法知道queue消息队列什么时候为空、什么时候该清楚定时器。那么,此时清除定时器,我们就需要用一个while函数来处理queue里面剩下的内容,handleLastMsgQueue 函数就是干这个的。
2.2.2、session管理组件
这个组件没有什么隐晦难懂的知识,直接贴代码:
<template>
<div :class="['session-item', active ? 'active' : '']">code>
<div class="name">{ -- -->{ session.topic }}</div>code>
<div class="count-time">code>
<div class="count">{ -- -->{ session?.messageSize ?? 0 }}条对话</div>code>
<div class="time">{ -- -->{ session.updateDate }}</div>code>
</div>
<!-- 当鼠标放在会话上时会弹出遮罩 -->
<div class="mask"></div>code>
<div class="btn-wrapper" @click.stop="$emit('click')">code>
<el-popconfirm
confirm-button-text='好的'code>
cancel-button-text='不用了'code>
icon="el-icon-circle-close"code>
icon-color="red"code>
@click.prevent="deleteSession(session)"code>
title="是否确认永久删除该聊天会话?"code>
@confirm="deleteSession(session)"code>
>
<el-icon slot="reference" :size="15" class="el-icon-circle-close"></el-icon>code>
</el-popconfirm>
</div>
</div>
</template>
<script>
export default { -- -->
props: {
session: {
type: Object,
required: true
},
active: {
type: Boolean,
default: false
}
},
data() {
return {
ChatSession: { }
}
},
methods: {
deleteSession(session) {
//请求后台删除接口
this.$deleteSession(session.id)
//通知父组件删除session
this.$emit('delete', session)
}
}
}
</script>
<style lang="scss" scoped>code>
.session-item { -- -->
padding: 12px;
background-color: white;
border-radius: 10px;
width: 91%;
/* 当鼠标放在会话上时改变鼠标的样式,暗示用户可以点击。目前还没做拖动的效果,以后会做。 */
cursor: grab;
position: relative;
overflow: hidden;
.name {
font-size: 14px;
font-weight: 700;
width: 200px;
color: rgba(black, 0.8);
text-align: left;
}
.count-time {
margin-top: 10px;
font-size: 10px;
color: rgba(black, 0.5);
/* 让消息数量和最近更新时间显示水平显示 */
display: flex;
/* 让消息数量和最近更新时间分布在水平方向的两端 */
justify-content: space-between;
}
/* 当处于激活状态时增加蓝色描边 */
&.active {
transition: all 0.12s linear;
border: 2px solid #1d93ab;
}
&:hover {
/* 遮罩入场,从最左侧滑进去,渐渐变得不透明 */
.mask {
opacity: 1;
left: 0;
}
.btn-wrapper {
&:hover {
cursor: pointer;
}
/* 按钮入场,从最右侧滑进去,渐渐变得不透明 */
opacity: 1;
right: 20px;
}
}
.mask {
transition: all 0.2s ease-out;
position: absolute;
background-color: rgba(black, 0.05);
width: 100%;
height: 100%;
top: 0;
left: -100%;
opacity: 0;
}
/* 删除按钮样式的逻辑和mask类似 */
.btn-wrapper {
color: rgba(black, 0.5);
transition: all 0.2s ease-out;
position: absolute;
top: 10px;
right: -20px;
z-index: 10;
opacity: 0;
.edit {
margin-right: 5px;
}
;
.el-icon-circle-close {
display: inline-block;
width: 25px;
height: 25px;
color: red;
}
}
}
</style>
上述代码只有一个地方稍稍注意,那就是 <div class="btn-wrapper" @click.stop="$emit('click')">code> 这里, 在这个div中,我们必须阻止 click 点击事件,防止我们点击div里面的删除元素时,把点击事件传递给div,激活当前session。效果如下:
2.2.3、聊天组件
各个聊天组件如下所示,其中:
2.2.3.1、MessageInput组件
<code><template>
<div class="message-input">code>
<div class="input-wrapper">code>
<el-input
v-model="message"code>
:autosize="false"code>
:rows="3"code>
class="input"code>
resize="none"code>
type="textarea"code>
@keydown.native="sendMessage"code>
autofocus="autofocus"code>
>
</el-input>
<div class="button-wrapper">code>
<el-button icon="el-icon-position" type="primary" @click="send" :disabled="!isSend">code>
发送
</el-button>
</div>
</div>
</div>
</template>
<script>
export default { -- -->
props: {
isSend: {
type: Boolean,
default: false
}
},
data() {
return {
message: ""
};
},
methods: {
sendMessage(e) {
//shift + enter 换行
if (!e.shiftKey && e.keyCode === 13) {
if ((this.message + "").trim() === '' || this.message.length <= 0) {
return;
}
// 阻止默认行为,避免换行
e.preventDefault();
this.send();
}
},
send(){
if (this.isSend) {
this.$emit('send', this.message);
this.message = '';
}
}
}
}
</script>
<style lang="scss" scoped>code>
.message-input { -- -->
padding: 20px;
border-top: 1px solid rgba(black, 0.07);
border-left: 1px solid rgba(black, 0.07);
border-right: 1px solid rgba(black, 0.07);
border-top-right-radius: 5px;
border-top-left-radius: 5px;
}
.button-wrapper {
display: flex;
justify-content: flex-end;
margin-top: 20px;
}
</style>
2.2.3.2、MessageRow组件
<!-- 整个div是用来调整内部消息的位置,每条消息占的空间都是一整行,然后根据right还是left来调整内部的消息是靠右边还是靠左边 -->
<template>
<div :class="['message-row', message.role === 'user' ? 'right' : 'left']">code>
<!-- 消息展示,分为上下,上面是头像,下面是消息 -->
<div class="row">code>
<!-- 头像, -->
<div class="avatar-wrapper">code>
<el-avatar v-if="message.role === 'user'" :src="$store.state.userInfo?$store.state.userInfo.imageUrl:require('@/assets/gpt.png')" class="avatar"code>
shape="square"/>code>
<el-avatar v-else :src="require('@/assets/logo.png')" class="avatar" shape="square"/>code>
</div>
<!-- 发送的消息或者回复的消息 -->
<div class="message">code>
<!-- 预览模式,用来展示markdown格式的消息 -->
<client-only>
<mavon-editor v-if="message.content" :class="message.role"code>
:style="{
backgroundColor: message.role === 'user' ? 'rgb(231, 248, 255)' : '#f7e8f1e3',
zIndex: 1,
minWidth: '5px',
fontSize:'15px',
}"code>
default-open="preview" :subfield='false' :toolbarsFlag="false" :ishljs="true" ref="md"code>
v-model="message.content" :editable="false"/>code>
<TextLoading v-else></TextLoading>
<!-- 如果消息的内容为空则显示加载动画 -->
</client-only>
</div>
</div>
</div>
</template>
<script>
import '@/assets/css/md/github-markdown.css'
import TextLoading from './TextLoading'
export default {
components: {
TextLoading
},
props: {
message: {
type: Object,
default: null
}
},
data() {
return {
Editor: "",
}
},
created(){
}
}
</script>
<style lang="scss" scoped>code>
.message-row { -- -->
display: flex;
&.right {
// 消息显示在右侧
justify-content: flex-end;
.row {
// 头像也要靠右侧
.avatar-wrapper {
display: flex;
justify-content: flex-end;
}
// 用户回复的消息和ChatGPT回复的消息背景颜色做区分
.message {
background-color: rgb(231, 248, 255);
}
}
}
// 默认靠左边显示
.row {
.avatar-wrapper {
.avatar {
box-shadow: 20px 20px 20px 3px rgba(0, 0, 0, 0.03);
margin-bottom: 10px;
max-width: 40px;
max-height: 40px;
background: #d4d6dcdb !important;
}
}
.message {
font-size: 15px;
padding: 1.5px;
// 限制消息展示的最大宽度
max-width: 500px;
// 圆润一点
border-radius: 7px;
// 给消息框加一些描边,看起来更加实一些,要不然太扁了轻飘飘的。
border: 1px solid rgba(black, 0.1);
// 增加一些阴影看起来更加立体
box-shadow: 20px 20px 20px 1px rgba(0, 0, 0, 0.01);
margin-bottom: 5px;
}
}
}
.left {
text-align: left;
.message {
background-color: rgba(247, 232, 241, 0.89);
}
}
// 调整markdown组件的一些样式,deep可以修改组件内的样式,正常情况是scoped只能修改本组件的样式。
::v-deep {
.v-note-wrapper .v-note-panel .v-note-show .v-show-content, .v-note-wrapper .v-note-panel .v-note-show .v-show-content-html {
padding: 9px 10px 0 15px;
}
.markdown-body {
min-height: 0;
flex-grow: 1;
.v-show-content {
background-color: transparent !important;
}
}
}
</style>
2.2.3.3、TextLoading组件
<template>
<div class="loading">code>
<!-- 三个 div 三个黑点 -->
<div></div>
<div></div>
<div></div>
</div>
</template>
<style lang="scss" scoped>code>
.loading { -- -->
// 三个黑点水平展示
display: flex;
// 三个黑点均匀分布在54px中
justify-content: space-around;
color: #000;
width: 54px;
padding: 15px;
div {
background-color: currentColor;
border: 0 solid currentColor;
width: 5px;
height: 5px;
// 变成黑色圆点
border-radius: 100%;
// 播放我们下面定义的动画,每次动画持续0.7s且循环播放。
animation: ball-beat 0.7s -0.15s infinite linear;
}
div:nth-child(2n-1) {
// 慢0.5秒
animation-delay: -0.5s;
}
}
// 动画定义
@keyframes ball-beat {
// 关键帧定义,在50%的时候是颜色变透明,且缩小。
50% {
opacity: 0.2;
transform: scale(0.75);
}
// 在100%时是回到正常状态,浏览器会自动在这两个关键帧间平滑过渡。
100% {
opacity: 1;
transform: scale(1);
}
}
</style>
2.2.3.4、scrollToBottom 函数
export function scrollToBottom(elementId) {
const container = document.getElementById(elementId);
if (!container) {
return
}
// 头部
const start = container.scrollTop;
//底部-头部
const change = container.scrollHeight - start;
const duration = 1000; // 动画持续时间,单位毫秒
let startTime = null;
const animateScroll = (timestamp) => {
if (!startTime) startTime = timestamp;
const progress = timestamp - startTime;
const run = easeInOutQuad(progress, start, change, duration);
container.scrollTop = Math.floor(run);
if (progress < duration) {
requestAnimationFrame(animateScroll);
}
};
// 二次贝塞尔曲线缓动函数
function easeInOutQuad(t, b, c, d) {
t /= d / 2;
if (t < 1) return c / 2 * t * t + b;
t--;
return -c / 2 * (t * (t - 2) - 1) + b;
}
requestAnimationFrame(animateScroll);
}
三、总结
通义千问AI落地前端实现大致如上,在下篇中,我们将继续介绍Websocket是如何实现前后端的消息接受与发送的,敬请期待。。。。
声明
本文内容仅代表作者观点,或转载于其他网站,本站不以此文作为商业用途
如有涉及侵权,请联系本站进行删除
转载本站原创文章,请注明来源及作者。