本地构建编译Apache-Seatunnel2.3.5适配Web1.0.0运行实现Mysql-CDC示例
大飞哥~BigFei 2024-06-29 10:03:13 阅读 77
本地构建编译Apache-Seatunnel2.3.5适配Web1.0.0运行实现Mysql-CDC示例
文章目录
1.前言2.编译2.1版本说明2.2 seatunnel2.3.4-release分支配置2.3maven调优配置
3.web1.0.0适配3.1配置文件修改和新增文件3.2手动拷贝jar修改依赖3.3修改web不兼容的代码3.4 web编译打包
4.运行mysql-cdc示例4.1配置运行seatunnel4.2配置运行web4.3 拷贝jar到seatunnel家目录的lib和web家目录的libs下4.4 ui编译运行注意事项4.5mysql-cdc的示例
5.总结
1.前言
本地编译先关可以查看之前的文章
Apache Seatunnel本地源码构建编译运行调试
https://mp.weixin.qq.com/s/s_cjrXHvBjIQBF8RqQTvcQ
https://blog.csdn.net/qq_34905631/article/details/135068301?spm=1001.2014.3001.5501
CentOs7.x安装部署SeaTunnelWeb遇到的坑
https://mp.weixin.qq.com/s/1FcCB1TjfEs22iGiCoKL5g
https://blog.csdn.net/qq_34905631/article/details/135074860?spm=1001.2014.3001.5501
主要看Apache Seatunnel本地源码构建编译运行调试这篇。
2.编译
2.1版本说明
seatunnel的分支选择2.3.4-release里面的版本是
<version>2.3.5-SNAPSHOT</version>
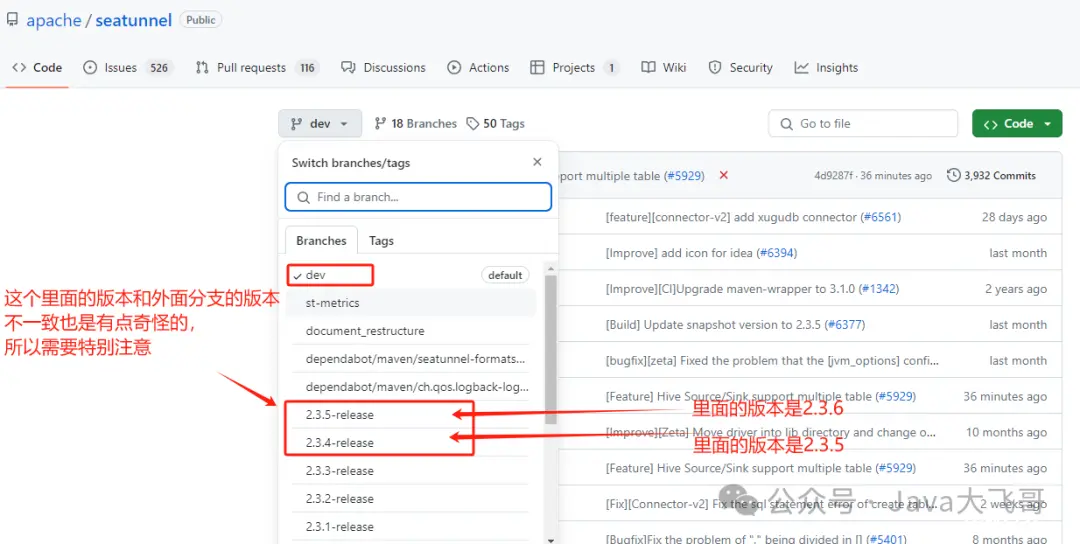
先把seatunnel2.3.4-release的分支拉下来,拉下项目来记得切换分支到2.3.4-release分支,这一步特别关键,否则没有切换分支可能默认在dev分支,估计会有问题,这里需要特别注意,
web版本为1.0.0。
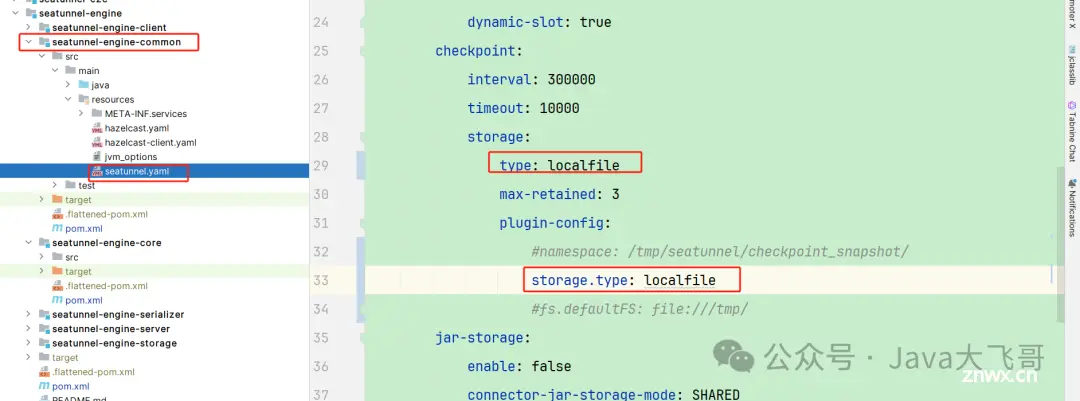
2.2 seatunnel2.3.4-release分支配置
如果你的电脑是windwos电脑可以将持久化配置成localfile,seatunnel源码文件有说明:localfile已经废弃,使用hdfs替代,因为我windows电脑上没有安装hadoop环境,所以这种搞一下本地耍没啥问题。
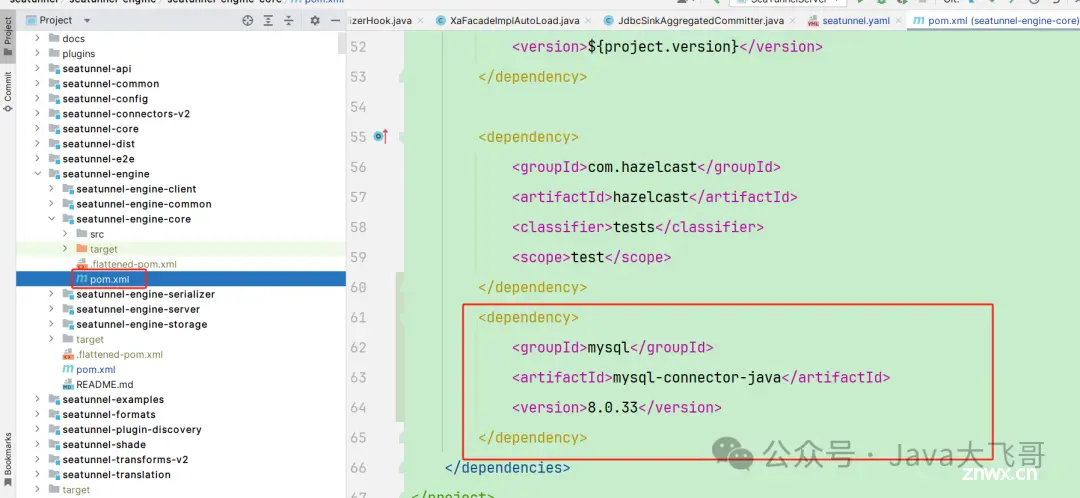
web的app中也可以加入这个包,下面web配置里面没有截图在这里说明下,加入这个包可选,后面运行的时候还需要把相关的jar包加加到web家目录的libs下和seatunnel家目录下的lib中。
编译打包:
mvn clean package -pl seatunnel-dist -am '-Dmaven.test.skip=true' -T 8C
2.3maven调优配置
下面的文章的评论里面有有如何配置maven的调优
https://blog.csdn.net/qq_34905631/article/details/135074860?spm=1001.2014.3001.5501
setting的maven的Runner中配置jvm参数如下:
-Dfile.encoding=GBK -DarchetypeCatalog=local -Xmx1024m -XX:MetaspaceSize=1024m -XX:MaxMetaspaceSize=1024m -Xss2m -Dmaven.test.skip=true -Dmaven.compile.fork=true
对maven做了一些参数调优,否则maven导入编译打包会很慢,settings->maven->importing中的jvm参数可以设置为:
-Xmx1024m
如果项目太大,不设置这个参数项目导入加载会很慢很慢,堆栈有可能溢出了,所以需要设置maven的导入的最大堆设置大一点,Archetype Catalogs里面新增一个local指定本地maven仓库的位置(这种是为了不用每次编译都去远程拉取下载,如果机器配置不好,网络慢,编译就非常非常慢,所以一般都是将各个模块分别install到本地仓库,然后执行总体编译打包命令的时候通过这个配置优选选用本地仓库的jar,就不会去远程下载了,这种就可以加快编译打包的速度),点击Build Tools–>Maven
设置maven的线程数据为:
Thread Count 8 -T option
设置输入一个8即可。以上配置是为了导入maven项目加载快和编译运行maven项目快。两个项目里面都这种maven调优配置一下。
3.web1.0.0适配
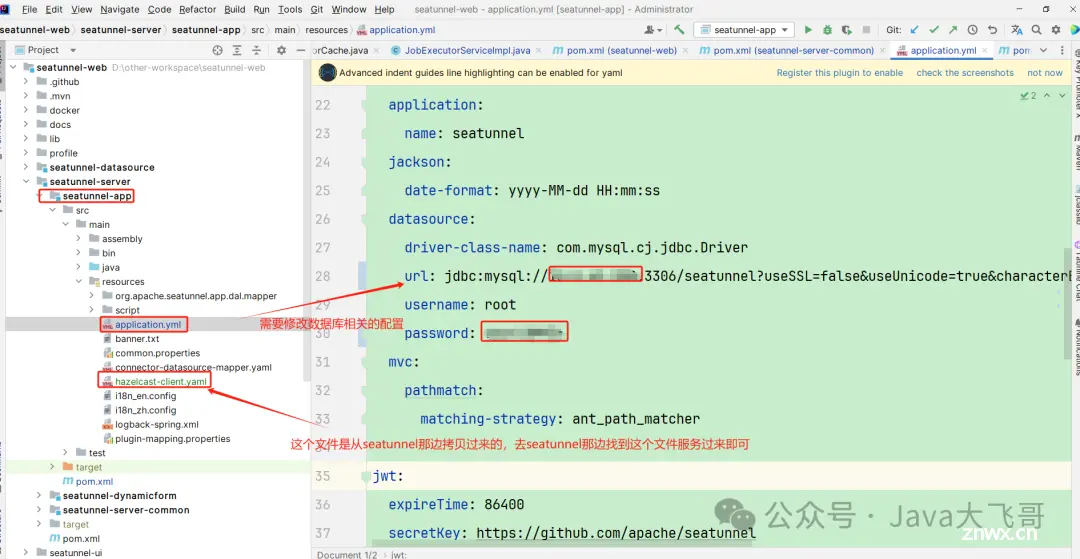
3.1配置文件修改和新增文件
3.2手动拷贝jar修改依赖
修改顶级父pom的版本号如下,该为2.3.5
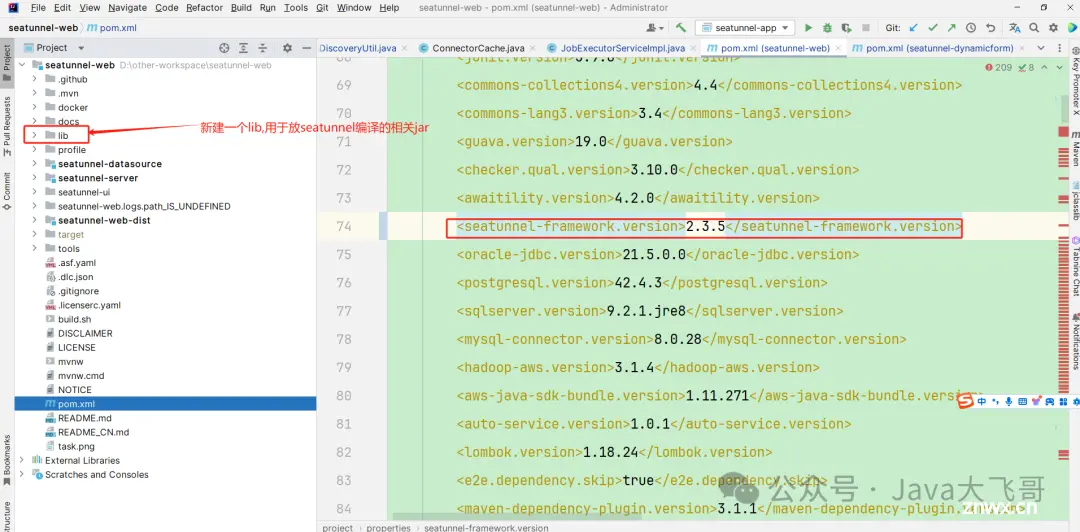
lib用于从seatunnel本地编译拷贝一些依赖的jar,然后替换如下:
<dependency>
<groupId>org.apache.seatunnel</groupId>
<artifactId>seatunnel-common</artifactId>
<version>${seatunnel-framework.version}</version>
<scope>system</scope>
<systemPath>D:/other-workspace/seatunnel-web/lib/seatunnel-common-2.3.5-SNAPSHOT-2.12.15.jar</systemPath>
</dependency>
这里由于不可以在顶级的父pom里面修改,因为顶级父pom里面的依赖是在里面统一定义管理的,所以不要加在顶级父pom里面,如果加了会编译报错,里面不支持上面那种手动依赖编译打包本地的jar包的,所以需要修改各个子模块中依赖seatunnel那边的jar包全部拷贝到web项目下的lib下,上面只是一个引入栗子,systemPath这里采用绝对路径的方式统一放在一个lib下管理,systemPath不使用
p
o
m
.
b
a
s
e
d
i
r
{pom.basedir}
pom.basedir{project.basedir}的方式,这种方式不便于多子模块管理外部jar依赖 ,如果用这种方式哪个模块里面需要在对应模块的路径下建立一个lib,然后将对应的jar拷贝过去,不方便,拷过来拷过去的,很烦的,所以使用绝对路径就可以统一管理,需要将web下所有依赖seatunnel的包全部手动拷贝过去这种引入对应的jar即可,编译会报错,就去检查是哪个模块缺少seatunnel的那个依赖包,拷贝到lib然后修改pom依赖即可
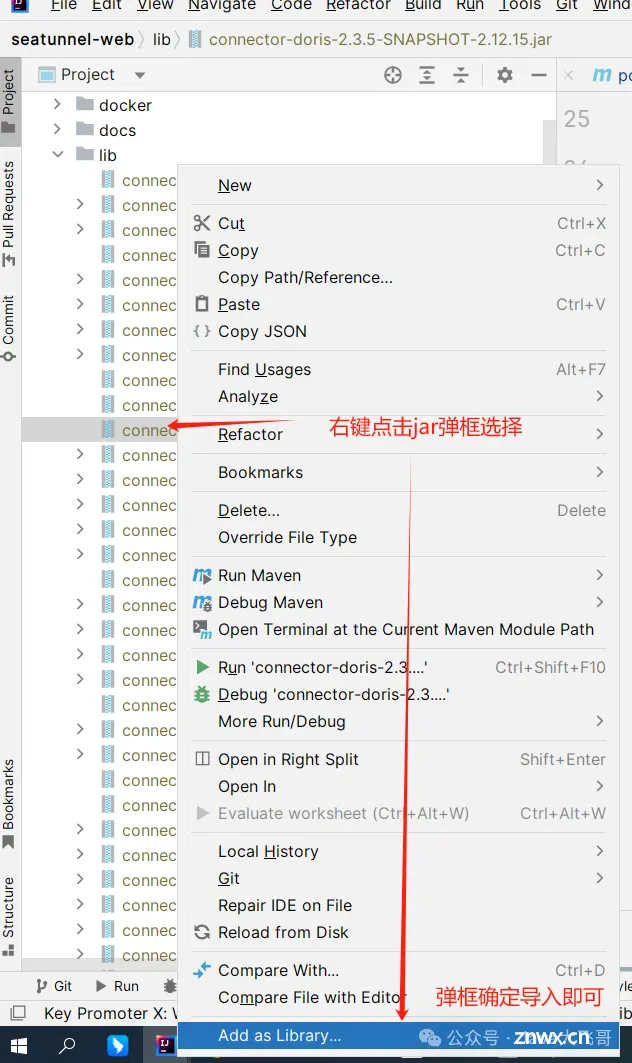
需要手动将拷贝的lib下的jar包文件手动导入项目,否则idea编译后不能识别代码,会有类是红色的说明没有导入依赖,所以要这种手动导入一下才可以的,这里需要特别注意。
3.3修改web不兼容的代码
上一步修改完依赖编译会有接口代码不兼容报错,所以需要修改web代码
EngineDataType内部类修改:
public static class SeaTunnelDataTypeConvertor
implements DataTypeConvertor<SeaTunnelDataType<?>> {
@Override
public SeaTunnelDataType<?> toSeaTunnelType(String s, String s1) {
return DATA_TYPE_MAP.get(s.toLowerCase(Locale.ROOT)).getRawType();
}
@Override
public SeaTunnelDataType<?> toSeaTunnelType(
String s, SeaTunnelDataType<?> seaTunnelDataType, Map<String, Object> map) {
return seaTunnelDataType;
}
@Override
public SeaTunnelDataType<?> toConnectorType(
String s, SeaTunnelDataType<?> seaTunnelDataType, Map<String, Object> map) {
return seaTunnelDataType;
}
@Override
public String getIdentity() {
return "EngineDataTypeConvertor";
}
}
JobExecutorServiceImpl类
executeJobBySeaTunnel方法:
原来:
JobExecutionEnvironment jobExecutionEnv =
seaTunnelClient.createExecutionContext(filePath, jobConfig);
现在:
SeaTunnelConfig seaTunnelConfig = ConfigProvider.locateAndGetSeaTunnelConfig();
ClientJobExecutionEnvironment jobExecutionEnv =
seaTunnelClient.createExecutionContext(filePath, jobConfig, seaTunnelConfig);
JobInstanceServiceImpl类:
public void complete(
@NonNull Integer userId, @NonNull Long jobInstanceId, @NonNull String jobEngineId)方法:
原来:
if (statusList.size() == 1 && statusList.contains("FINISHED")) {
jobStatus = JobStatus.FINISHED.name();
} else if (statusList.contains("FAILED")) {
jobStatus = JobStatus.FAILED.name();
} else if (statusList.contains("CANCELED")) {
jobStatus = JobStatus.CANCELED.name();
} else if (statusList.contains("CANCELLING")) {
jobStatus = JobStatus.CANCELLING.name();
} else {
jobStatus = JobStatus.RUNNING.name();
}
现在:
if (statusList.size() == 1 && statusList.contains("FINISHED")) {
jobStatus = JobStatus.FINISHED.name();
} else if (statusList.contains("FAILED")) {
jobStatus = JobStatus.FAILED.name();
} else if (statusList.contains("CANCELED")) {
jobStatus = JobStatus.CANCELED.name();
} else if (statusList.contains("CANCELING")) {
jobStatus = JobStatus.CANCELING.name();
} else {
jobStatus = JobStatus.RUNNING.name();
}
PluginDiscoveryUtil类的getConnectorFeatures方法
原来:
public static Map<PluginIdentifier, ConnectorFeature> getConnectorFeatures(
PluginType pluginType) throws IOException {
Common.setStarter(true);
if (!pluginType.equals(PluginType.SOURCE)) {
throw new UnsupportedOperationException("ONLY support plugin type source");
}
Path path = new SeaTunnelSinkPluginDiscovery().getPluginDir();
List<Factory> factories;
if (path.toFile().exists()) {
List<URL> files = FileUtils.searchJarFiles(path);
factories =
FactoryUtil.discoverFactories(new URLClassLoader(files.toArray(new URL[0])));
} else {
factories =
FactoryUtil.discoverFactories(Thread.currentThread().getContextClassLoader());
}
Map<PluginIdentifier, ConnectorFeature> featureMap = new ConcurrentHashMap<>();
factories.forEach(
plugin -> {
if (TableSourceFactory.class.isAssignableFrom(plugin.getClass())) {
TableSourceFactory tableSourceFactory = (TableSourceFactory) plugin;
PluginIdentifier info =
PluginIdentifier.of(
"seatunnel",
PluginType.SOURCE.getType(),
plugin.factoryIdentifier());
featureMap.put(
info,
new ConnectorFeature(
SupportColumnProjection.class.isAssignableFrom(
tableSourceFactory.getSourceClass())));
}
});
return featureMap;
}
现在:
public static Map<PluginIdentifier, ConnectorFeature> getConnectorFeatures(
PluginType pluginType) throws IOException {
Common.setStarter(true);
if (!pluginType.equals(PluginType.SOURCE)) {
throw new UnsupportedOperationException("ONLY support plugin type source");
}
List<Factory> factories = null;
SeaTunnelSinkPluginDiscovery seaTunnelSinkPluginDiscovery =
new SeaTunnelSinkPluginDiscovery();
Map<PluginIdentifier, String> allSupportedPlugins =
seaTunnelSinkPluginDiscovery.getAllSupportedPlugins(pluginType);
for (Entry<PluginIdentifier, String> entry : allSupportedPlugins.entrySet()) {
PluginIdentifier pluginIdentifier = entry.getKey();
List<PluginIdentifier> pluginIdentifiers = new ArrayList<>();
pluginIdentifiers.add(pluginIdentifier);
List<URL> files = seaTunnelSinkPluginDiscovery.getPluginJarPaths(pluginIdentifiers);
if (CollectionUtils.isNotEmpty(files)) {
factories =
FactoryUtil.discoverFactories(
new URLClassLoader(files.toArray(new URL[0])));
} else {
factories =
FactoryUtil.discoverFactories(
Thread.currentThread().getContextClassLoader());
}
}
Map<PluginIdentifier, ConnectorFeature> featureMap = new ConcurrentHashMap<>();
if (CollectionUtils.isNotEmpty(factories)) {
factories.forEach(
plugin -> {
if (TableSourceFactory.class.isAssignableFrom(plugin.getClass())) {
TableSourceFactory tableSourceFactory = (TableSourceFactory) plugin;
PluginIdentifier info =
PluginIdentifier.of(
"seatunnel",
PluginType.SOURCE.getType(),
plugin.factoryIdentifier());
featureMap.put(
info,
new ConnectorFeature(
SupportColumnProjection.class.isAssignableFrom(
tableSourceFactory.getSourceClass())));
}
});
}
return featureMap;
}
SchemaDerivationServiceImpl类derivationSQL中
原来:
TableFactoryContext context =
new TableFactoryContext(
Collections.singletonList(table),
ReadonlyConfig.fromMap(config),
Thread.currentThread().getContextClassLoader());
现在:
TableTransformFactoryContext context =
new TableTransformFactoryContext(
Collections.singletonList(table),
ReadonlyConfig.fromMap(config),
Thread.currentThread().getContextClassLoader());
SeaTunnelEngineProxy类restoreJob方法中
原来:
seaTunnelClient.restoreExecutionContext(filePath, jobConfig, jobEngineId).execute();
现在:
SeaTunnelConfig seaTunnelConfig = ConfigProvider.locateAndGetSeaTunnelConfig();
seaTunnelClient
.restoreExecutionContext(filePath, jobConfig, seaTunnelConfig, jobEngineId)
.execute();
TableSchemaServiceImpl类TableSchemaServiceImpl()方法
原来:
public TableSchemaServiceImpl() throws IOException {
Common.setStarter(true);
Path path = new SeaTunnelSinkPluginDiscovery().getPluginDir();
if (path.toFile().exists()) {
List<URL> files = FileUtils.searchJarFiles(path);
files.addAll(FileUtils.searchJarFiles(Common.pluginRootDir()));
factory = new DataTypeConvertorFactory(new URLClassLoader(files.toArray(new URL[0])));
} else {
factory = new DataTypeConvertorFactory();
}
}
现在:
public TableSchemaServiceImpl() throws IOException {
Common.setStarter(true);
SeaTunnelSinkPluginDiscovery seaTunnelSinkPluginDiscovery =
new SeaTunnelSinkPluginDiscovery();
Map<PluginIdentifier, String> allSupportedPlugins =
seaTunnelSinkPluginDiscovery.getAllSupportedPlugins(PluginType.SINK);
for (Map.Entry<PluginIdentifier, String> entry : allSupportedPlugins.entrySet()) {
PluginIdentifier pluginIdentifier = entry.getKey();
List<PluginIdentifier> pluginIdentifiers = new ArrayList<>();
pluginIdentifiers.add(pluginIdentifier);
List<URL> files = seaTunnelSinkPluginDiscovery.getPluginJarPaths(pluginIdentifiers);
if (CollectionUtils.isNotEmpty(files)) {
factory =
new DataTypeConvertorFactory(new URLClassLoader(files.toArray(new URL[0])));
} else {
factory = new DataTypeConvertorFactory();
}
}
}
TableSchemaServiceImpl类getSeaTunnelSchema中
原来:
SeaTunnelDataType<?> dataType = convertor.toSeaTunnelType(field.getType());
现在:
SeaTunnelDataType<?> dataType = convertor.toSeaTunnelType(field.getType(), null);
到此web1.0.0的兼容代码已经修改完成。
3.4 web编译打包
执行如下编译打包命令
mvn clean package -pl seatunnel-web-dist -am '-Dmaven.test.skip=true' -T 8C
4.运行mysql-cdc示例
经过以上的步骤,seatunnel2.3.5和web1.0.0的适配已经可以正常在dist下打包成功,
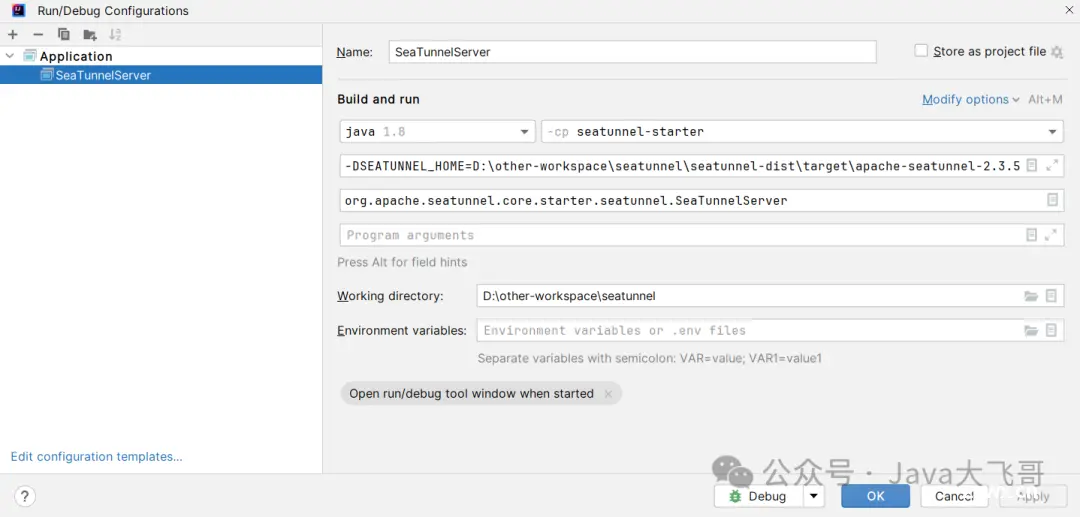
4.1配置运行seatunnel
环境变量和启动类配置
环境变量:这个是dis的target的二进制解压路径(运行家目录)
-DSEATUNNEL_HOME=D:\other-workspace\seatunnel\seatunnel-dist\target\apache-seatunnel-2.3.5-SNAPSHOT
4.2配置运行web
环境变量、jvm参数和启动类配置
环境变量:这个和seatunnel的是同一个
-DSEATUNNEL_HOME=D:\other-workspace\seatunnel\seatunnel-dist\target\apache-seatunnel-2.3.5-SNAPSHOT
jvm参数:是web-dis下的target的加压路径(运行家目录)
ST_WEB_BASEDIR_PATH=D:\other-workspace\seatunnel-web\seatunnel-web-dist\target\apache-seatunnel-web-1.0.0-SNAPSHOT
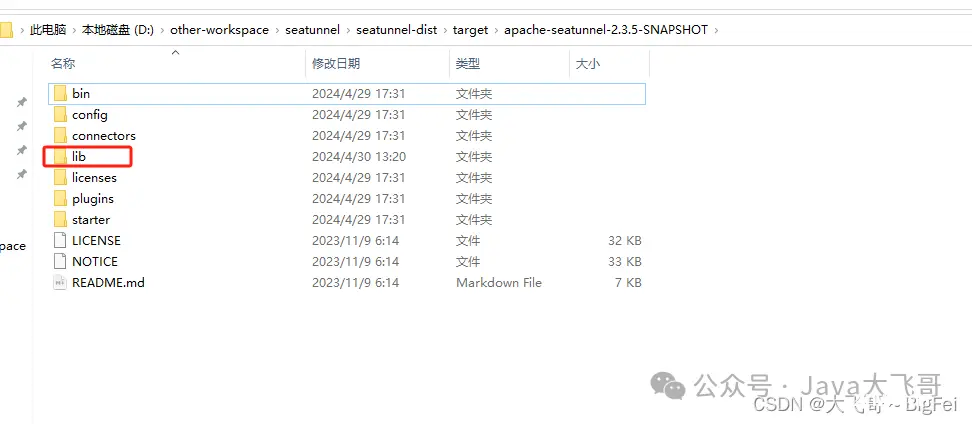
4.3 拷贝jar到seatunnel家目录的lib和web家目录的libs下
seatunnel的家目录:
web的家目录:
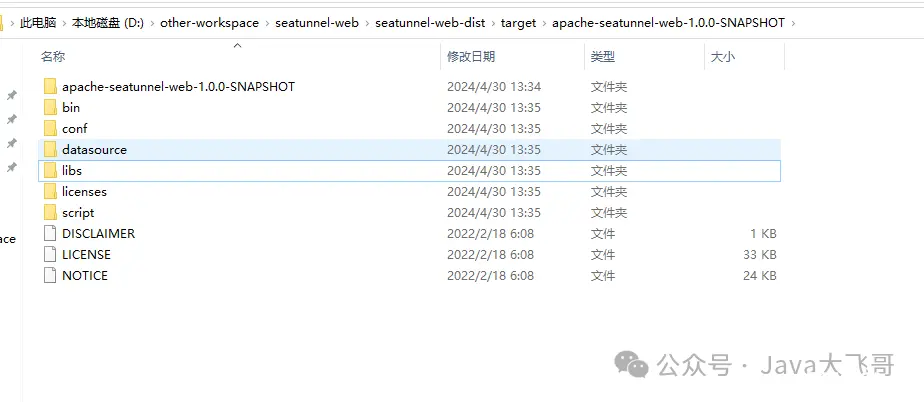
需要在这seatunnel家目录的lib和web家目录的libs下放入如下jar包:
mysql-connector-java-8.0.33.jar
datasource-jdbc-mysql-1.0.0-SNAPSHOT.jar
connector-jdbc-2.3.5-SNAPSHOT-2.12.15.jar
connector-cdc-mysql-2.3.5-SNAPSHOT-2.12.15.jar
其它的cdc也是一样的都要将所需要的jar放到这两个路径下,否则,缺少依赖运行会报错哦。
点击debug将两个项目启动起来,能正常启动就是ok的,seatunnel启动有一个hadoop的报错,不影响可以正常启动的,如果有hadoop环境就不会有hadoop的报错的。
4.4 ui编译运行注意事项
本机上安装的node、npm的版本需要大于等于web项目中规定的版本,否则会编译失败,如果版本过低,需要将web-dist的pom中的如下插件注释:
版本过低会编译打包会遇到如下错误:
[ERROR] Failed to execute goal com.github.eirslett:frontend-maven-plugin:1.11.3:npm (build) on project seatunnel-web-dist: Failed to
run task: 'npm run build:prod' failed. org.apache.commons.exec.ExecuteException: Process exited with an error: 1 (Exit value: 1) ->
解决:
<!--<plugin>
<groupId>com.github.eirslett</groupId>
<artifactId>frontend-maven-plugin</artifactId>
<version>1.11.3</version>
<configuration>
<workingDirectory>${project.basedir}/../seatunnel-ui</workingDirectory>
</configuration>
<executions>
<execution>
<id>install node and npm</id>
<goals>
<goal>install-node-and-npm</goal>
</goals>
<configuration>
<nodeVersion>v14.17.3</nodeVersion>
<npmVersion>6.14.13</npmVersion>
</configuration>
</execution>
<execution>
<id>install</id>
<goals>
<goal>npm</goal>
</goals>
<phase>generate-resources</phase>
<configuration>
<arguments>install --ignore-scripts</arguments>
</configuration>
</execution>
<execution>
<id>build</id>
<goals>
<goal>npm</goal>
</goals>
<configuration>
<arguments>run build:prod</arguments>
</configuration>
</execution>
</executions>
</plugin>-->
然后去升级本地安装的node、npm,先卸载低版本,然后安装最新稳定高版本,重重之重:配置node的环境变量,npm的环境变量,这个我之前的文章的评论里面有,或者去百度即可。然后将ui启动进行mysql-cdc的示例。
4.5mysql-cdc的示例
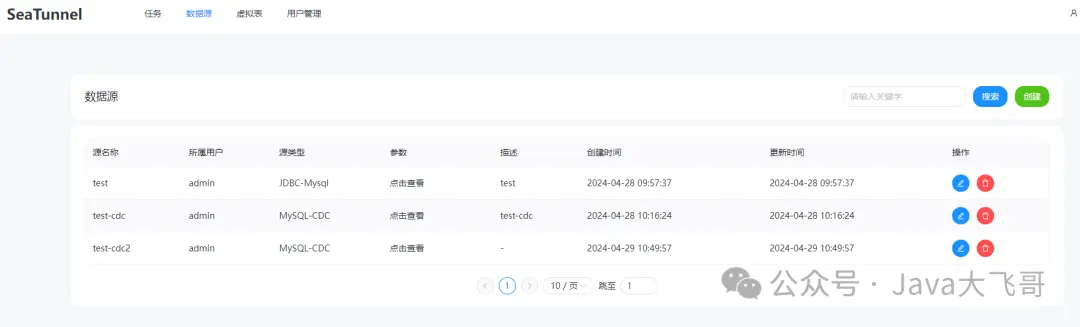
添加数据源
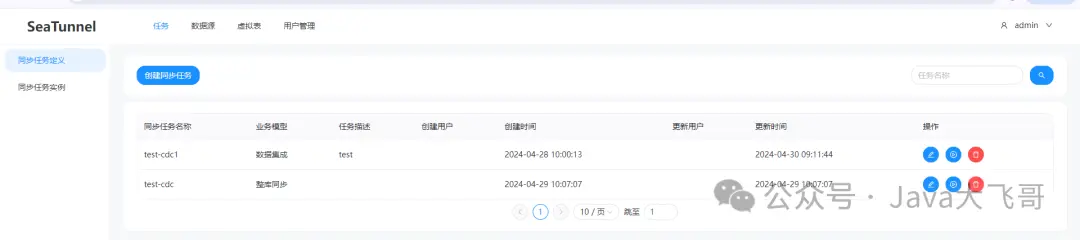
创建cdc任务
下面创建了两种类型的任务:数据集成和整库同步,任务报存类型必须是流式类型,如果选择批类型,运行会报不支持的错误,这个两个类型的任务唯一的区别就是数据集成只能选一张表,整库同步可以选多张表来进行cdc任务,源source的的数据源是一个mysql-cdc的一个数据源,而sink端的数据源是一个jdbc的数据源,所以在sink端只能选jdbc的数据源,不能选cdc的数据源,在进行cdc的时候需要检查msyql8的binlog监听是否开启,如果没有开启,需要开启mysql8.0的binlog监听。
任务执行现象和结论:
点击执行按钮后去目的地表查看,没有数据,过了一会后去查看目的地表有数据,然后改源表中的一条数据的一个字段的值,在去目的地表查看对应的字段也变更了,说明mysql-cdc单表cdc(先做全量后做增量和实时)的demo是成功了。
在web项目下会有一个profile里面会保存每次创建的任务的文件,下面是我随便找了一个用作demo文件,这个文件的内容都是web页面配置生成到这个profile下的:
env {
"job.mode"=STREAMING
"job.name"="SeaTunnel_Job"
}
source {
MySQL-CDC {
format=DEFAULT
"snapshot.split.size"=8096
"snapshot.fetch.size"=1024
"incremental.parallelism"=1
"connect.timeout.ms"=30000
"connect.max-retries"=3
"connection.pool.size"=20
"chunk-key.even-distribution.factor.lower-bound"=0.05
"chunk-key.even-distribution.factor.upper-bound"=100
"sample-sharding.threshold"=1000
"inverse-sampling.rate"=1000
"startup.mode"=INITIAL
"exactly_once"="true"
"stop.mode"=NEVER
parallelism=1
"result_table_name"=Table13434473575488
"dag-parsing.mode"=MULTIPLEX
catalog {
factory=Mysql
}
database-names=[
"xxxxx"
]
table-names=[
"xxxx.xx_order"
]
password="xxxx"
username=root
base-url="jdbc:mysql://xxxx:3306/seatunnel?useSSL=false&useUnicode=true&characterEncoding=utf-8&allowMultiQueries=true&allowPublicKeyRetrieval=true"
server-time-zone=UTC
}
}
transform {
}
sink {
Jdbc {
"schema_save_mode"="CREATE_SCHEMA_WHEN_NOT_EXIST"
"data_save_mode"="APPEND_DATA"
"connection_check_timeout_sec"=30
"batch_size"=1000
"is_exactly_once"="true"
"xa_data_source_class_name"=test-cdc1
"max_commit_attempts"=3
"transaction_timeout_sec"=-1
"auto_commit"="true"
"support_upsert_by_query_primary_key_exist"="true"
"multi_table_sink_replica"=1
"source_table_name"=Table13434473575488
"generate_sink_sql"=true
catalog {
factory=MySQL
username=root
password="xxx"
base-url="jdbc:mysql://xxxx:3306/seatunnel?useSSL=false&useUnicode=true&characterEncoding=utf-8&allowMultiQueries=true&allowPublicKeyRetrieval=true"
}
database="xxx_test"
url="jdbc:mysql://xxxxx:3306/seatunnel?useSSL=false&useUnicode=true&characterEncoding=utf-8&allowMultiQueries=true&allowPublicKeyRetrieval=true"
driver="com.mysql.cj.jdbc.Driver"
password="xxxxxx"
user=root
}
}
运行遇到一个报错:
Caused by: java.lang.ClassCastException: cannot assign instance of java.lang.Long to field org.apache.seatunnel.api.table.catalog.Column.columnLength of type java.lang.Integer in instance of org.apache.seatunnel.api.table.catalog.PhysicalColumn
这个报错是由于我之前把seatunnel的代码拉下来默认在dev分支,两边引擎的代码不一致导致,所以文章开头特别强调需要切换分支到2.3.4-release上,然后重新编译将seatunnel的jar拷贝到web项目新建的lib路径下统一管理外部jar下,重新编译web后跑起来运行两边的代码就是一致的了,web依赖seatunnel需要以seatunnel中编译的为主,否则就会有一些奇奇怪怪的问。
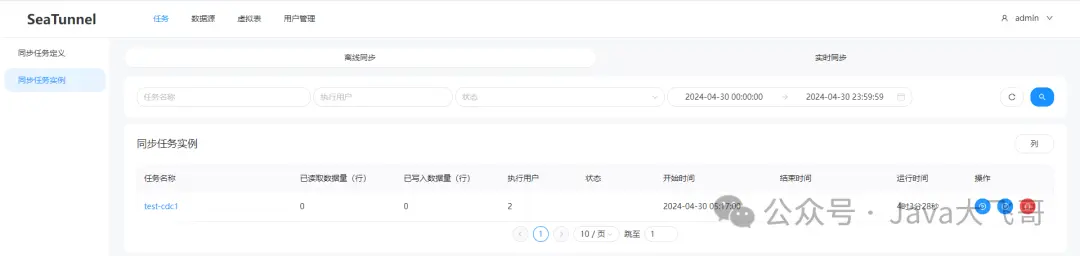
同步任务实例:
下面是一个历史任务执行可以查看的界面,由于我们配置的存储是localfile的,所以这个刷新这个同步任务实例或者点击里面的任务查看会报错,是因为这里的接口是去hdfs上找历史任务的jar包,本地没有hadoop环境所以会报错,特此说明,不影响我们mysql-cdc的操作的,正式环境有hadoop环境就没有这个问题了,这个是windows上本地编译运行需要hadoop环境,否则会报错,但是在linux环境不会,这个存储介质支持:hdfs、oss(阿里oss-hdfs)、s3等
5.总结
其实他的逻辑也简单的,就是根据主键唯一标识分割数据发给不同的节点上两阶段执行,每个节点都是执行source --> t —> sink,连接段提交事务才算完成一整个链路的数据同步的,如果是cdc的cdc的那个插件,拿mysql来讲是会监听binlog的日志变化,然后读取变化的数据发给节点sink根据主键更新,source的数据源是一个cdc的数据源,而且sink端的数据源是一个jdbc的数据源的;这个跟写业务代码处理数据同步有啥区别么?
比如说同步一张有几千万数据的一个单表,
第一步:分页根据id升序查出所有的id,(或者是查一个list,分割list给多个线程执行)
第二步:一页一个线程处理数据同步
第三部:加一个栅栏同步等待所有数据同步线程处理完成,然后主线程才算执行完成
思路是不是都大同小异:都是分割数据,多线程执行(分布式多节点执行任务),栅栏同步等待全部线程执行完成(两阶段事务,read + writ都之心完成才算执行成功,否则回退),根据主键分割数据,然后下发给多节点同步处理数据,在加一个两阶段事务,保证数据read + write 两边一致性,中间在做一个job的checkpoin(检查点) ,savepoint(保存点) 这两个都是涉及到任务执行的情况状态等信息的持久存储,所以可以存储在hdfs/oss(ali-hdfs-oss)/s3等分布式存储,可以多线程任务共享数据,无非可以在把filink / spark /自定义引擎 啥的搞一套,在一个加个插件发现机制
source + t + sink
这个三个端都有自己的不同数据源的实现,可以加载发现自己的jar包,无非搞了一个web控制台可视化管理任务,就这么简单的,这个设计思想是可以学习可借鉴,本文用之中方式适配了运行了一个mysql-cdc单表的数据同步,如果是其他的需要用这种方式去适配,如果有其它的api兼容性问题需要自己处理解决,我只是提供一种思路和方法,之前只搞了一个mysql-jdbc的单表数据同步,这次摸索搞了一个mysql-jdbc的单表数据同步,只要熟悉项目代码,能把项目本地编译运行起来就可以修改拓展源码,比如:你可以新增一个其他的数据源的支持,对写入数据的某一个字段值在sink的时候拼接一个字符串啥的需求也是可以做的等等等,或者你可以给官方贡献代码了。希望我的分享对你有所启发和帮助,请一键三连,么么么哒!
上一篇: WebView与JS的交互
下一篇: Vue3【二十一】Vue 路由模式(createWebHashHistory /createWebHistory )和RouterLink写法
本文标签
声明
本文内容仅代表作者观点,或转载于其他网站,本站不以此文作为商业用途
如有涉及侵权,请联系本站进行删除
转载本站原创文章,请注明来源及作者。