使用Docker搭建本地Nexus私有仓库
txzq 2024-07-01 12:07:06 阅读 78
0-1开始Java语言编程之路
一、Ubuntu下Java语言环境搭建
二、Ubuntu下Docker环境安装
三、使用Docker搭建本地Nexus Maven私有仓库
四、Ubuntu下使用VisualStudioCode进行Java开发
你需要Nexus
Java应用编译构建的一种主流方式就是通过Maven, Maven可以很方便的管理Java应用的各种依赖包。但是在默认情况下,maven在进行java应用编译的时候,会从maven远程仓库下载相应的依赖包。Maven公共仓库是在国外的,网络不好的情况下,依赖包的下载会相当的耗时,这时私有库就派上了用场。
通过Docker 快速搭建Nexus私有仓库
Nexus是一款开源的私有仓库,他们也提供了官方的docker镜像,使用docker部署起来非常的方便,不过也有一些小细节需要我们注意,下面我们一步一步来搭建这个本地私用库吧。
拉取最新Nexus镜像
docker pull sonatype/nexus3
docker images
REPOSITORY TAG IMAGE ID CREATED SIZE
prom/prometheus-linux-amd64 latest 051cb67876a6 6 days ago 262MB
apache/apisix 3.9.0-debian 5e90db4294cd 2 weeks ago 326MB
sonatype/nexus3 latest b630de26992b 4 months ago 570MB
hello-world latest d2c94e258dcb 11 months ago 13.3kB
bitnami/etcd 3.5.7 985a23c47893 12 months ago 146MB
我们可以看到 sonatype/nexus3这个镜像,570MB大小,所以下载的时候,需要一些时间,请大家耐心等待。
创建nexus数据卷
Nexus需要从远程仓库同步依赖库,所以需要持久化存储这些依赖库到本地,因此我们需要选创建一个数据卷。
另外,在Nexus第一次启动时,会在数据卷中创建初始密码文件,我们需要查看该文件,获得初始密码我们才能进行进一步的Nexus初始化工作。
#创建一个名为 nexus-data的数据卷
docker volume create --name nexus3
#查看数据卷信息
docker volume inspect nexus3
[
{
"CreatedAt": "2024-04-17T16:32:30+08:00",
"Driver": "local",
"Labels": null,
"Mountpoint": "/var/lib/docker/volumes/nexus3/_data",
"Name": "nexus3",
"Options": null,
"Scope": "local"
}
]
root@txzq1899-ubuntu: cd /var/lib/docker/volumes/nexus3/_data
root@txzq1899-ubuntu:/var/lib/docker/volumes/nexus3/_data# pwd
/var/lib/docker/volumes/nexus3/_data
root@txzq1899-ubuntu:/var/lib/docker/volumes/nexus3/_data# ll
总计 80
drwxr-xr-x 14 200 200 4096 4月 17 16:34 ./
drwx-----x 3 root root 4096 4月 17 16:32 ../
-rw-r--r-- 1 200 200 36 4月 17 16:33 admin.password
drwxr-xr-x 3 200 200 4096 4月 17 16:34 blobs/
drwxr-xr-x 336 200 200 12288 4月 17 16:33 cache/
drwxr-xr-x 7 200 200 4096 4月 17 16:33 db/
drwxr-xr-x 3 200 200 4096 4月 17 16:34 elasticsearch/
drwxr-xr-x 3 200 200 4096 4月 17 16:33 etc/
drwxr-xr-x 2 200 200 4096 4月 17 16:33 generated-bundles/
drwxr-xr-x 2 200 200 4096 4月 17 16:33 instances/
-rw-r--r-- 1 200 200 1 4月 17 16:33 karaf.pid
drwxr-xr-x 3 200 200 4096 4月 17 16:33 keystores/
-rw-r--r-- 1 200 200 14 4月 17 16:33 lock
drwxr-xr-x 3 200 200 4096 4月 17 16:34 log/
drwxr-xr-x 2 200 200 4096 4月 17 16:33 orient/
-rw-r--r-- 1 200 200 5 4月 17 16:33 port
drwxr-xr-x 2 200 200 4096 4月 17 16:33 restore-from-backup/
drwxr-xr-x 7 200 200 4096 4月 17 16:34 tmp/
root@txzq1899-ubuntu:/var/lib/docker/volumes/nexus3/_data#
这里要注意docker默认将数据卷存放在
/var/lib/docker/volumes 目录,而这个目录需要root权限才能访问。
创建并运行Nexus容器
–name nexus3
指定容器名称为 nexus3 -e NEXUS_CONTEXT=nexus
指定访问上下文,即通过http://localhost:8081/nexus访问 INSTALL4J_ADD_VM_PARAMS
调整JVM参数 -v nexus3:/nexus-data
映射数据卷
docker run -d -p 8081:8081 \
--name nexus3 -e NEXUS_CONTEXT=nexus \
-e INSTALL4J_ADD_VM_PARAMS="-Xms1024m -Xmx1024m -XX:MaxDirectMemorySize=1024m" \
-v nexus3:/nexus-data \
sonatype/nexus3
查看容器日志
#Nexus 初次启动会比较慢,我们可以查看nexus3的容器日志。
#当我们看到 Started Sonatype Nexus OSS 3.63.0-01
#就表示Nexus 已经启动成功了。
docker logs -f nexus3
2024-04-17 08:34:21,619+0000 INFO [jetty-main-1] *SYSTEM org.sonatype.nexus.siesta.SiestaServlet - JAX-RS RuntimeDelegate: org.sonatype.nexus.siesta.internal.resteasy.SisuResteasyProviderFactory@2cba0cc4
2024-04-17 08:34:21,663+0000 INFO [jetty-main-1] *SYSTEM org.jboss.resteasy.plugins.validation.i18n - RESTEASY008550: Unable to find CDI supporting ValidatorFactory. Using default ValidatorFactory
2024-04-17 08:34:23,205+0000 INFO [jetty-main-1] *SYSTEM org.sonatype.nexus.siesta.SiestaServlet - Initialized
2024-04-17 08:34:23,215+0000 INFO [jetty-main-1] *SYSTEM org.sonatype.nexus.repository.httpbridge.internal.ViewServlet - Initialized
2024-04-17 08:34:23,240+0000 INFO [FelixStartLevel] *SYSTEM org.sonatype.nexus.extender.NexusLifecycleManager - Start TASKS
2024-04-17 08:34:23,279+0000 INFO [jetty-main-1] *SYSTEM org.eclipse.jetty.server.handler.ContextHandler - Started o.e.j.w.WebAppContext@1705e4a6{ Sonatype Nexus,/nexus,file:///opt/sonatype/nexus/public/,AVAILABLE}
2024-04-17 08:34:23,404+0000 INFO [jetty-main-1] *SYSTEM org.eclipse.jetty.server.AbstractConnector - Started ServerConnector@195ab70a{ HTTP/1.1, (http/1.1)}{ 0.0.0.0:8081}
2024-04-17 08:34:23,405+0000 INFO [jetty-main-1] *SYSTEM org.eclipse.jetty.server.Server - Started @81852ms
2024-04-17 08:34:23,407+0000 INFO [jetty-main-1] *SYSTEM org.sonatype.nexus.bootstrap.jetty.JettyServer -
-------------------------------------------------
Started Sonatype Nexus OSS 3.63.0-01
-------------------------------------------------
2024-04-17 08:34:23,413+0000 INFO [FelixStartLevel] *SYSTEM org.sonatype.nexus.quartz.internal.task.QuartzTaskInfo - Task 'Metric aggregation' [content.usage.aggregation] : state=WAITING
2024-04-17 08:34:23,498+0000 INFO [FelixStartLevel] *SYSTEM org.sonatype.nexus.scheduling.TaskSchedulerImpl - Task 'Metric aggregation' [content.usage.aggregation] scheduled: cron
访问Nexus
先打开admin.password文件,复制初始密码
打开本地Nexus:
Local Nexus3
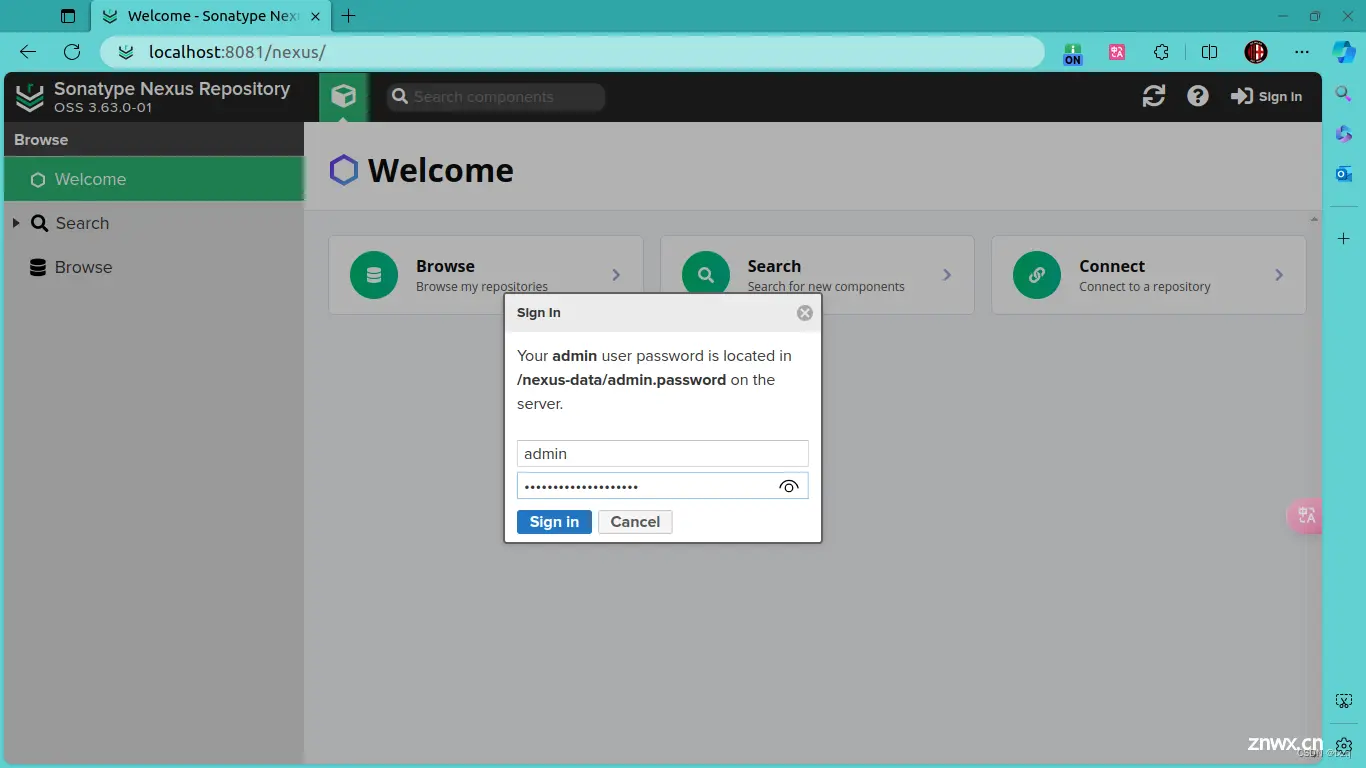
第一次登录后,会提示修改管理员密码
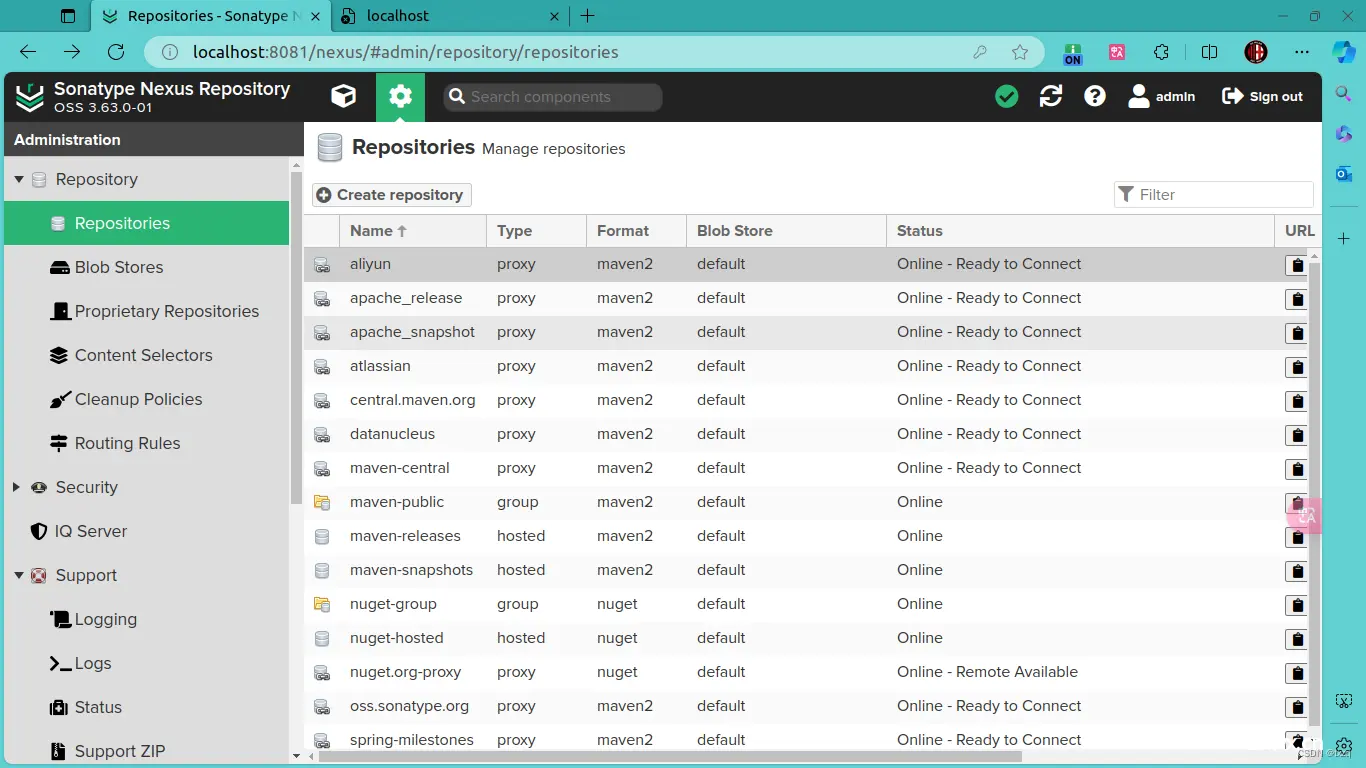
配置阿里云代理
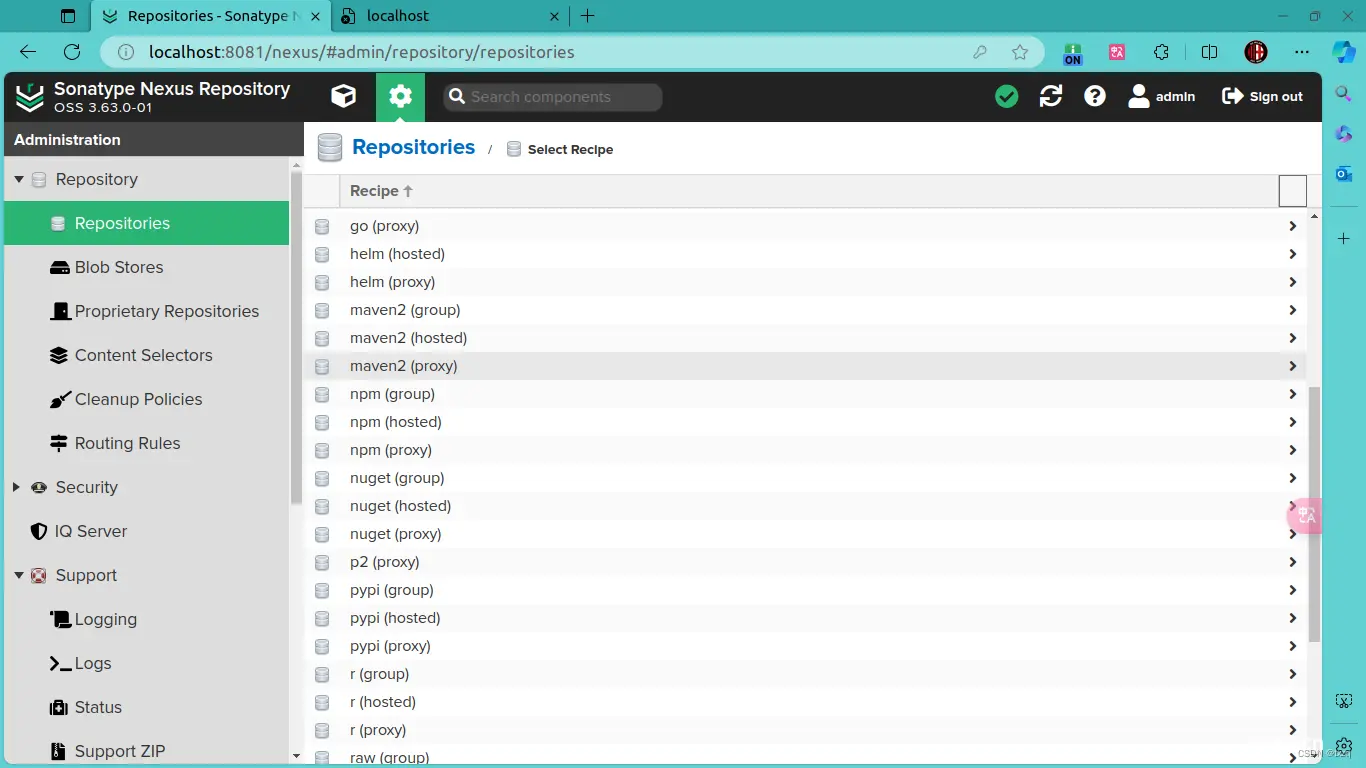
进到Repository设置页面,点Create Rrepository,
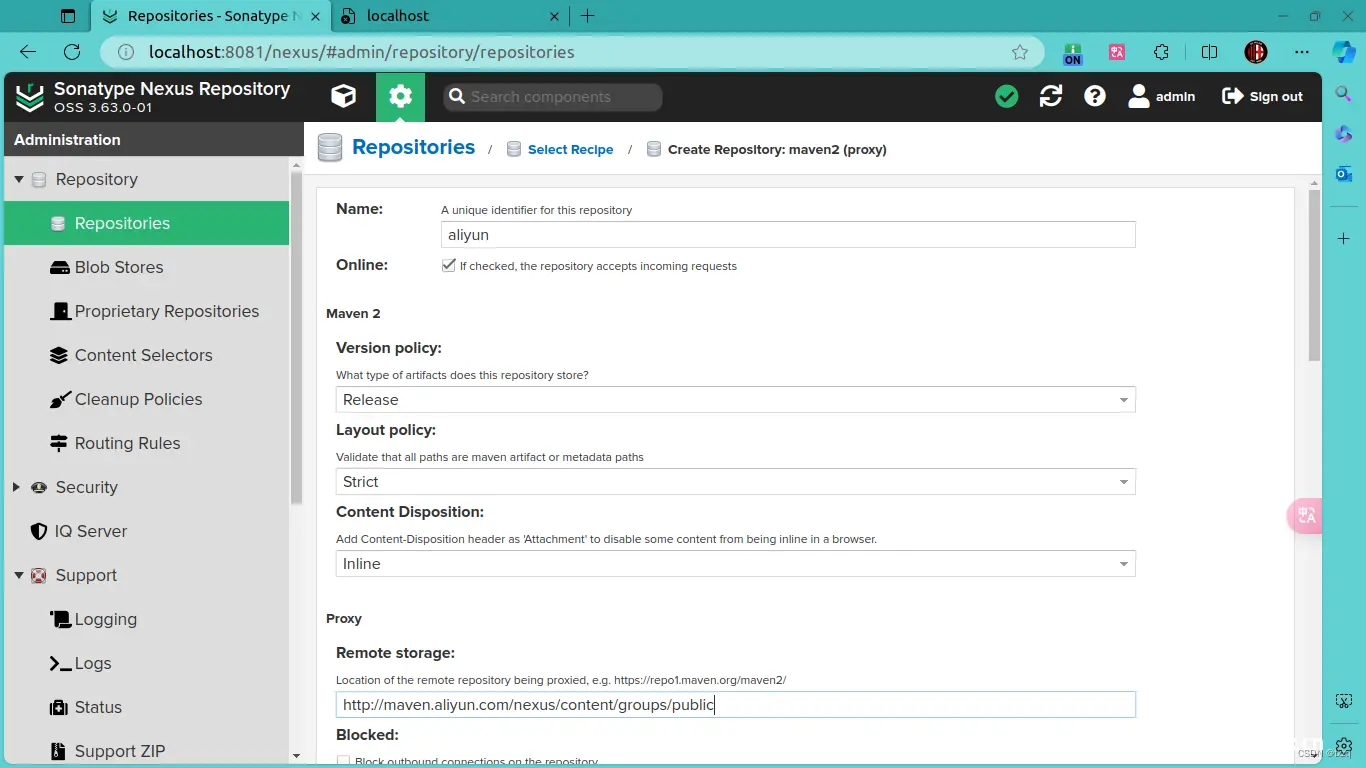
这里我们选择《maven2 proxy》
输入Name : aliyunProxy 设置,输入Remote storage :
http://maven.aliyun.com/nexus/content/groups/public
保存配置
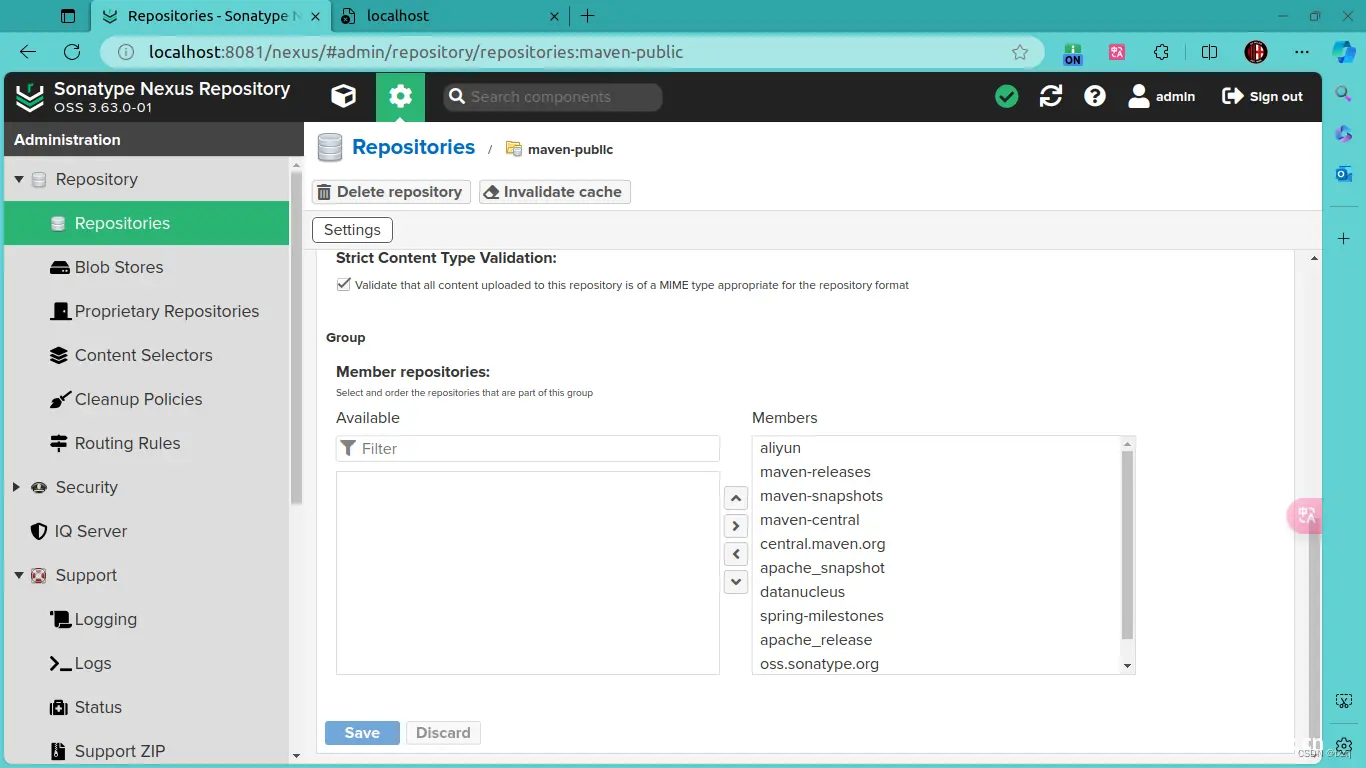
配置maven-public(group)
回到Repository管理页面,找到maven-public,并点击 maven-public进入编辑页面
在Member repositories 左则 Available List中的aliyun 添加右则的 Members中,并将aliyun 上移至第一的位置。点Save进行保存
测试验证
到这里本地的Nexus 私有库就已经基本上搭建好了。
在使用之前,首先要在maven的配置文件中使用我们本地的私有仓库
通常在~/.m2/目录下,有一个 setting.xml 文件,如果没有,请创建。
<?xml version="1.0" encoding="UTF-8"?>
<settings xmlns="http://maven.apache.org/SETTINGS/1.2.0"
xmlns:xsi="http://www.w3.org/2001/XMLSchema-instance"
xsi:schemaLocation="http://maven.apache.org/SETTINGS/1.2.0 https://maven.apache.org/xsd/settings-1.2.0.xsd">
<localRepository>/home/vian/Dev_Environment/maven_repository</localRepository>
<servers>
<server>
<id>maven-releases</id>
<username>nexus-user</username>
<password>hello-world</password>
</server>
<server>
<id>maven-snapshots</id>
<username>nexus-user</username>
<password>hello-world</password>
</server>
<server>
<id>nexus</id>
<username>nexus-user</username>
<password>hello-world</password>
</server>
<server>
<id>maven-central</id>
<username>nexus-user</username>
<password>hello-world</password>
</server>
</servers>
<mirrors>
<mirror>
<id>maven-default-http-blocker</id>
<mirrorOf>external:http:*</mirrorOf>
<name>Pseudo repository to mirror external repositories initially using HTTP.</name>
<url>http://0.0.0.0/</url>
<blocked>true</blocked>
</mirror>
<mirror>
<id>nexus</id>
<name>本地Nexus私有仓库镜像</name>
<url>http://localhost:8081/nexus/repository/maven-public/</url>
<mirrorOf>*,!spring-milestones</mirrorOf>
</mirror>
</mirrors>
<profiles>
<profile>
<id>txzq-dev</id>
<repositories>
<repository>
<id>nexus</id>
<name>Public Repositories</name>
<url>http://localhost:8081/nexus/repository/maven-public/</url>
<releases>
<enabled>true</enabled>
</releases>
</repository>
<repository>
<id>maven-central</id>
<name>Central Repositories</name>
<url>http://localhost:8081/nexus/repository/maven-central/</url>
<releases>
<enabled>true</enabled>
</releases>
<snapshots>
<enabled>false</enabled>
</snapshots>
</repository>
<repository>
<id>maven-releases</id>
<name>Release Repositories</name>
<url>http://localhost:8081/nexus/repository/maven-releases/</url>
<releases>
<enabled>true</enabled>
</releases>
<snapshots>
<enabled>false</enabled>
</snapshots>
</repository>
<repository>
<id>maven-snapshots</id>
<name>Snapshot Repositories</name>
<url>http://localhost:8081/nexus/repository/maven-snapshots/</url>
<releases>
<enabled>true</enabled>
</releases>
<snapshots>
<enabled>true</enabled>
</snapshots>
</repository>
</repositories>
</profile>
</profiles>
<activeProfiles>
<activeProfile>txzq-dev</activeProfile>
</activeProfiles>
</settings>
我们通过Visual Studio Code 创建一个SpringBoot 项目,并找开该项目。
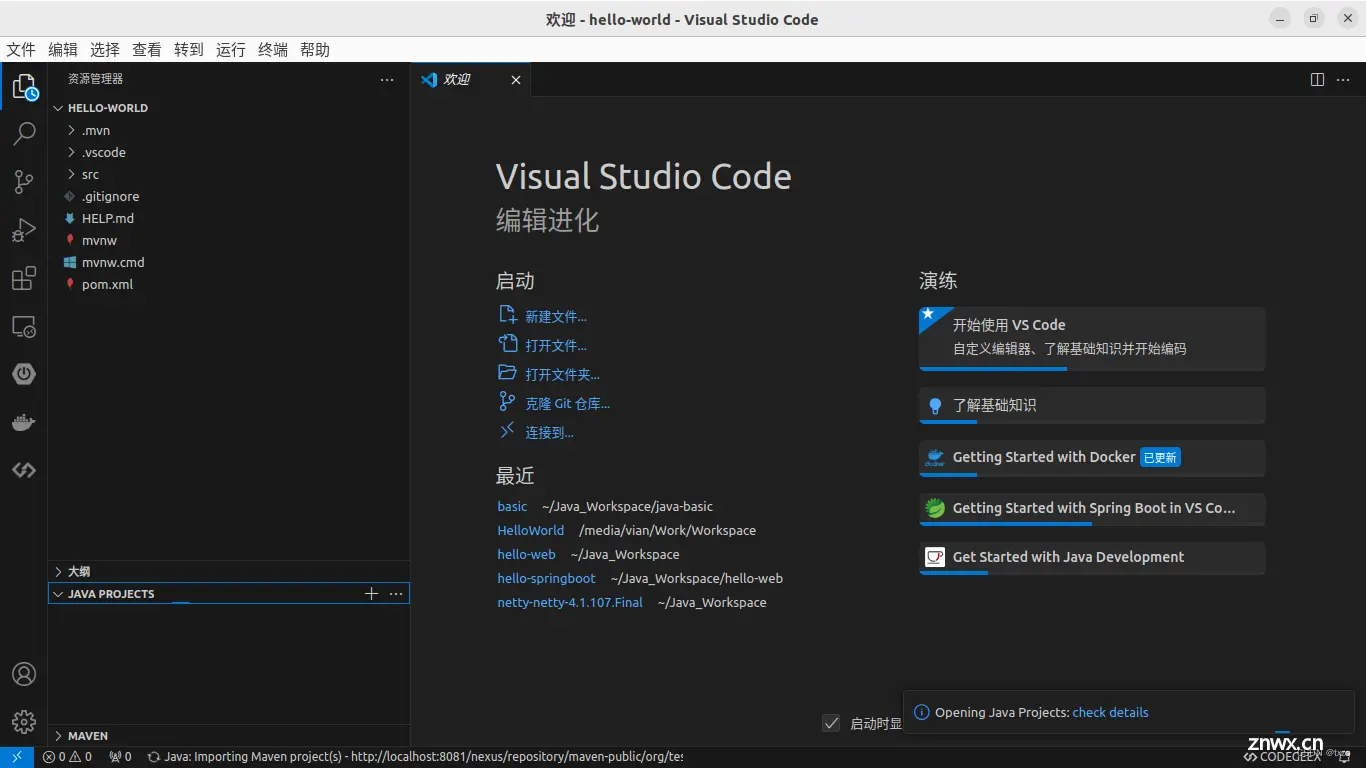
打开一个终端,通过Maven进行一次编译
mvn clean install
查看编译过程,我们可以看到在repackage阶段,已经从本地nexus下载依赖包了。
vian@txzq1899-ubuntu:/media/vian/Work/Workspace/hello-world$ mvn clean install
[INFO] Scanning for projects...
[INFO]
[INFO] ------------------------< com.txzq:hello-world >------------------------
[INFO] Building hello-world 0.0.1-SNAPSHOT
[INFO] from pom.xml
[INFO] --------------------------------[ jar ]---------------------------------
[INFO]
[INFO] --- clean:3.3.2:clean (default-clean) @ hello-world ---
[INFO] Deleting /media/vian/Work/Workspace/hello-world/target
[INFO]
[INFO] --- resources:3.3.1:resources (default-resources) @ hello-world ---
[INFO] Copying 1 resource from src/main/resources to target/classes
[INFO] Copying 0 resource from src/main/resources to target/classes
[INFO]
[INFO] --- compiler:3.11.0:compile (default-compile) @ hello-world ---
[INFO] Changes detected - recompiling the module! :source
[INFO] Compiling 1 source file with javac [debug release 17] to target/classes
[INFO]
[INFO] --- resources:3.3.1:testResources (default-testResources) @ hello-world ---
[INFO] skip non existing resourceDirectory /media/vian/Work/Workspace/hello-world/src/test/resources
[INFO]
[INFO] --- compiler:3.11.0:testCompile (default-testCompile) @ hello-world ---
[INFO] Changes detected - recompiling the module! :dependency
[INFO] Compiling 1 source file with javac [debug release 17] to target/test-classes
[INFO]
[INFO] --- surefire:3.1.2:test (default-test) @ hello-world ---
[INFO] Using auto detected provider org.apache.maven.surefire.junitplatform.JUnitPlatformProvider
[INFO]
[INFO] -------------------------------------------------------
[INFO] T E S T S
[INFO] -------------------------------------------------------
[INFO] Running com.txzq.helloworld.HelloWorldApplicationTests
19:28:21.256 [main] INFO org.springframework.test.context.support.AnnotationConfigContextLoaderUtils -- Could not detect default configuration classes for test class [com.txzq.helloworld.HelloWorldApplicationTests]: HelloWorldApplicationTests does not declare any static, non-private, non-final, nested classes annotated with @Configuration.
19:28:21.413 [main] INFO org.springframework.boot.test.context.SpringBootTestContextBootstrapper -- Found @SpringBootConfiguration com.txzq.helloworld.HelloWorldApplication for test class com.txzq.helloworld.HelloWorldApplicationTests
. ____ _ __ _ _
/\\ / ___'_ __ _ _(_)_ __ __ _ \ \ \ \
( ( )\___ | '_ | '_| | '_ \/ _` | \ \ \ \
\\/ ___)| |_)| | | | | || (_| | ) ) ) )
' |____| .__|_| |_|_| |_\__, | / / / /
=========|_|==============|___/=/_/_/_/
:: Spring Boot :: (v3.2.4)
2024-04-17T19:28:21.903+08:00 INFO 183809 --- [hello-world] [ main] c.t.h.HelloWorldApplicationTests : Starting HelloWorldApplicationTests using Java 17.0.9 with PID 183809 (started by vian in /media/vian/Work/Workspace/hello-world)
2024-04-17T19:28:21.905+08:00 INFO 183809 --- [hello-world] [ main] c.t.h.HelloWorldApplicationTests : No active profile set, falling back to 1 default profile: "default"
2024-04-17T19:28:23.656+08:00 INFO 183809 --- [hello-world] [ main] c.t.h.HelloWorldApplicationTests : Started HelloWorldApplicationTests in 2.067 seconds (process running for 3.35)
Java HotSpot(TM) 64-Bit Server VM warning: Sharing is only supported for boot loader classes because bootstrap classpath has been appended
[INFO] Tests run: 1, Failures: 0, Errors: 0, Skipped: 0, Time elapsed: 3.697 s -- in com.txzq.helloworld.HelloWorldApplicationTests
[INFO]
[INFO] Results:
[INFO]
[INFO] Tests run: 1, Failures: 0, Errors: 0, Skipped: 0
[INFO]
[INFO]
[INFO] --- jar:3.3.0:jar (default-jar) @ hello-world ---
[INFO] Building jar: /media/vian/Work/Workspace/hello-world/target/hello-world-0.0.1-SNAPSHOT.jar
[INFO]
[INFO] --- spring-boot:3.2.4:repackage (repackage) @ hello-world ---
Downloading from nexus: http://localhost:8081/nexus/repository/maven-public/org/springframework/boot/spring-boot-buildpack-platform/3.2.4/spring-boot-buildpack-platform-3.2.4.pom
Downloaded from nexus: http://localhost:8081/nexus/repository/maven-public/org/springframework/boot/spring-boot-buildpack-platform/3.2.4/spring-boot-buildpack-platform-3.2.4.pom (3.2 kB at 2.7 kB/s)
Downloading from nexus: http://localhost:8081/nexus/repository/maven-public/org/springframework/boot/spring-boot-loader-tools/3.2.4/spring-boot-loader-tools-3.2.4.pom
Downloaded from nexus: http://localhost:8081/nexus/repository/maven-public/org/springframework/boot/spring-boot-loader-tools/3.2.4/spring-boot-loader-tools-3.2.4.pom (2.2 kB at 4.7 kB/s)
Downloading from nexus: http://localhost:8081/nexus/repository/maven-public/org/springframework/boot/spring-boot-buildpack-platform/3.2.4/spring-boot-buildpack-platform-3.2.4.jar
Downloaded from nexus: http://localhost:8081/nexus/repository/maven-public/org/springframework/boot/spring-boot-buildpack-platform/3.2.4/spring-boot-buildpack-platform-3.2.4.jar (272 kB at 331 kB/s)
Downloading from nexus: http://localhost:8081/nexus/repository/maven-public/org/springframework/boot/spring-boot-loader-tools/3.2.4/spring-boot-loader-tools-3.2.4.jar
Downloaded from nexus: http://localhost:8081/nexus/repository/maven-public/org/springframework/boot/spring-boot-loader-tools/3.2.4/spring-boot-loader-tools-3.2.4.jar (434 kB at 732 kB/s)
[INFO] Replacing main artifact /media/vian/Work/Workspace/hello-world/target/hello-world-0.0.1-SNAPSHOT.jar with repackaged archive, adding nested dependencies in BOOT-INF/.
[INFO] The original artifact has been renamed to /media/vian/Work/Workspace/hello-world/target/hello-world-0.0.1-SNAPSHOT.jar.original
[INFO]
[INFO] --- install:3.1.1:install (default-install) @ hello-world ---
[INFO] Installing /media/vian/Work/Workspace/hello-world/pom.xml to /home/vian/Dev_Environment/maven_repository/com/txzq/hello-world/0.0.1-SNAPSHOT/hello-world-0.0.1-SNAPSHOT.pom
[INFO] Installing /media/vian/Work/Workspace/hello-world/target/hello-world-0.0.1-SNAPSHOT.jar to /home/vian/Dev_Environment/maven_repository/com/txzq/hello-world/0.0.1-SNAPSHOT/hello-world-0.0.1-SNAPSHOT.jar
[INFO] ------------------------------------------------------------------------
[INFO] BUILD SUCCESS
[INFO] ------------------------------------------------------------------------
[INFO] Total time: 12.542 s
[INFO] Finished at: 2024-04-17T19:28:29+08:00
[INFO] ------------------------------------------------------------------------
声明
本文内容仅代表作者观点,或转载于其他网站,本站不以此文作为商业用途
如有涉及侵权,请联系本站进行删除
转载本站原创文章,请注明来源及作者。