Qml 实现瀑布流布局
cnblogs 2024-09-11 08:09:00 阅读 55

最近在刷掘金的时候看到一篇关于瀑布流布局的文章,然鹅他们的实现都是前端的那套,就想着 Qml 有没有类似实现。
结果百度了一圈也没有( T_T Qml 凉了凉了 ),于是,我按照自己理解,简单实现了一个 Qml 版的瀑布流布局。
【写在前面】
最近在刷掘金的时候看到一篇关于瀑布流布局的文章,然鹅他们的实现都是前端的那套,就想着 Qml 有没有类似实现。
结果百度了一圈也没有( T_T Qml 凉了凉了 ),于是,我按照自己理解,简单实现了一个 Qml 版的瀑布流布局。
关于瀑布流:
瀑布流布局(Waterfall Layout),也被称为瀑布式布局或多栏自适应布局,是一种网页布局技术,它允许内容以多列的形式显示,类似于瀑布一样从上到下流动。这种布局方式特别适合于展示图片或卡片式内容,如图片库、新闻摘要、商品列表等。
瀑布流布局的特点包括:
<li>多列显示:内容被分割成多列,每列可以独立滚动,使得页面可以展示更多的信息。
- 动态宽度:每列的宽度通常是固定的,而内容块(如图片或卡片)的宽度可以是动态的,以适应不同的屏幕大小。
- 不等高:内容块的高度可以不同,这样可以使布局看起来更加自然和有吸引力。
- 响应式:布局可以根据用户的屏幕尺寸自动调整,以提供最佳的浏览体验。
- 灵活性:内容块可以自由地在列之间流动,不需要严格的对齐。
【正文开始】
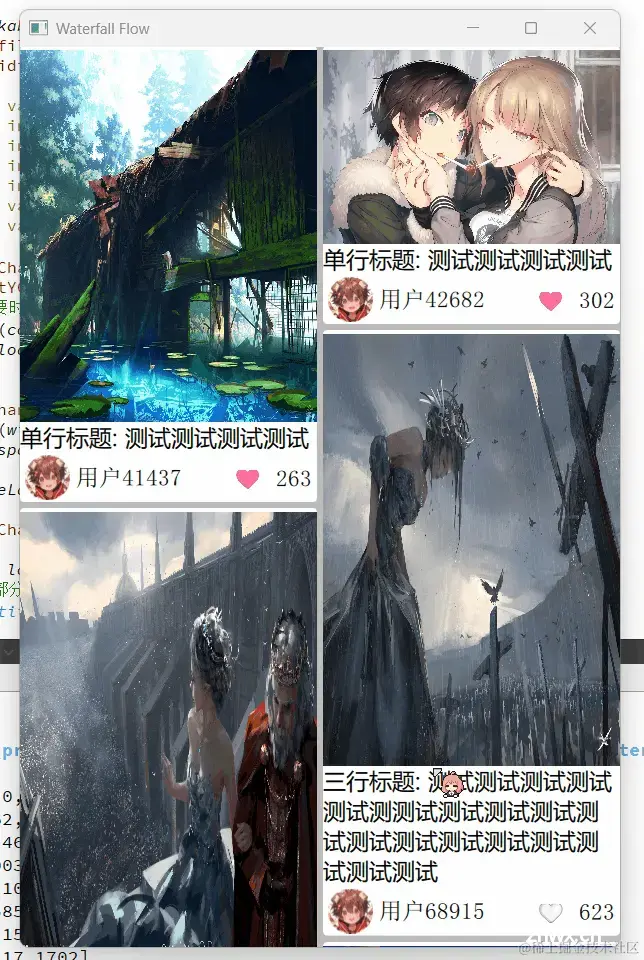
一个经典的瀑布流布局来自小红书:

而我们实现的 Qml 版效果图如下:
现在开始讲解思路:
首先考虑屏幕宽度,竖屏两列,横屏可以三列或者更多,应当根据宽度动态改变,然后便可以计算出列宽:
<code>width: (flickable.width - flickable.spacing) / flickable.column
因此,其实未知的仅有卡片高度:
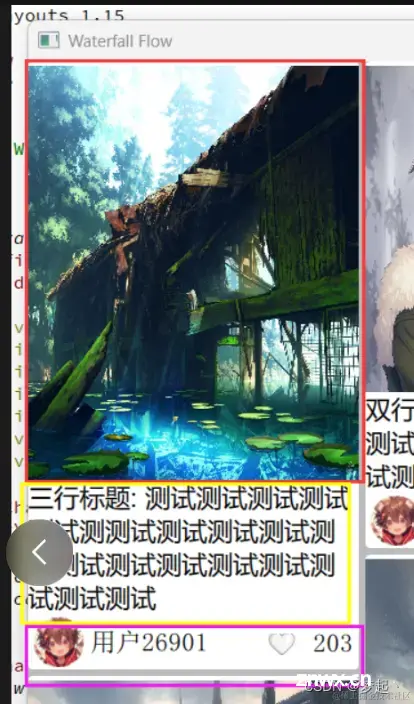
如图所示,卡片高度由三部分组成:<code>【封面图片高度】+【标题高度】+【卡片信息高度】。
height: coverRealHeight + titleHeight + infoHeight
现在有了宽高,接下来只要计算出 位置 (x, y) 即可:
if (flickable.currentColumn == flickable.column) {
flickable.currentColumn = 0;
flickable.currentX = 0;
for (let i = 0; i < flickable.column; i++) {
flickable.currentY[i] += flickable.prevHeight[i];
}
}
x = flickable.currentX;
y = flickable.currentY[flickable.currentColumn];
flickable.prevHeight[flickable.currentColumn] = Math.round(height + flickable.spacing);
print(flickable.currentColumn, flickable.currentX, flickable.prevHeight, flickable.currentY);
flickable.currentX += coverRealWidth + flickable.spacing;
flickable.currentColumn++;
let max = 0;
for (let j = 0; j < flickable.column; j++) {
max = Math.max(flickable.prevHeight[j] + flickable.currentY[j]);
}
flickable.contentHeight = max;
x 坐标计算思路是:从左往右依次增加一个卡片宽度,到达本行最后一个卡片时置零即可。
y坐标计算思路是:记录下本行卡片高度数组 prevHeight[column],到达本行最后一个卡片时计算下行卡片 y 坐标数组 currentY[column],而首行则为 0。
至此,Rect (x, y, width, height) 全部已知,我们可以直接利用 Repeater 轻松实例化出来:
Repeater {
id: repeater
model: ListModel {
id: listModel
Component.onCompleted: {
flickable.loadMore();
}
}
delegate: Rectangle {
id: rootItem
width: (flickable.width - flickable.spacing) / flickable.column
height: coverRealHeight + titleHeight + infoHeight
radius: 4
clip: true
property real aspectRatio: coverWidth / coverHeight
property real coverRealWidth: width
property real coverRealHeight: width / aspectRatio
property real titleWidth: width
property real titleHeight: titleText.height
property real infoWidth: width
property real infoHeight: 50
Component.onCompleted: {
if (flickable.currentColumn == flickable.column) {
flickable.currentColumn = 0;
flickable.currentX = 0;
for (let i = 0; i < flickable.column; i++) {
flickable.currentY[i] += flickable.prevHeight[i];
}
}
x = flickable.currentX;
y = flickable.currentY[flickable.currentColumn];
flickable.prevHeight[flickable.currentColumn] = Math.round(height + flickable.spacing);
print(flickable.currentColumn, flickable.currentX, flickable.prevHeight, flickable.currentY);
flickable.currentX += coverRealWidth + flickable.spacing;
flickable.currentColumn++;
let max = 0;
for (let j = 0; j < flickable.column; j++) {
max = Math.max(flickable.prevHeight[j] + flickable.currentY[j]);
}
flickable.contentHeight = max;
}
Column {
Item {
id: coverPort
width: coverRealWidth
height: coverRealHeight
Image {
anchors.fill: parent
anchors.topMargin: rootItem.radius
source: cover
}
}
Item {
id: titlePort
width: titleWidth
height: titleText.height
Text {
id: titleText
width: parent.width
wrapMode: Text.WrapAnywhere
text: title
font.family: "微软雅黑"
font.pointSize: 14
}
}
Item {
id: infoPort
width: infoWidth
height: infoHeight
RowLayout {
anchors.fill: parent
CircularImage {
id: head
Layout.preferredWidth: parent.height - 5
Layout.preferredHeight: parent.height - 5
Layout.leftMargin: 5
Layout.alignment: Qt.AlignVCenter
source: "file:/C:/Users/mps95/Desktop/head.jpg"
}
Text {
Layout.fillWidth: true
Layout.fillHeight: true
text: "用户" + user
font.pointSize: 14
verticalAlignment: Text.AlignVCenter
elide: Text.ElideRight
}
Text {
Layout.preferredWidth: 100
Layout.preferredHeight: parent.height
Layout.rightMargin: 5
text: (like ? "🩷" : "🤍") + " " + Math.round(Math.random() * 1000)
font.pointSize: 14
horizontalAlignment: Text.AlignRight
verticalAlignment: Text.AlignVCenter
property int like: Math.round(Math.random())
}
}
}
}
}
}
loadMore() 是向后台请求更多的卡片数据,这部分需要根据实际需求进行改造,我这里就简单生成了一些模拟数据:
function loadMore() {
//这部分来自后台请求, 必须知道封面宽高
let titleList = [
"单行标题: 测试测试测试测试",
"双行标题: 测试测试测试测试测试测测试测试测试测试测试测试",
"三行标题: 测试测试测试测试测试测测试测试测试测试测试测试测试测试测试测试测试测试测试"
];
for (let i = 0; i < 10; i++) {
let userId = Math.round(Math.random() * 100000);
let type = Math.round(Math.random()); //0 image / 1 video
let cover = "file:/C:/Users/mps95/Desktop/素材/动漫图片/img2" + i + ".jpg"; //封面, 无论视频还是图片都需要有
let url = cover;
if (type == 1) {
//url = "file:/test.mp4";
}
let object = {
type: type,
cover: cover,
user: userId,
url: url,
title: titleList[Math.round(Math.random() * 2)],
coverWidth: 300,
coverHeight: (type + 2) * 100 + Math.round(Math.random() * 3) * 80
};
jsonData.push(object);
listModel.append(object);
}
}
【结语】
最后:项目链接(多多star呀..⭐_⭐):
Github 的 WaterfallFlow 瀑布流视图(并且可以自适应),类似小红书
注意: 测试用的图片没有包含在内,请改为自己的测试集。
声明
本文内容仅代表作者观点,或转载于其他网站,本站不以此文作为商业用途
如有涉及侵权,请联系本站进行删除
转载本站原创文章,请注明来源及作者。