Spring MVC 中 HttpMessageConverter 转换器
cnblogs 2024-07-14 08:09:00 阅读 84
1. Spring MVC 中 HttpMessageConverter 转换器
@
目录
- 1. Spring MVC 中 HttpMessageConverter 转换器
- 2. 补充:什么是 HTTP 消息
- 3. 转换器
- 3.1 转换器转换的是什么
- 4. Spring MVC中的 AJAX 请求
- 5. @ResponseBody 将服务器端的 return 返回值转化为“字符串(JSON格式的字符串)”再返回给客户端
- 6. 补充:@RestController = (@Controller + @ResponseBody )
- 7. @RequestBody 将前端的请求体的信息转换Java程序中的 POJO对象
- 7.1 MappingJackson2HttpMessageConverter 将前端提交的 JSON 格式的字符串,转换为 Java程序中的POJO对象
- 8. RequestEntity 类
- 9. ResponseEntity 类
- 10. 总结:
- 11. 最后:
2. 补充:什么是 HTTP 消息
HTTP 消息其实就是 HTTP 协议。HTTP 协议包括 <code>请求协议 和 响应协议。
以下是一份HTTP POST请求协议:
POST /springmvc/user/login HTTP/1.1--请求行
Content-Type: application/x-www-form-urlencoded--请求头
Content-Length: 32
Host: www.example.com
User-Agent: Mozilla/5.0
Connection: Keep-Alive
Accept: text/html,application/xhtml+xml,application/xml;q=0.9,*/*;q=0.8
--空白行
username=admin&password=1234--请求体
以下是一份HTTP GET请求协议:
GET /springmvc/user/del?id=1&name=zhangsan HTTP/1.1--请求行
Host: www.example.com--请求头
User-Agent: Mozilla/5.0
Connection: Keep-Alive
Accept: text/html,application/xhtml+xml,application/xml;q=0.9,*/*;q=0.8
以下是一份HTTP响应协议:
HTTP/1.1 200 OK--状态行
Date: Thu, 01 Jul 2021 06:35:45 GMT--响应头
Content-Type: text/plain; charset=utf-8
Content-Length: 12
Connection: keep-alive
Server: Apache/2.4.43 (Win64) OpenSSL/1.1.1g
--空白行
<!DOCTYPE html>--响应体
<html>
<head>
<title>hello</title>
</head>
<body>
<h1>Hello World!</h1>
</body>
</html>
3. 转换器
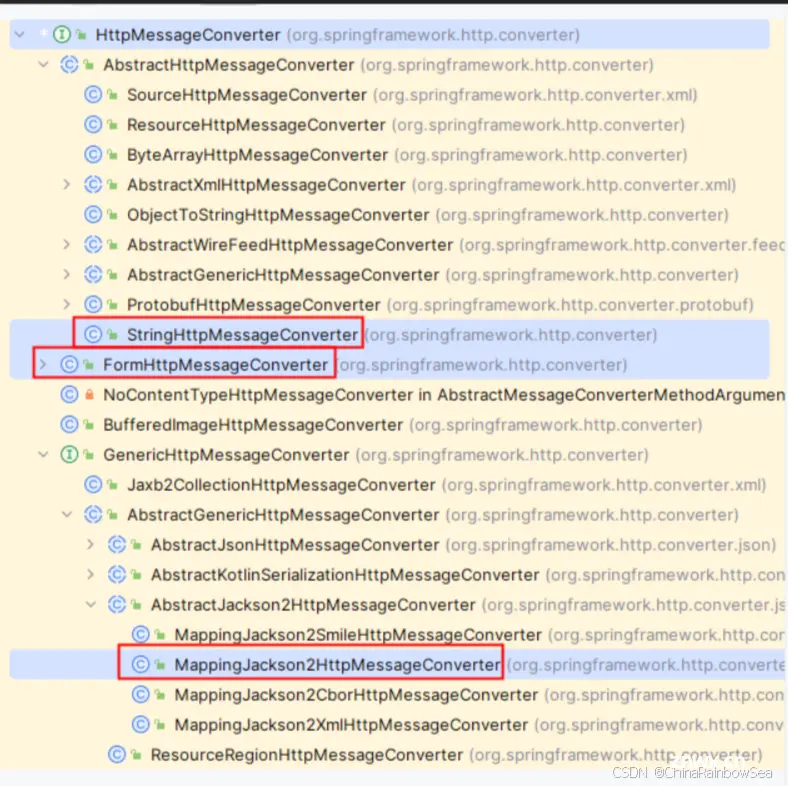
HttpMessageConverter 是 Spring MVC 中非常重要的一个接口。翻译为:HTTP消息转换器。
该接口下提供了很多实现类,不同的实现类有不同的转换方式。
3.1 转换器转换的是什么
转换的是<code>HTTP协议与
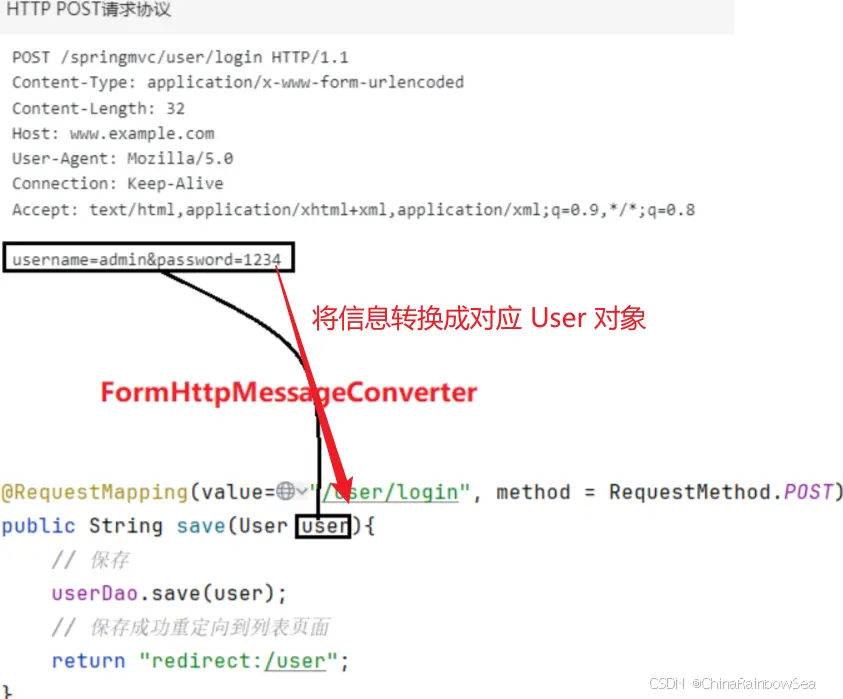
Java程序中的对象之间的互相转换。请看下图:
上图是我们之前经常写的代码。请求体中的数据是如何转换成 user 对象的,底层实际上使用了 <code>HttpMessageConverter 接口的其中的一个实现类
FormHttpMessageConverter。
通过上图可以看出
FormHttpMessageConverter是负责将请求协议转换为Java对象的。
上图的代码也是之前我们经常写的,Controller 返回值看做逻辑视图名称,视图解析器将其转换成物理视图名称,生成视图对象,<code>StringHttpMessageConverter 负责将视图对象中的 HTML 字符串写入到 HTTP协议的响应体中。最终完成响应。
通过上图可以看出
StringHttpMessageConverter是负责将Java对象转换为响应协议的。
通过以上内容的学习,大家应该能够了解到 HttpMessageConverter接口是用来做什么的了:

如上图所示:HttpMessageConverter 接口的可以将请求协议转换成 Java对象;也可以把 Java对象转换为响应协议。
HttpMessageConverter 是接口,Spring MVC 帮我们提供了非常多而丰富的实现类。每个实现类都有自己不同的转换风格。
对于我们程序员来说,Spring MVC 已经帮助我们写好了,我们只需要在不同的业务场景下,选择合适的HTTP消息转换器即可。
怎么选择呢?当然是通过 Spring MVC 为我们提供的注解,我们通过使用不同的注解来启用不同的消息转换器。
我们重点牢牢把握住下面的这两个注解,两个类 ;
- 两个注解:
@ResponseBody
@RequestBody
- 两个类:
ResponseEntity
RequestEntity
4. Spring MVC中的 AJAX 请求
SpringMVC+Vue3+Thymeleaf+Axios发送一个简单的AJAX请求。
引入 Vue 和 Axios的js文件:
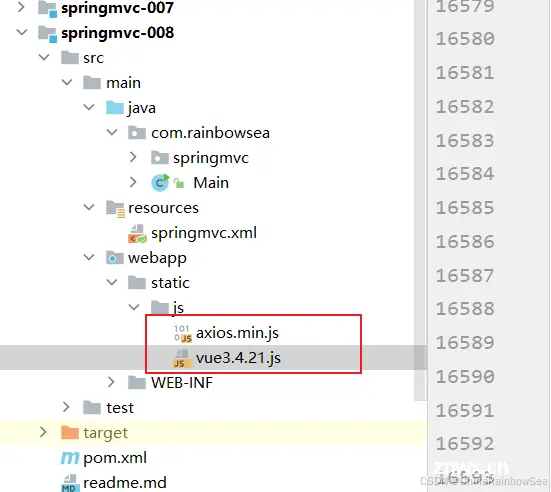
导入相关的 jar 依赖
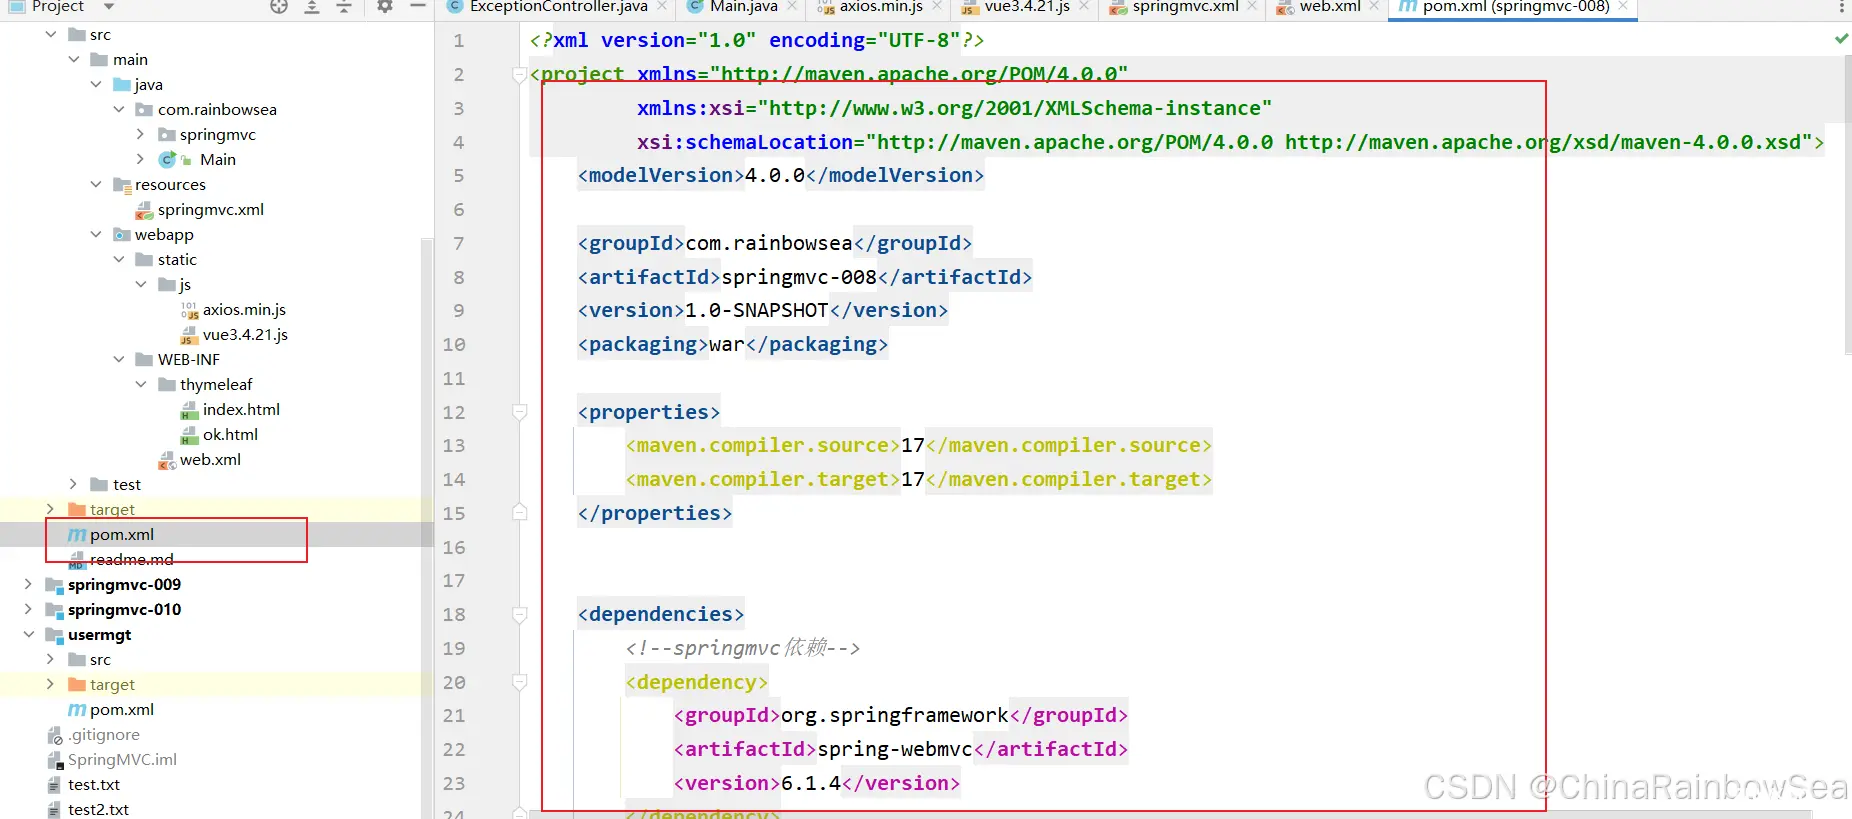
<code><?xml version="1.0" encoding="UTF-8"?>code>
<project xmlns="http://maven.apache.org/POM/4.0.0"code>
xmlns:xsi="http://www.w3.org/2001/XMLSchema-instance"code>
xsi:schemaLocation="http://maven.apache.org/POM/4.0.0 http://maven.apache.org/xsd/maven-4.0.0.xsd">code>
<modelVersion>4.0.0</modelVersion>
<groupId>com.rainbowsea</groupId>
<artifactId>springmvc-008</artifactId>
<version>1.0-SNAPSHOT</version>
<packaging>war</packaging>
<properties>
<maven.compiler.source>17</maven.compiler.source>
<maven.compiler.target>17</maven.compiler.target>
</properties>
<dependencies>
<!--springmvc依赖-->
<dependency>
<groupId>org.springframework</groupId>
<artifactId>spring-webmvc</artifactId>
<version>6.1.4</version>
</dependency>
<!--logback依赖-->
<dependency>
<groupId>ch.qos.logback</groupId>
<artifactId>logback-classic</artifactId>
<version>1.5.3</version>
</dependency>
<!--servlet依赖-->
<dependency>
<groupId>jakarta.servlet</groupId>
<artifactId>jakarta.servlet-api</artifactId>
<version>6.0.0</version>
<scope>provided</scope>
</dependency>
<!--thymeleaf和spring6整合的依赖-->
<dependency>
<groupId>org.thymeleaf</groupId>
<artifactId>thymeleaf-spring6</artifactId>
<version>3.1.2.RELEASE</version>
</dependency>
<!-- 引入jackson依赖,可以将java对象转换为json格式字符串-->
<!-- 专门负责将Java对象转换成JSON格式字符串的组件,
当然,它也可以将JSON格式的字符串转换成Java对象-->
<dependency>
<groupId>com.fasterxml.jackson.core</groupId>
<artifactId>jackson-databind</artifactId>
<version>2.17.0</version>
</dependency>
</dependencies>
</project>
web.xml 文件的相关配置信息内容:
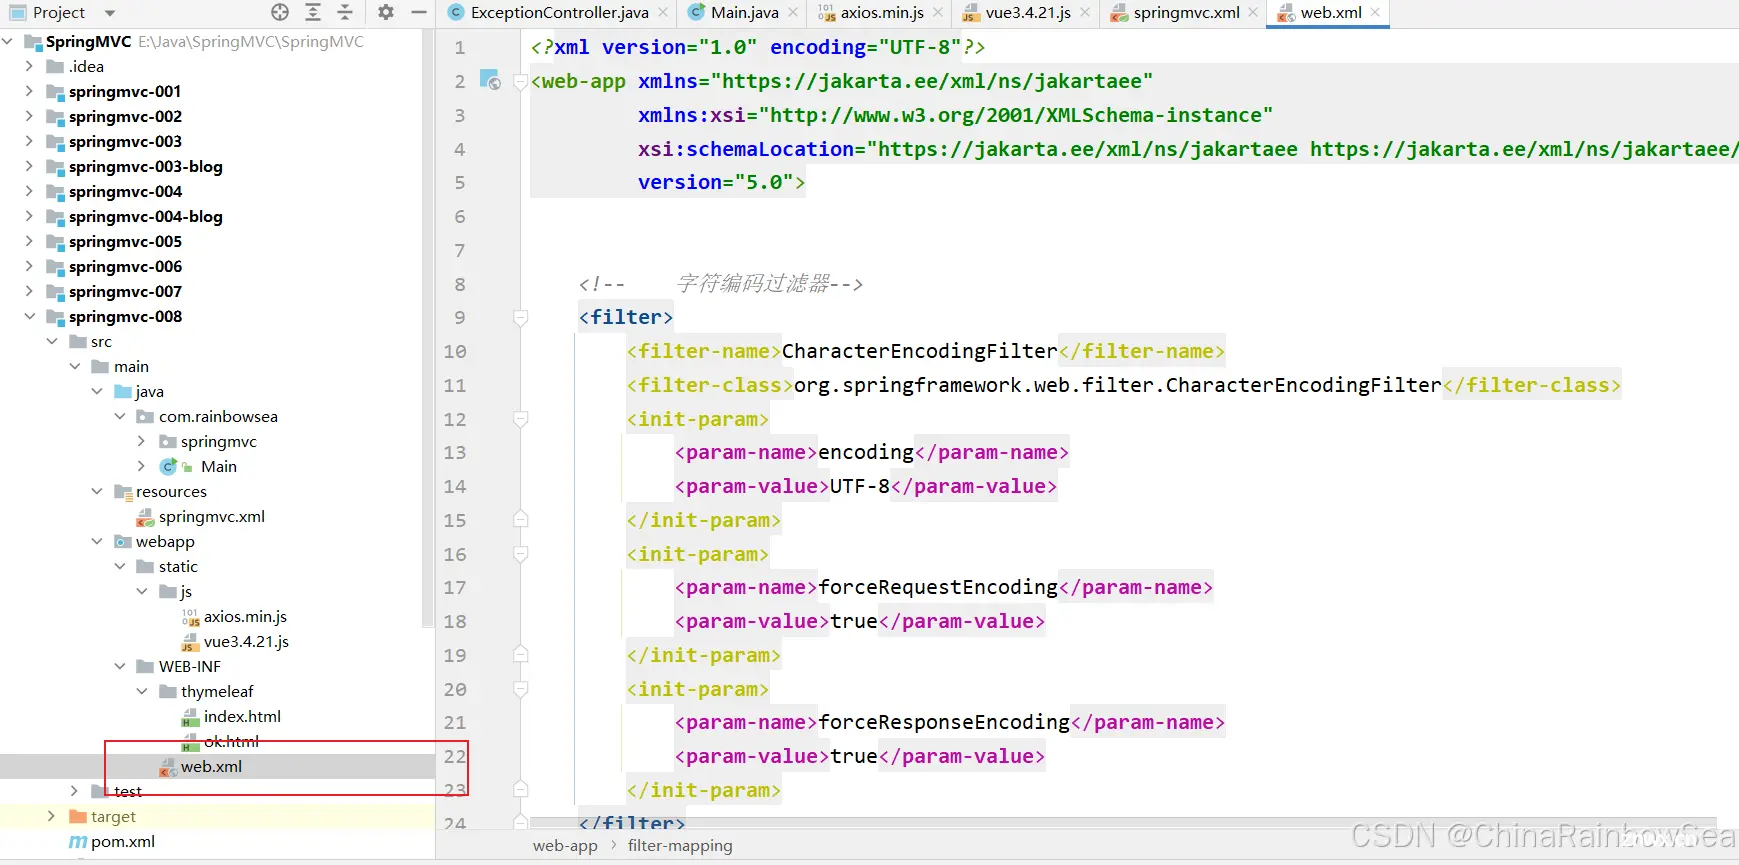
<code><?xml version="1.0" encoding="UTF-8"?>code>
<web-app xmlns="https://jakarta.ee/xml/ns/jakartaee"code>
xmlns:xsi="http://www.w3.org/2001/XMLSchema-instance"code>
xsi:schemaLocation="https://jakarta.ee/xml/ns/jakartaee https://jakarta.ee/xml/ns/jakartaee/web-app_5_0.xsd"code>
version="5.0">code>
<!-- 字符编码过滤器-->
<filter>
<filter-name>CharacterEncodingFilter</filter-name>
<filter-class>org.springframework.web.filter.CharacterEncodingFilter</filter-class>
<init-param>
<param-name>encoding</param-name>
<param-value>UTF-8</param-value>
</init-param>
<init-param>
<param-name>forceRequestEncoding</param-name>
<param-value>true</param-value>
</init-param>
<init-param>
<param-name>forceResponseEncoding</param-name>
<param-value>true</param-value>
</init-param>
</filter>
<filter-mapping>
<filter-name>CharacterEncodingFilter</filter-name>
<url-pattern>/*</url-pattern>
</filter-mapping>
<!-- 前端控制器-->
<servlet>
<servlet-name>DispatcherServlet</servlet-name>
<servlet-class>org.springframework.web.servlet.DispatcherServlet</servlet-class>
<init-param>
<param-name>contextConfigLocation</param-name>
<param-value>classpath:springmvc.xml</param-value>
</init-param>
</servlet>
<servlet-mapping>
<servlet-name>DispatcherServlet</servlet-name>
<!-- 除了 jsp 页面其他的都走这个-->
<url-pattern>/</url-pattern>
</servlet-mapping>
<!-- 添加一个过滤器,这个过滤器是springmvc提前写好的,直接用就行了,这个过滤器可以帮助你将请求
POST转换成PUT请求/DELETE请求-->
<!-- 同时注意:该过滤器一定要在字符编码过滤器后面配置,不然,先设置的话,可能会出现获取到的请求数据是乱码-->
<filter>
<filter-name>HiddenHttpMethodFilter</filter-name>
<filter-class>org.springframework.web.filter.HiddenHttpMethodFilter</filter-class>
</filter>
<filter-mapping>
<filter-name>HiddenHttpMethodFilter</filter-name>
<!-- 表示任意的 请求-->
<url-pattern>/*</url-pattern>
</filter-mapping>
</web-app>
相关 springmvc.xml 文件配置信息的编写:
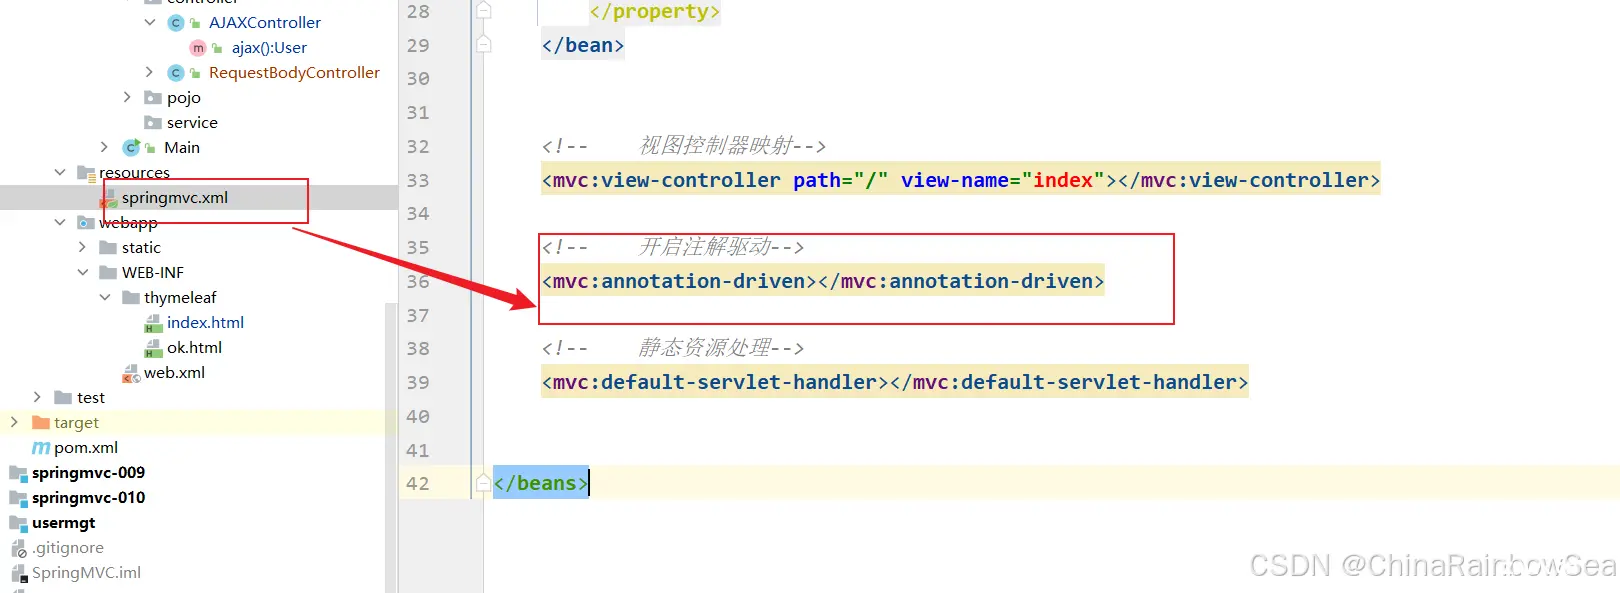
其中重点是:静态资源处理、开启注解驱动、视图控制器映射等相关配置。
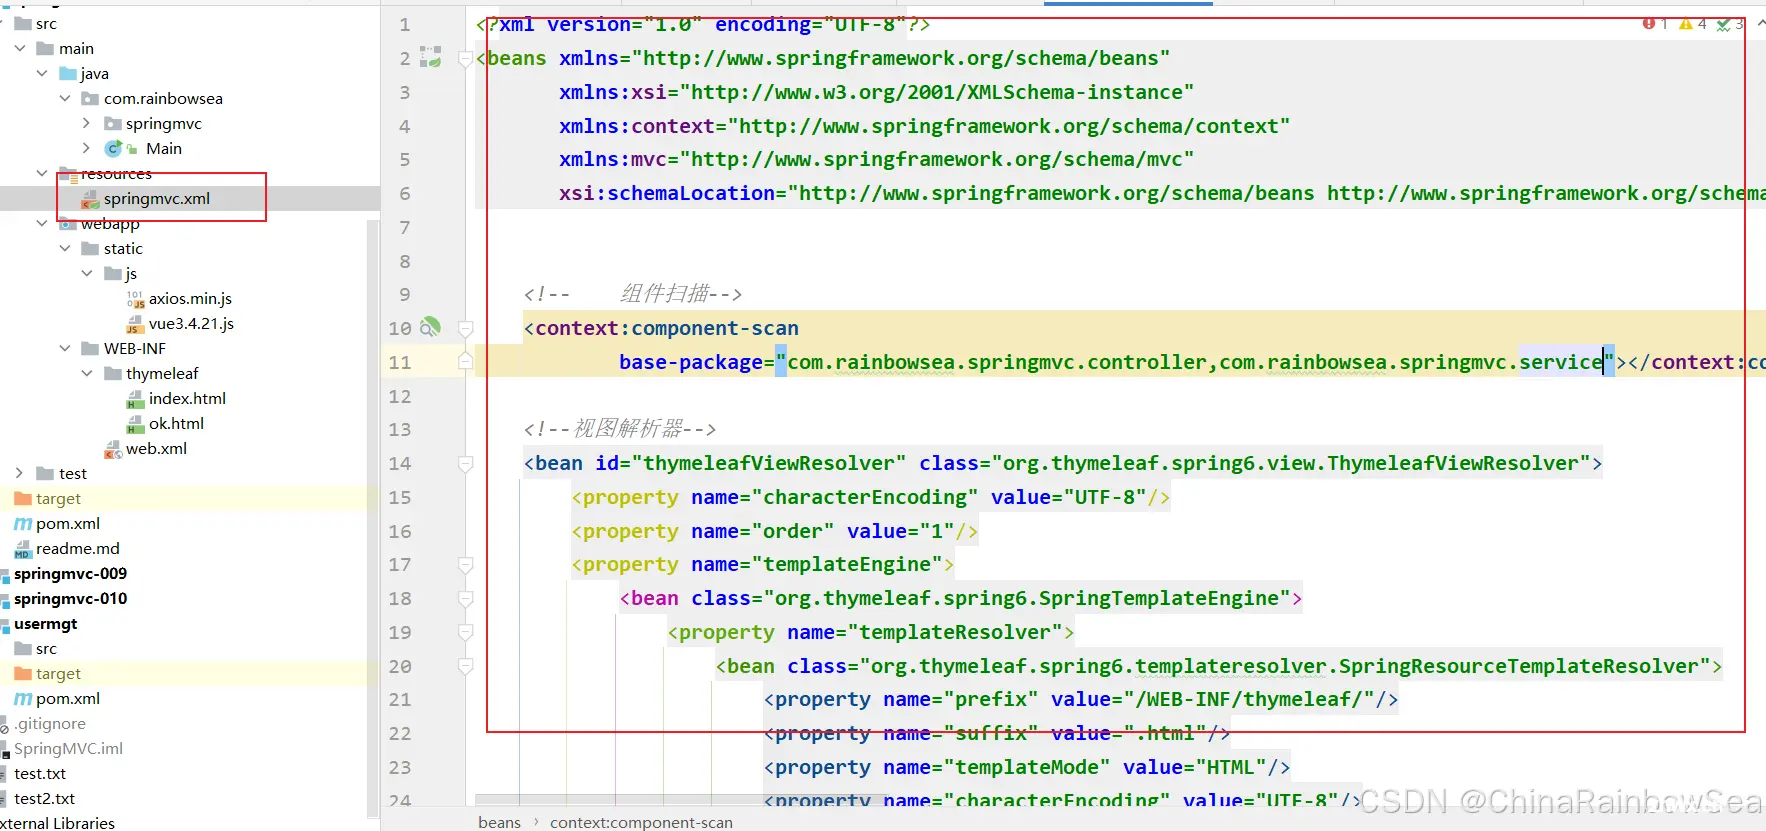
<code><?xml version="1.0" encoding="UTF-8"?>code>
<beans xmlns="http://www.springframework.org/schema/beans"code>
xmlns:xsi="http://www.w3.org/2001/XMLSchema-instance"code>
xmlns:context="http://www.springframework.org/schema/context"code>
xmlns:mvc="http://www.springframework.org/schema/mvc"code>
xsi:schemaLocation="http://www.springframework.org/schema/beans http://www.springframework.org/schema/beans/spring-beans.xsd http://www.springframework.org/schema/context https://www.springframework.org/schema/context/spring-context.xsd http://www.springframework.org/schema/mvc https://www.springframework.org/schema/mvc/spring-mvc.xsd">code>
<!-- 组件扫描-->
<context:component-scan
base-package="com.rainbowsea.springmvc.controller,com.rainbowsea.springmvc.service"></context:component-scan>code>
<!--视图解析器-->
<bean >
<property name="characterEncoding" value="UTF-8"/>code>
<property name="order" value="1"/>code>
<property name="templateEngine">code>
<bean >
<property name="templateResolver">code>
<bean >
<property name="prefix" value="/WEB-INF/thymeleaf/"/>code>
<property name="suffix" value=".html"/>code>
<property name="templateMode" value="HTML"/>code>
<property name="characterEncoding" value="UTF-8"/>code>
</bean>
</property>
</bean>
</property>
</bean>
<!-- 视图控制器映射-->
<mvc:view-controller path="/" view-name="index"></mvc:view-controller>code>
<!-- 开启注解驱动-->
<mvc:annotation-driven></mvc:annotation-driven>
<!-- 静态资源处理-->
<mvc:default-servlet-handler></mvc:default-servlet-handler>
</beans>
Vue3 + Thymeleaf + Axios 发送 AJAX 请求:
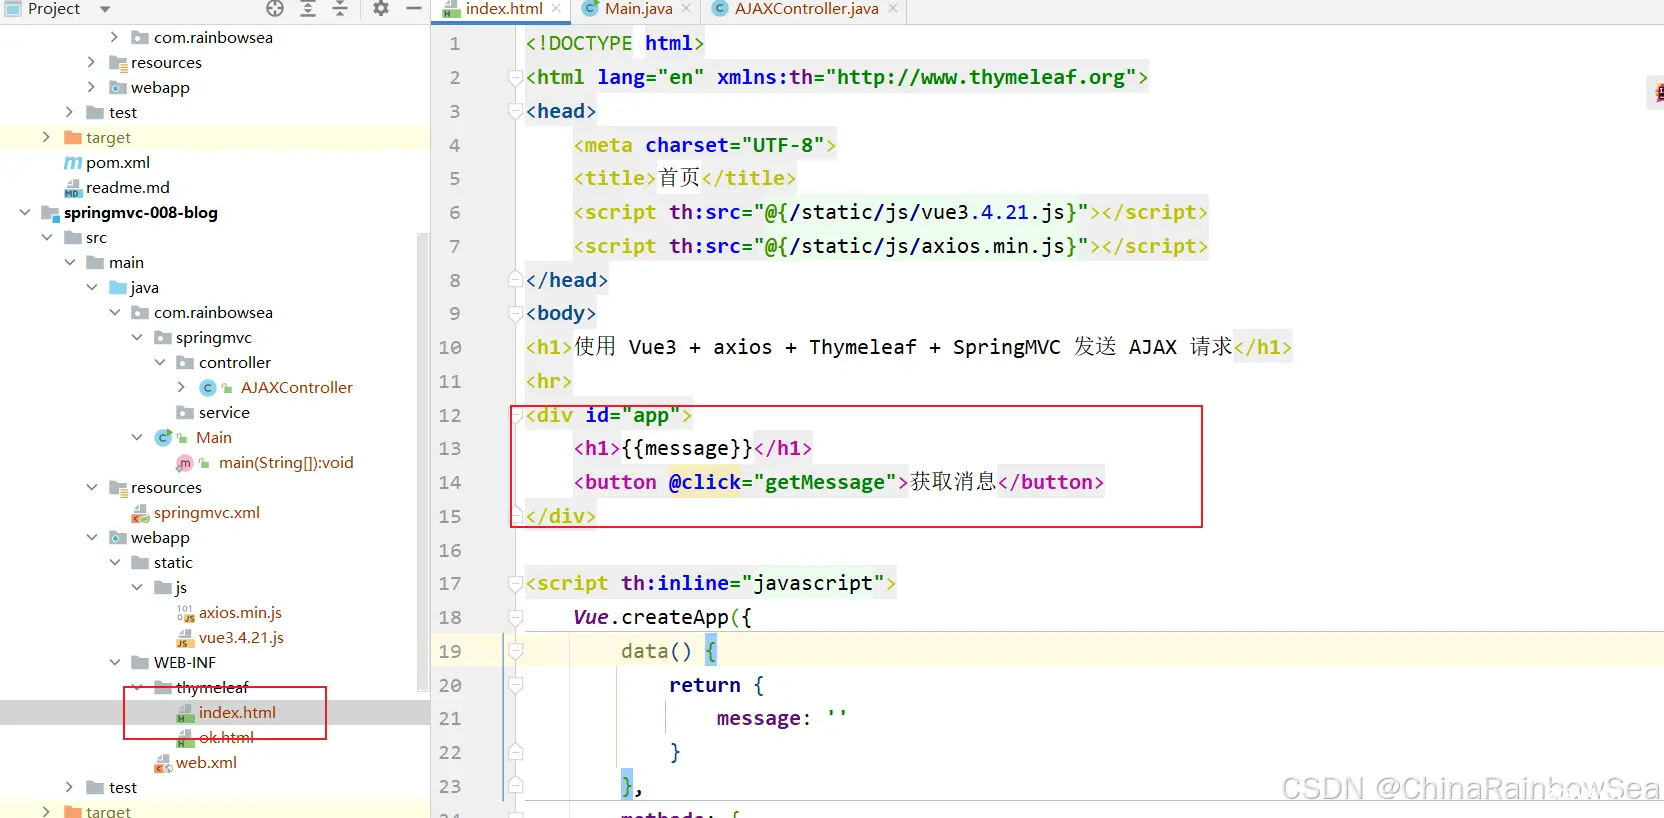
<code><!DOCTYPE html>
<html lang="en" xmlns:th="http://www.thymeleaf.org">code>
<head>
<meta charset="UTF-8">code>
<title>首页</title>
<script th:src="@{/static/js/vue3.4.21.js}"></script>code>
<script th:src="@{/static/js/axios.min.js}"></script>code>
</head>
<body>
<h1>使用 Vue3 + axios + Thymeleaf + SpringMVC 发送 AJAX 请求</h1>
<hr>
<div >
<h1>{{message}}</h1>
<button @click="getMessage">获取消息</button>code>
</div>
<script th:inline="javascript">code>
Vue.createApp({
data() {
return {
message: ''
}
},
methods: {
//异步方法(ajax请求多数情况下都是异步请求)
async getMessage() {
try {
// 发送 ajax请求
// await axios.get('/springmvc/ajax')
//动态获取 应用的根/springmvc/
const response = await axios.get([[@{/}]] + 'ajax')
// 将返回的数据交给 message
this.message = response.data
}catch
(e)
{
console.error(e)
}
}
}
}).mount("#app")
</script>
</body>
</html>
重点来了,Controller 怎么写呢?
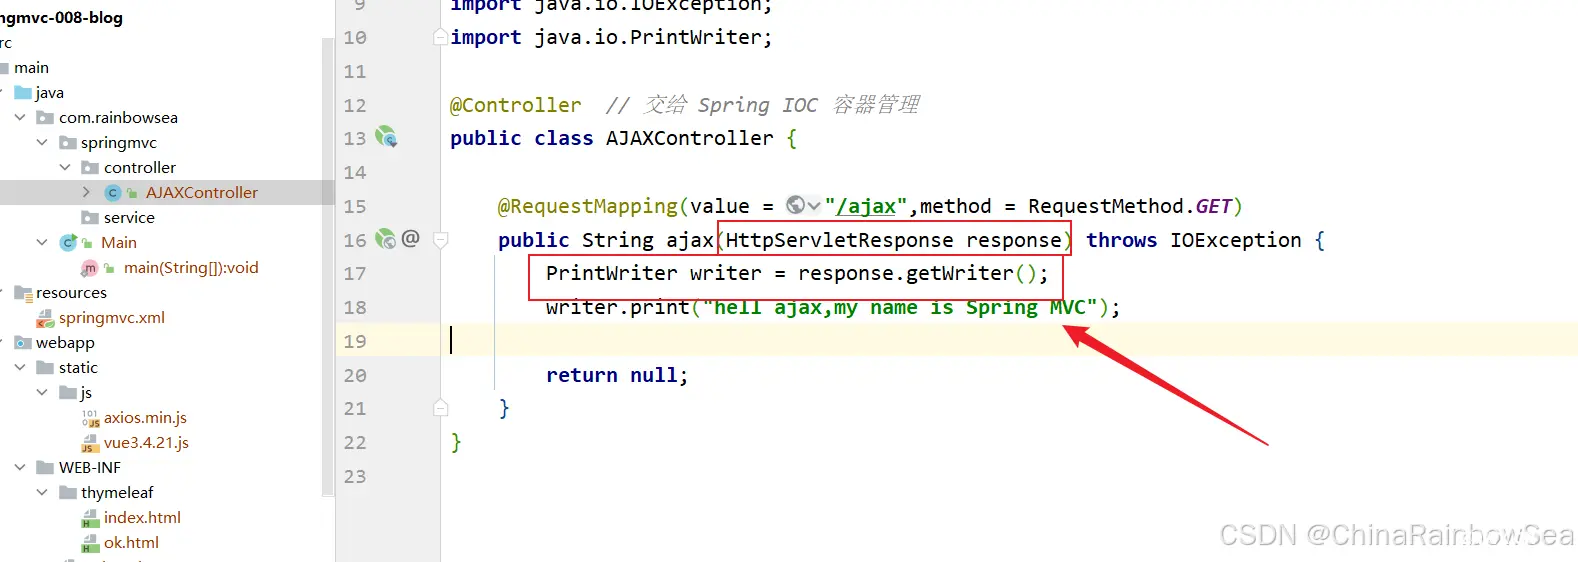
之前我们都是传统的请求,Controller 返回一个 逻辑视图名 。然后交给 视图解析器 —>进行解析,最后跳转页面。而 AJAX 请求是不需要跳转页面的,因为 AJAX 是页面局部刷新,以前我们在 Servlet 中使用
response.getWriter( ).print("message")的方式响应。在 Spring MVC 中怎么办呢?当然,我们在 Spring MVC 中也可以使用 Servelt 原生API 来完成整个功能,代码如下:
或者这样也行:不需要有返回值
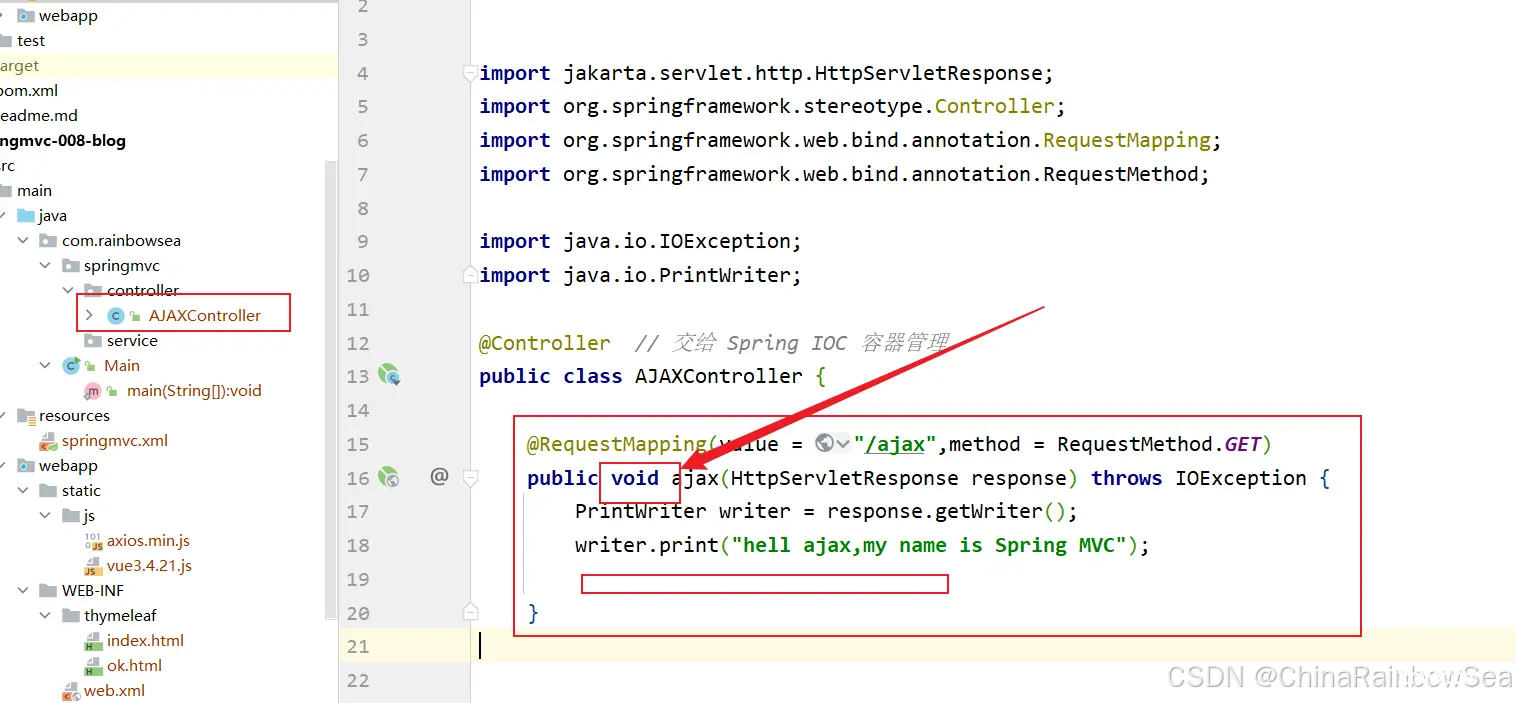
<code>
import jakarta.servlet.http.HttpServletResponse;
import org.springframework.stereotype.Controller;
import org.springframework.web.bind.annotation.RequestMapping;
import org.springframework.web.bind.annotation.RequestMethod;
import java.io.IOException;
import java.io.PrintWriter;
@Controller // 交给 Spring IOC 容器管理
public class AJAXController {
@RequestMapping(value = "/ajax",method = RequestMethod.GET)
public void ajax(HttpServletResponse response) throws IOException {
PrintWriter writer = response.getWriter();
writer.print("hell ajax,my name is Spring MVC");
}
}
启动服务器测试:http://localhost:8080/springmvc/
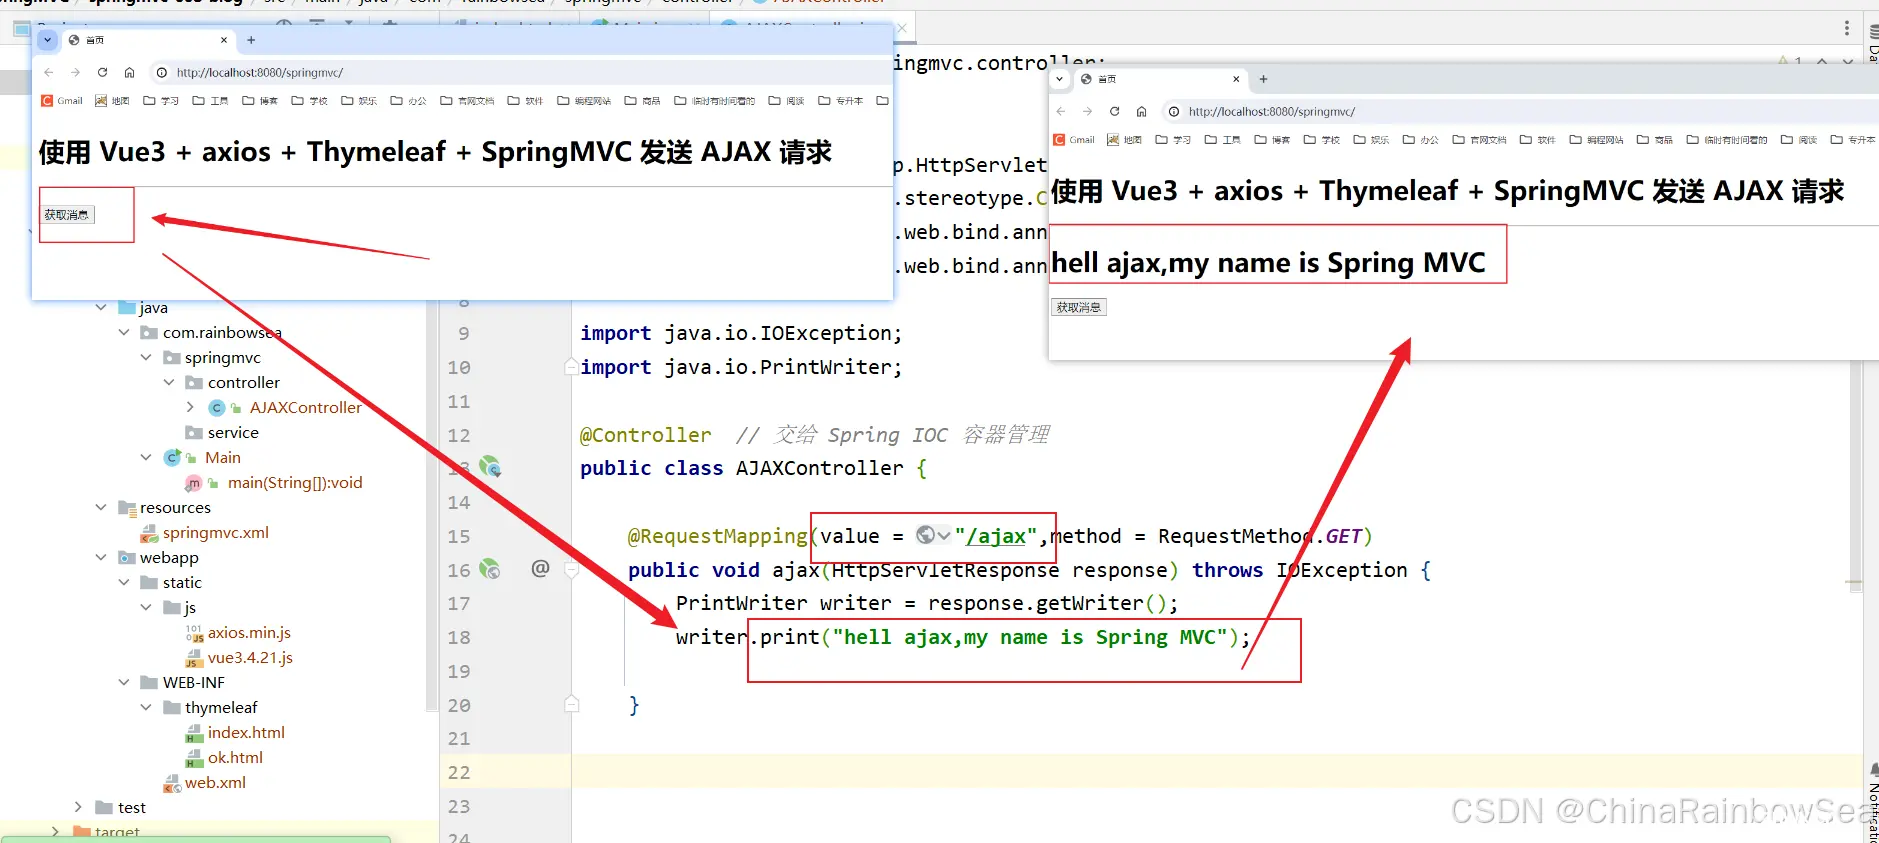
注意:如果采用这种方式响应,则和 springmvc.xml 文件中配置的视图解析器没有关系,不走视图解析器了。
难道我们以后 AJAX 请求 要使用上面这种原生Servlet API吗?
不需要,我们可以使用 SpringMVC 中提供的 HttpMessageConverter 消息转换器。
我们要向前端响应一个字符串 "hell ajax,my name is Spring MVC" ,这个 "hell ajax,my name is Spring MVC" 就是响应协议中的响应体。
我们可以使用 <code>@ResponseBody注解 来启用对应的消息转换器。而这种消息转换器只负责将Controller返回的信息以响应体的形式写入响应协议。
5. @ResponseBody 将服务器端的 return 返回值转化为“字符串(JSON格式的字符串)”再返回给客户端
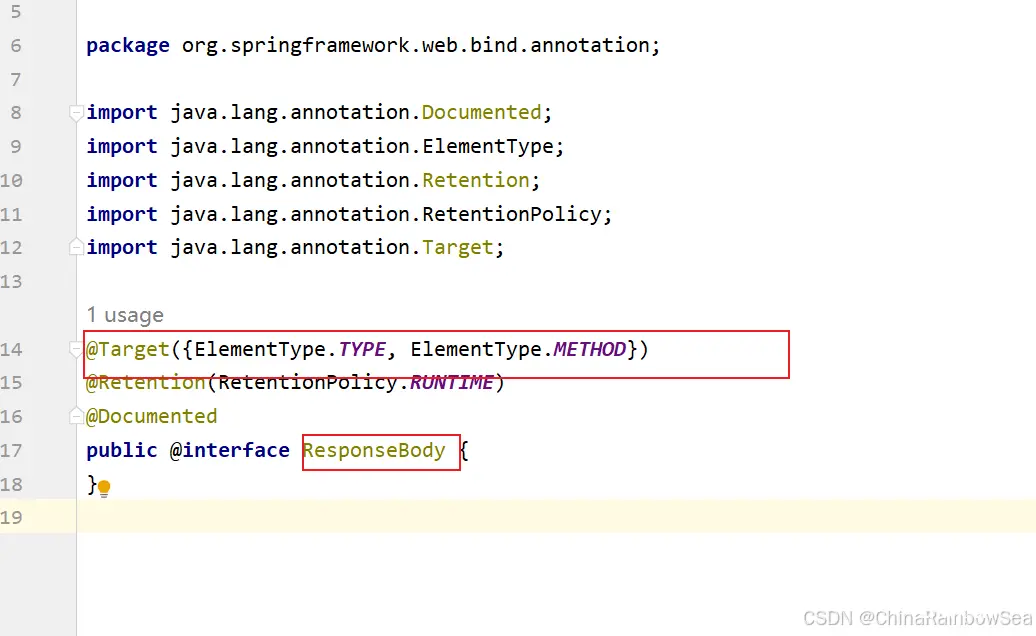
上面的 AJAX 案例,Controller的代码可以修改为:
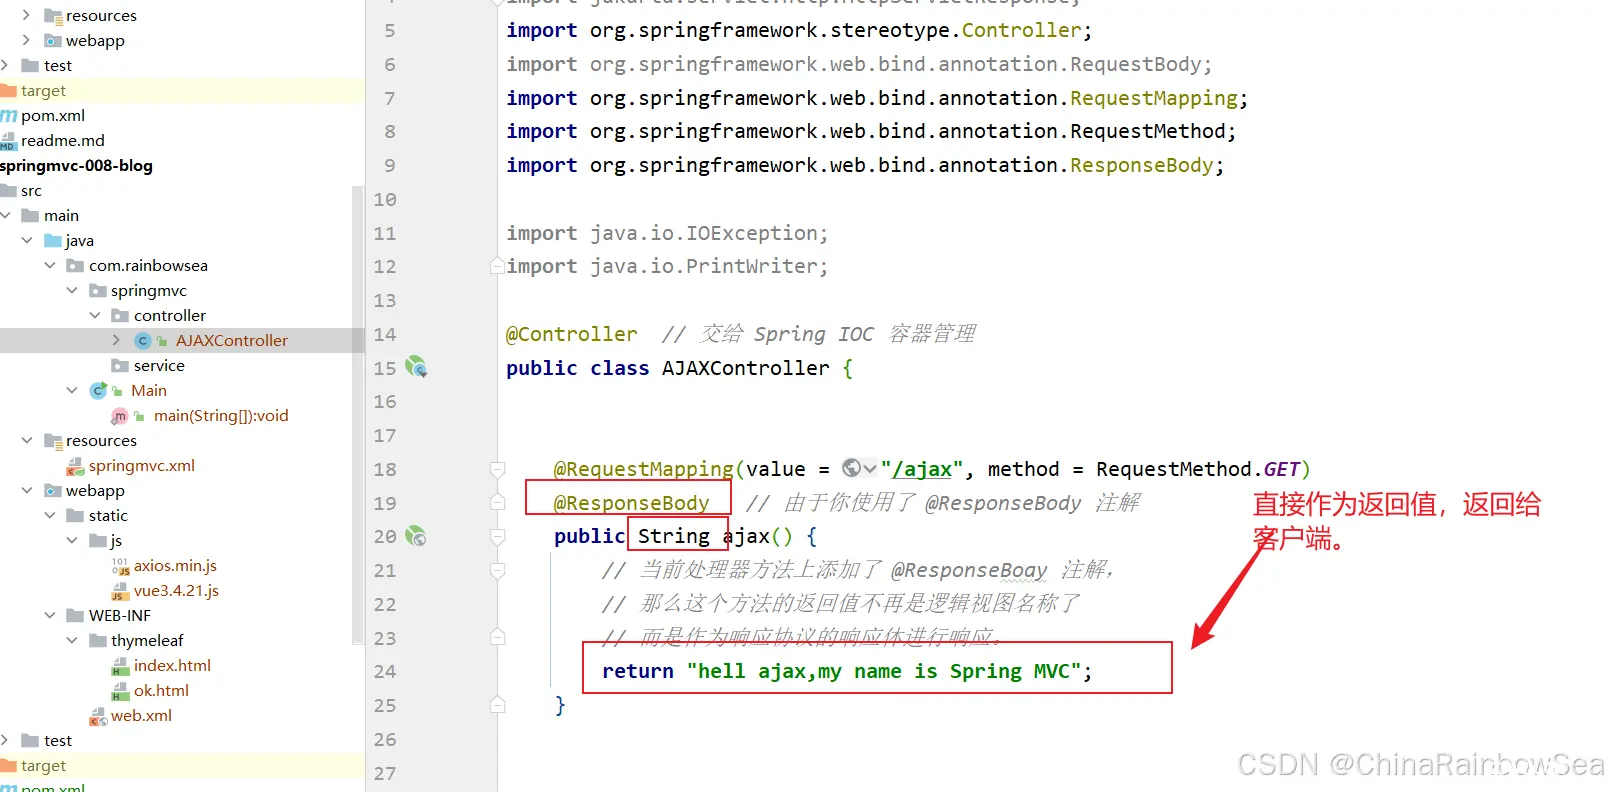
<code>
import jakarta.servlet.http.HttpServletResponse;
import org.springframework.stereotype.Controller;
import org.springframework.web.bind.annotation.RequestBody;
import org.springframework.web.bind.annotation.RequestMapping;
import org.springframework.web.bind.annotation.RequestMethod;
import org.springframework.web.bind.annotation.ResponseBody;
import java.io.IOException;
import java.io.PrintWriter;
@Controller // 交给 Spring IOC 容器管理
public class AJAXController {
@RequestMapping(value = "/ajax", method = RequestMethod.GET)
@ResponseBody // 由于你使用了 @ResponseBody 注解
public String ajax() {
// 当前处理器方法上添加了 @ResponseBoay 注解,
// 那么这个方法的返回值不再是逻辑视图名称了
// 而是作为响应协议的响应体进行响应。
return "hell ajax,my name is Spring MVC";
}
最核心需要理解的位置是:
return "hell ajax,my name is Spring MVC";
这里的 "hell ajax,my name is Spring MVC" 不是逻辑视图名称了,而是作为响应体的内容进行响应。直接输出到浏览器客户端。
以上程序中使用的消息转换器是:
StringHttpMessageConverter,为什么会启用这个消息转换器呢?因为你添加了@ResponseBody这个注解了。
启动服务器测试:http://localhost:8080/springmvc/
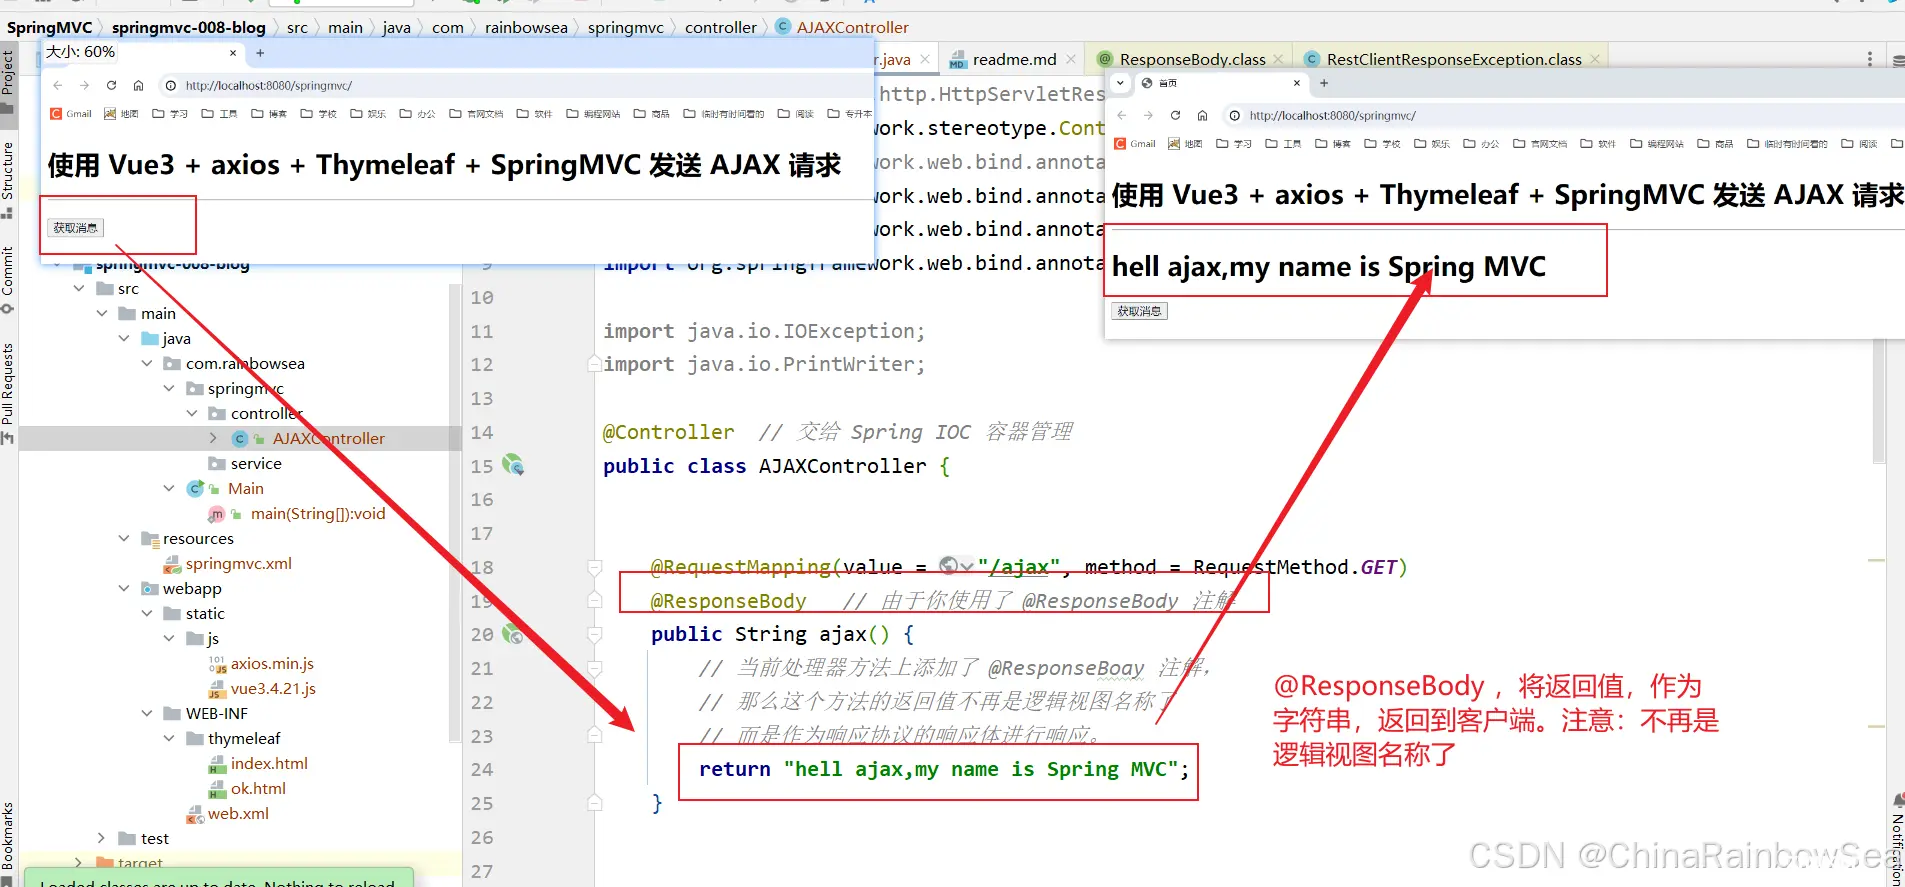
通常 AJAX 请求需要服务器给返回一段JSON格式的字符串,可以返回JSON格式的字符串吗?
这是完全可以的,此时底层使用的消息转换器还是:StringHttpMessageConverter
当然可以,代码如下:
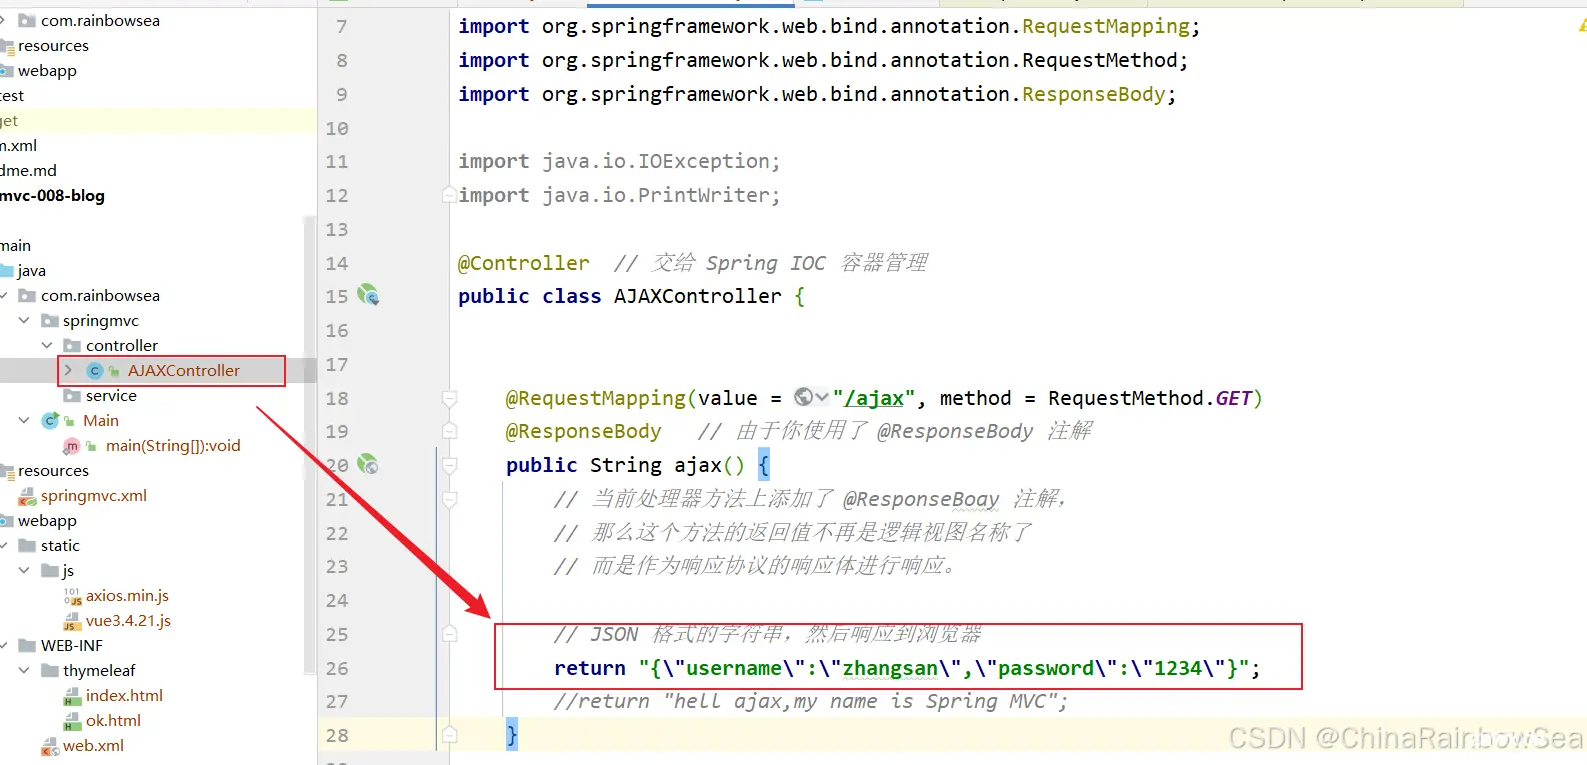
<code>
import jakarta.servlet.http.HttpServletResponse;
import org.springframework.stereotype.Controller;
import org.springframework.web.bind.annotation.RequestBody;
import org.springframework.web.bind.annotation.RequestMapping;
import org.springframework.web.bind.annotation.RequestMethod;
import org.springframework.web.bind.annotation.ResponseBody;
import java.io.IOException;
import java.io.PrintWriter;
@Controller // 交给 Spring IOC 容器管理
public class AJAXController {
@RequestMapping(value = "/ajax", method = RequestMethod.GET)
@ResponseBody // 由于你使用了 @ResponseBody 注解
public String ajax() {
// 当前处理器方法上添加了 @ResponseBoay 注解,
// 那么这个方法的返回值不再是逻辑视图名称了
// 而是作为响应协议的响应体进行响应。
// JSON 格式的字符串,然后响应到浏览器
return "{\"username\":\"zhangsan\",\"password\":\"1234\"}";
//return "hell ajax,my name is Spring MVC";
}
}
启动服务器测试:http://localhost:8080/springmvc/
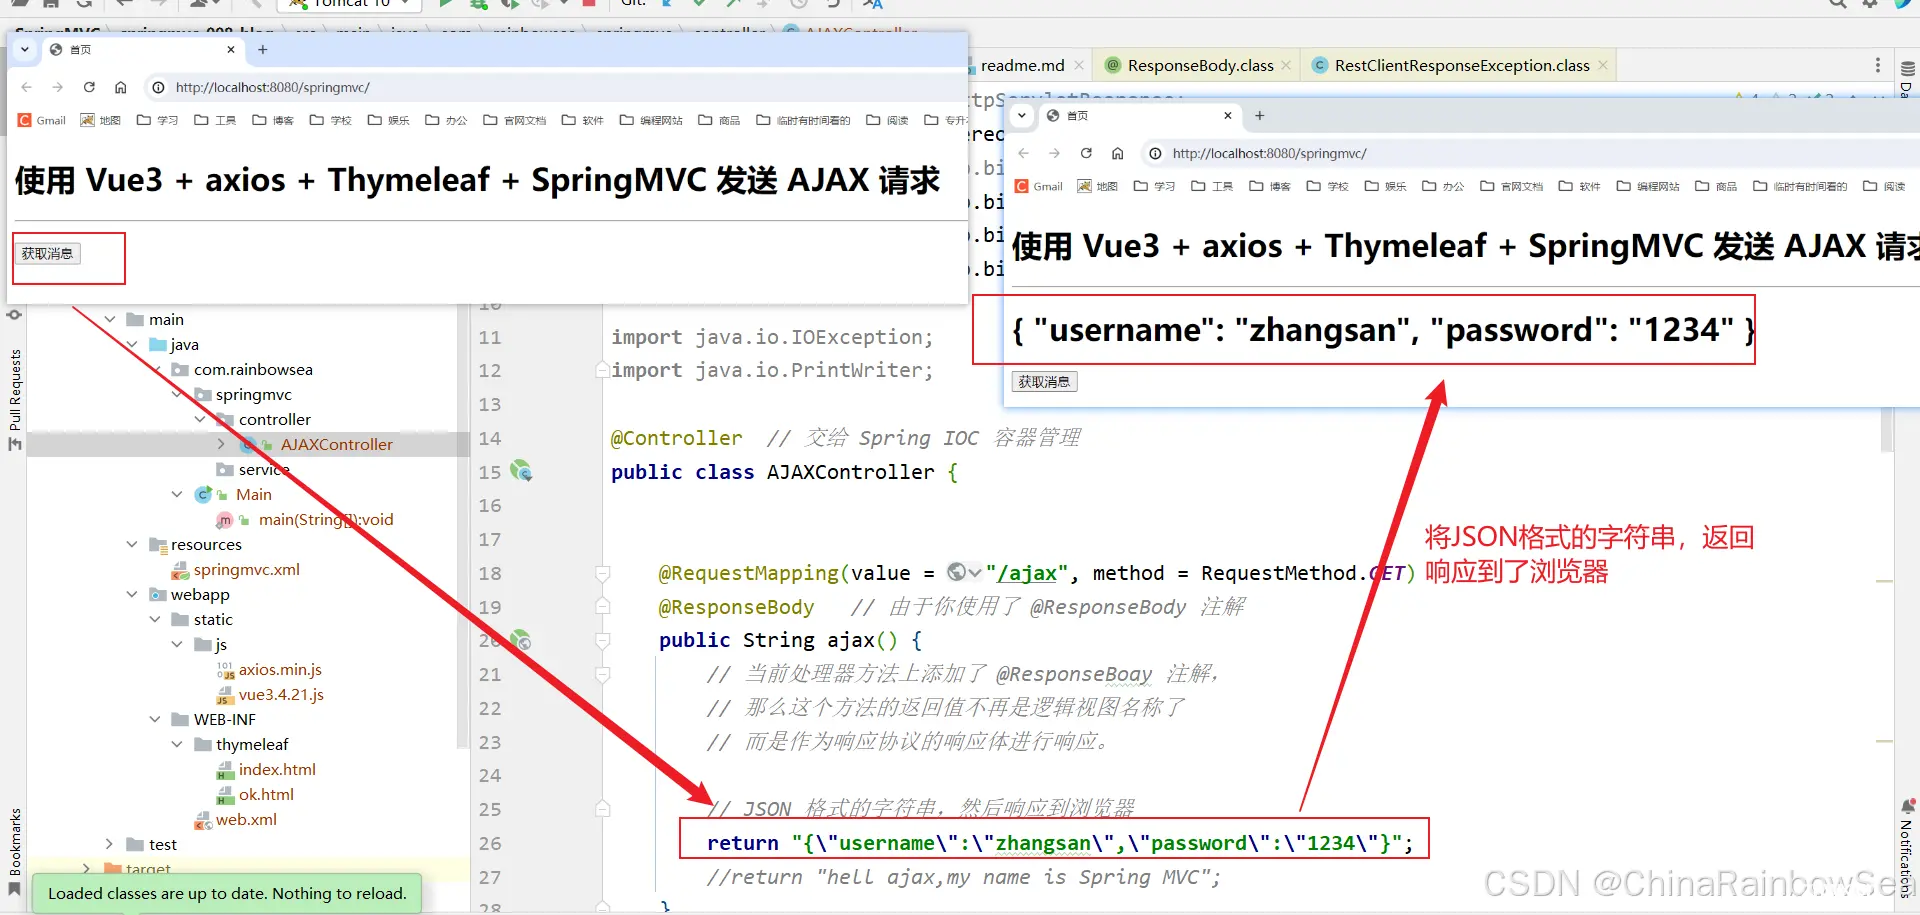
这是完全可以的,此时底层使用的消息转换器还是:StringHttpMessageConverter
那如果在程序中是一个POJO对象,怎么将POJO对象 以 JSON格式 的字符串响应给浏览器呢 ?两种方式:
第一种方式:自己写代码 将POJO对象 转换成JSON格式的字符串(如上面所示 return "{"username":"zhangsan","password":"1234"}"; ),用上面的方式直接 return即可。
第二种方式:启用<code>MappingJackson2HttpMessageConverter消息转换器。
第二种方式:启用MappingJackson2HttpMessageConverter消息转换器。
启用 MappingJackson2HttpMessageConverter 消息转换器的步骤如下:
第一步: 引入 jackson依赖,可以将 java对象 转换为 json格式字符串

<code> <!-- 引入jackson依赖,可以将java对象转换为json格式字符串-->
<!-- 专门负责将Java对象转换成JSON格式字符串的组件,
当然,它也可以将JSON格式的字符串转换成Java对象-->
<dependency>
<groupId>com.fasterxml.jackson.core</groupId>
<artifactId>jackson-databind</artifactId>
<version>2.17.0</version>
</dependency>
第二步: 开启注解驱动
这一步非常关键,开启注解驱动后,在 HandlerAdapter 中会自动装配一个消息转换器:MappingJackson2HttpMessageConverter

<code><mvc:annotation-driven/>
第三步: 我们想将以 POJO对象转换为 JOSN 格式的字符串,返回给客户端,我们需要创建一个 POJO对象。
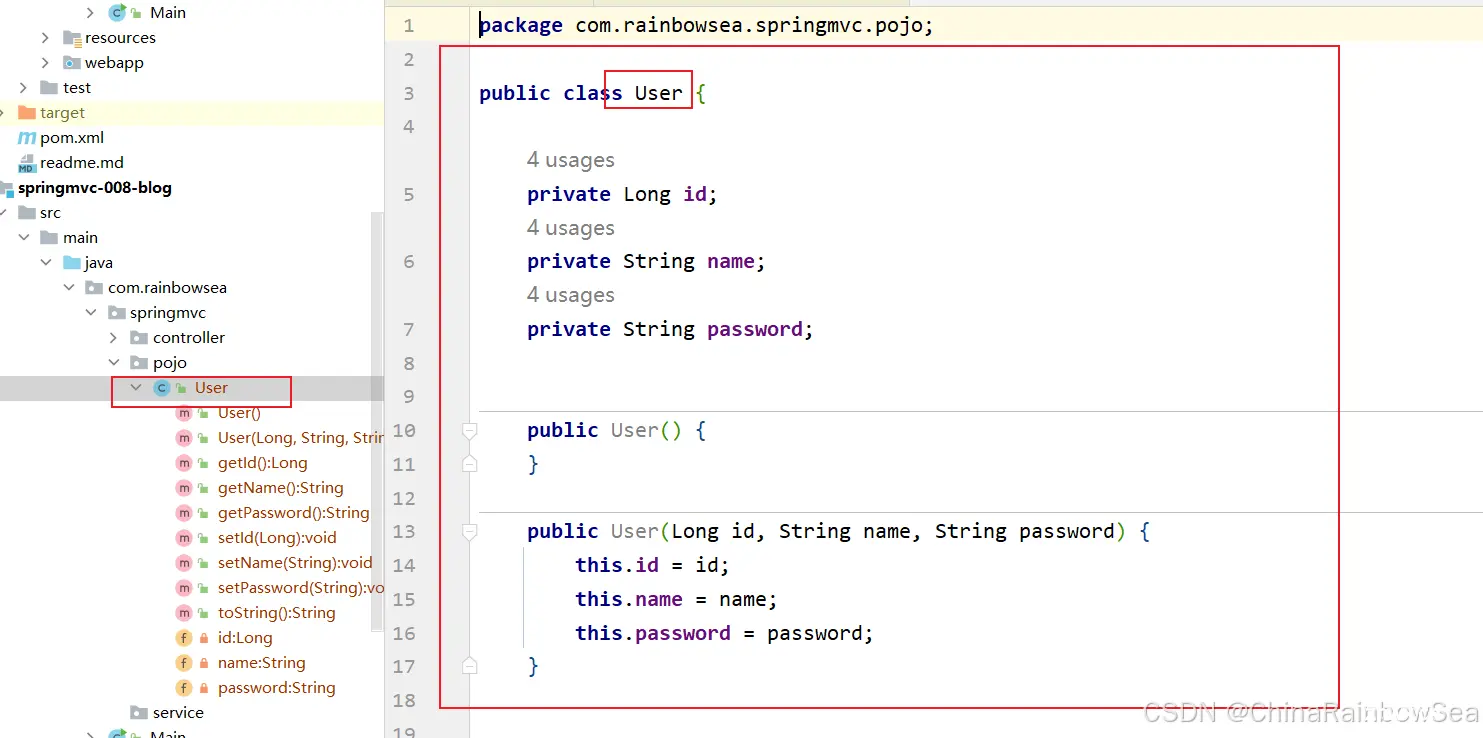
<code>package com.rainbowsea.springmvc.pojo;
public class User {
private Long id;
private String name;
private String password;
public User() {
}
public User(Long id, String name, String password) {
this.id = id;
this.name = name;
this.password = password;
}
@Override
public String toString() {
return "User{" +
", name='" + name + '\'' +code>
", password='" + password + '\'' +code>
'}';
}
public Long getId() {
return id;
}
public void setId(Long id) {
this.id = id;
}
public String getName() {
return name;
}
public void setName(String name) {
this.name = name;
}
public String getPassword() {
return password;
}
public void setPassword(String password) {
this.password = password;
}
}
第四步: 控制器方法使用 @ResponseBody 注解标注(非常重要),控制器方法返回这个POJO对象
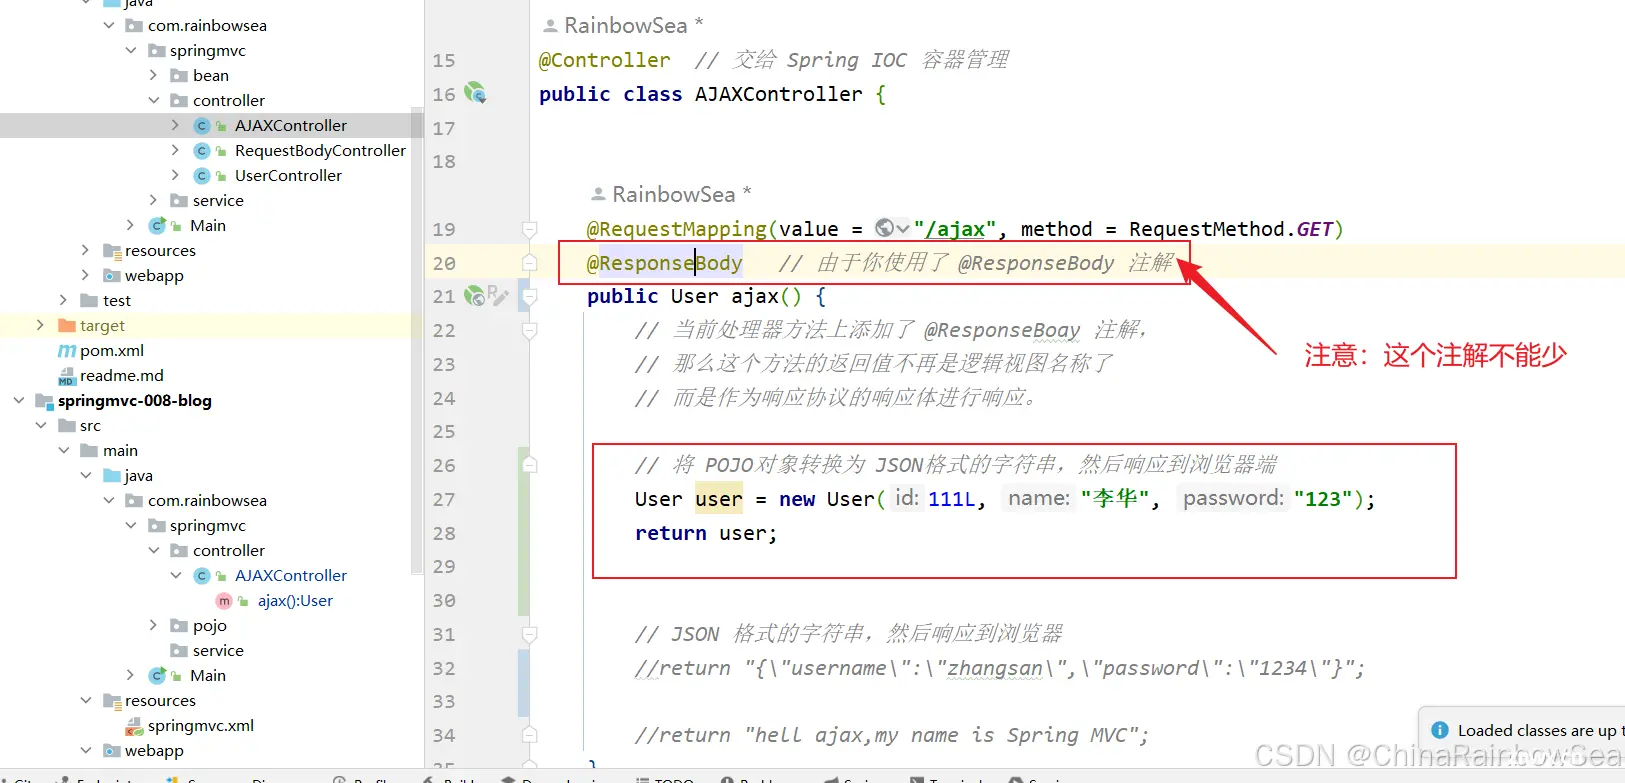
<code>
import com.rainbowsea.springmvc.pojo.User;
import jakarta.servlet.http.HttpServletResponse;
import org.springframework.stereotype.Controller;
import org.springframework.web.bind.annotation.RequestBody;
import org.springframework.web.bind.annotation.RequestMapping;
import org.springframework.web.bind.annotation.RequestMethod;
import org.springframework.web.bind.annotation.ResponseBody;
import java.io.IOException;
import java.io.PrintWriter;
@Controller // 交给 Spring IOC 容器管理
public class AJAXController {
@RequestMapping(value = "/ajax", method = RequestMethod.GET)
@ResponseBody // 由于你使用了 @ResponseBody 注解
public User ajax() {
// 当前处理器方法上添加了 @ResponseBoay 注解,
// 那么这个方法的返回值不再是逻辑视图名称了
// 而是作为响应协议的响应体进行响应。
// 将 POJO对象转换为 JSON格式的字符串,然后响应到浏览器端
User user = new User(111L, "李华", "123");
return user;
// JSON 格式的字符串,然后响应到浏览器
//return "{\"username\":\"zhangsan\",\"password\":\"1234\"}";
//return "hell ajax,my name is Spring MVC";
}
}
启动服务器测试:http://localhost:8080/springmvc/
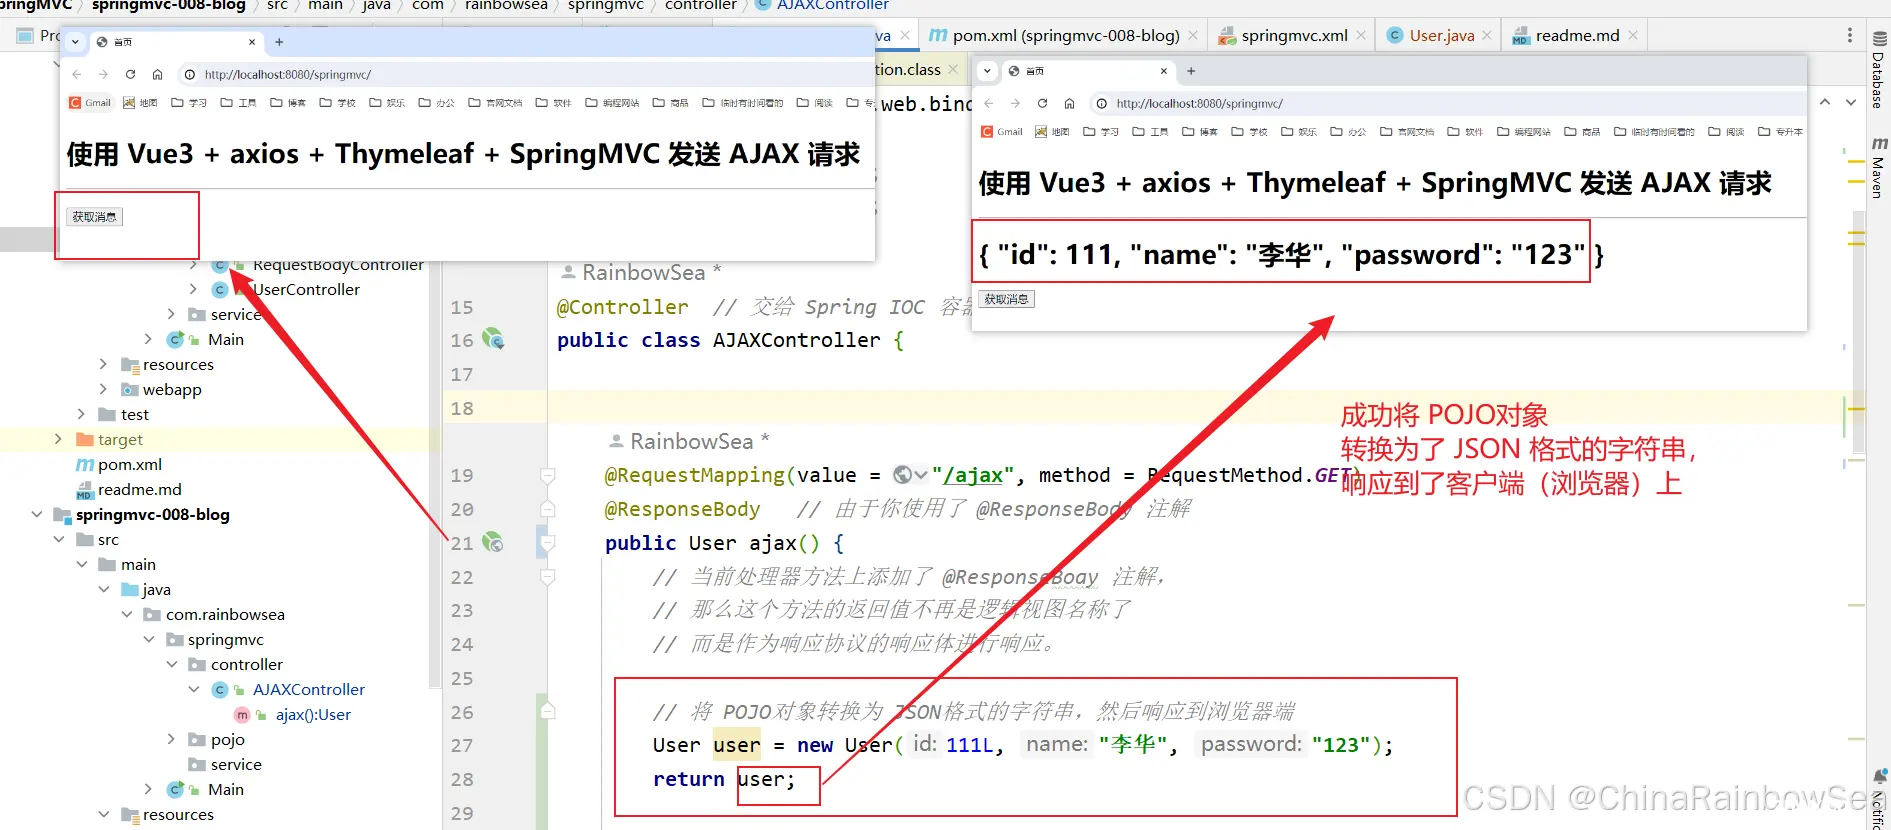
以上代码底层启动的就是:<code> MappingJackson2HttpMessageConverter 消息转换器。
它的功能很强大,可以将 POJO对象转换成 JSON格式的字符串,响应给前端。
其实这个消息转换器
MappingJackson2HttpMessageConverter本质上只是比:StringHttpMessageConverter稍微多了一个 JSON 字符串的转换,其他的还是一样的。
6. 补充:@RestController = (@Controller + @ResponseBody )
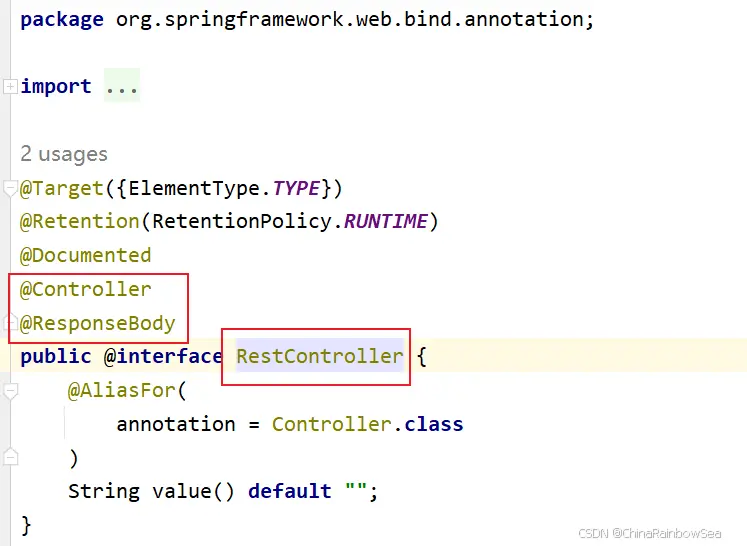
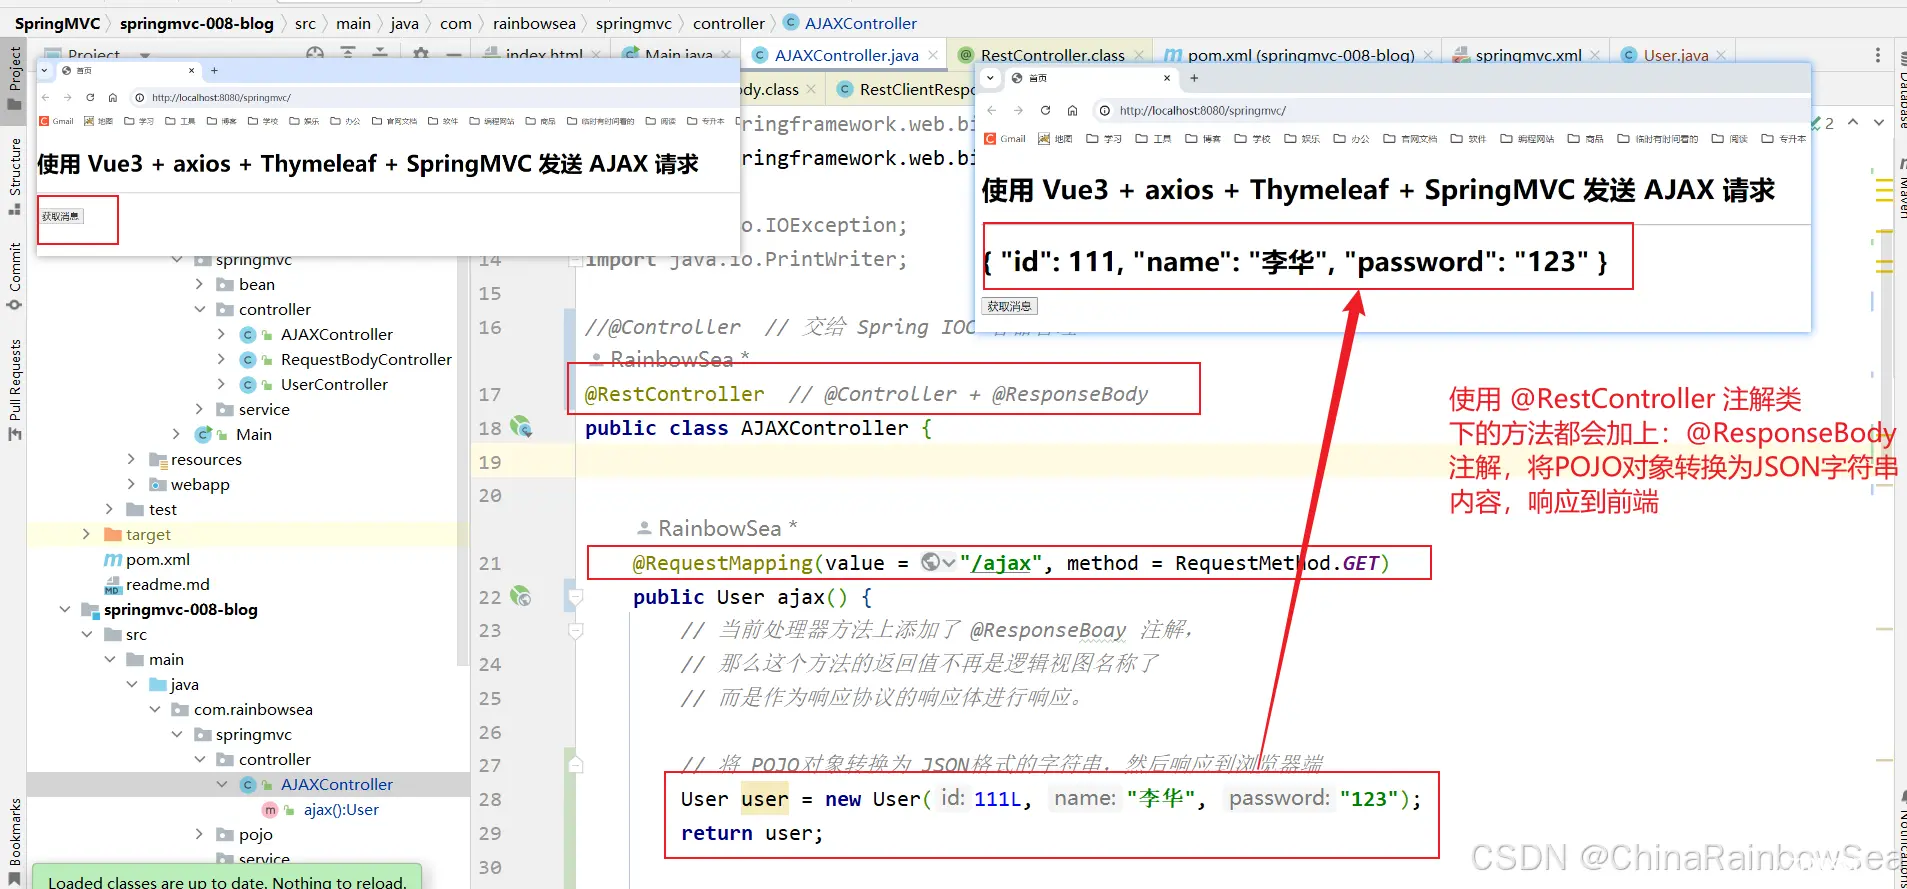
因为我们现代的开发方式都是基于 AJAX 方式的,因此 @ResponseBody注解非常重要,很常用。 为了方便,Spring MVC中提供了一个注解 @RestController。这一个注解代表了:@Controller + @ResponseBody。 @RestController标注在类上即可。
被它标注的@RestController中所有的方法上都会自动标注 @ResponseBody
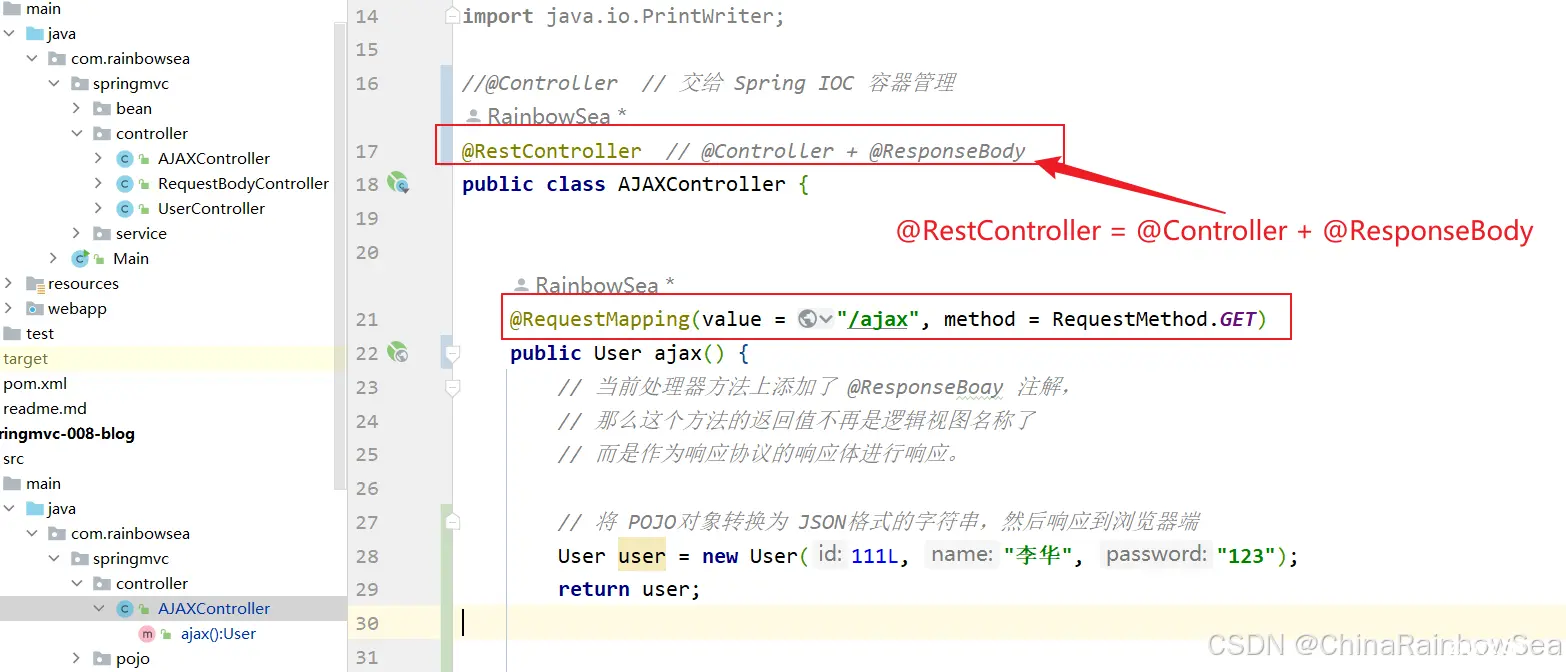
<code>
import com.rainbowsea.springmvc.pojo.User;
import jakarta.servlet.http.HttpServletResponse;
import org.springframework.stereotype.Controller;
import org.springframework.web.bind.annotation.RequestBody;
import org.springframework.web.bind.annotation.RequestMapping;
import org.springframework.web.bind.annotation.RequestMethod;
import org.springframework.web.bind.annotation.ResponseBody;
import org.springframework.web.bind.annotation.RestController;
import java.io.IOException;
import java.io.PrintWriter;
@RestController // @Controller + @ResponseBody
public class AJAXController {
@RequestMapping(value = "/ajax", method = RequestMethod.GET)
public User ajax() {
// 当前处理器方法上添加了 @ResponseBoay 注解,
// 那么这个方法的返回值不再是逻辑视图名称了
// 而是作为响应协议的响应体进行响应。
// 将 POJO对象转换为 JSON格式的字符串,然后响应到浏览器端
User user = new User(111L, "李华", "123");
return user;
}
}
7. @RequestBody 将前端的请求体的信息转换Java程序中的 POJO对象
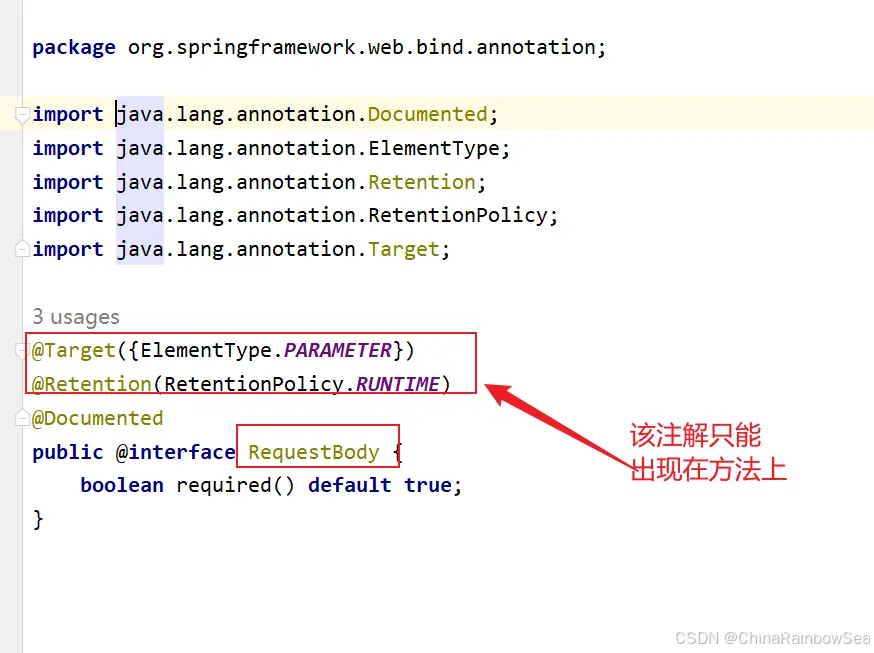
该注解只能使用在处理器方法的形参上,
这个注解的作用是直接将请求体传递给Java程序,在Java程序中可以直接使用一个String 类型的变量接收这个请求体的内容。
底层使用的HTTP消息转换器是:FormHttpMessageConvertor
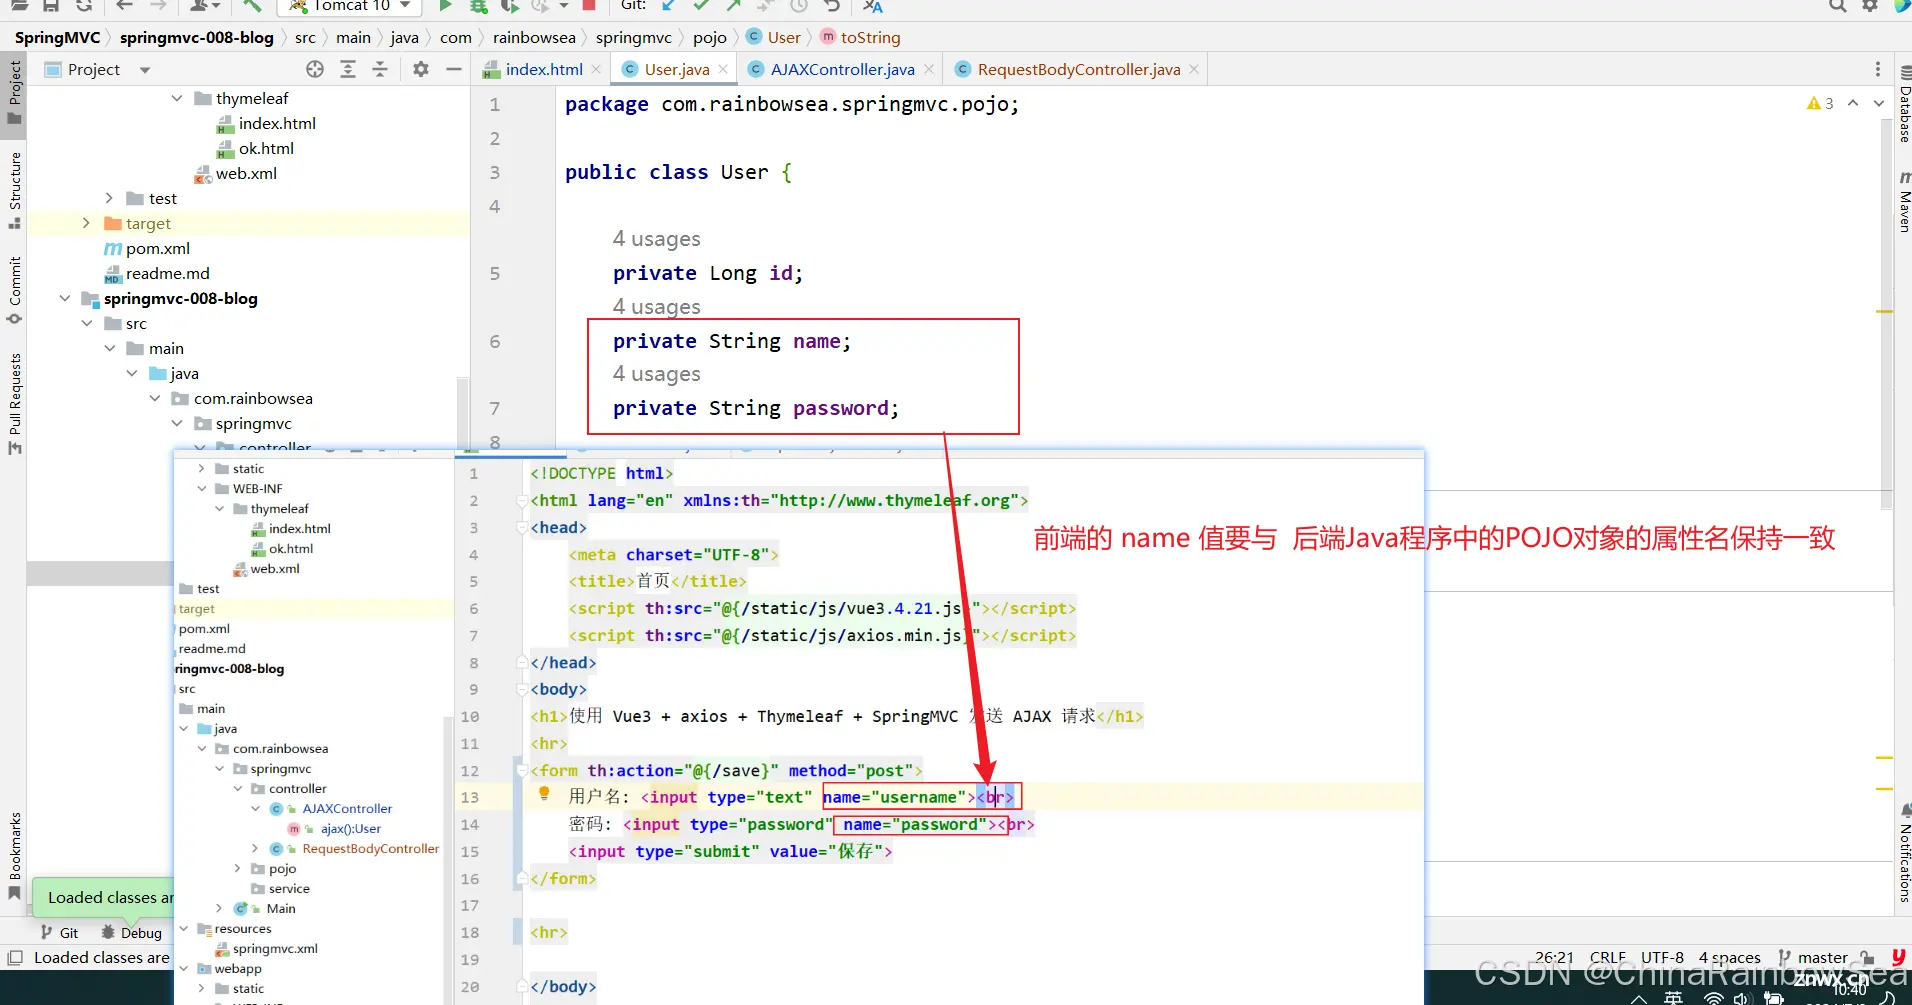
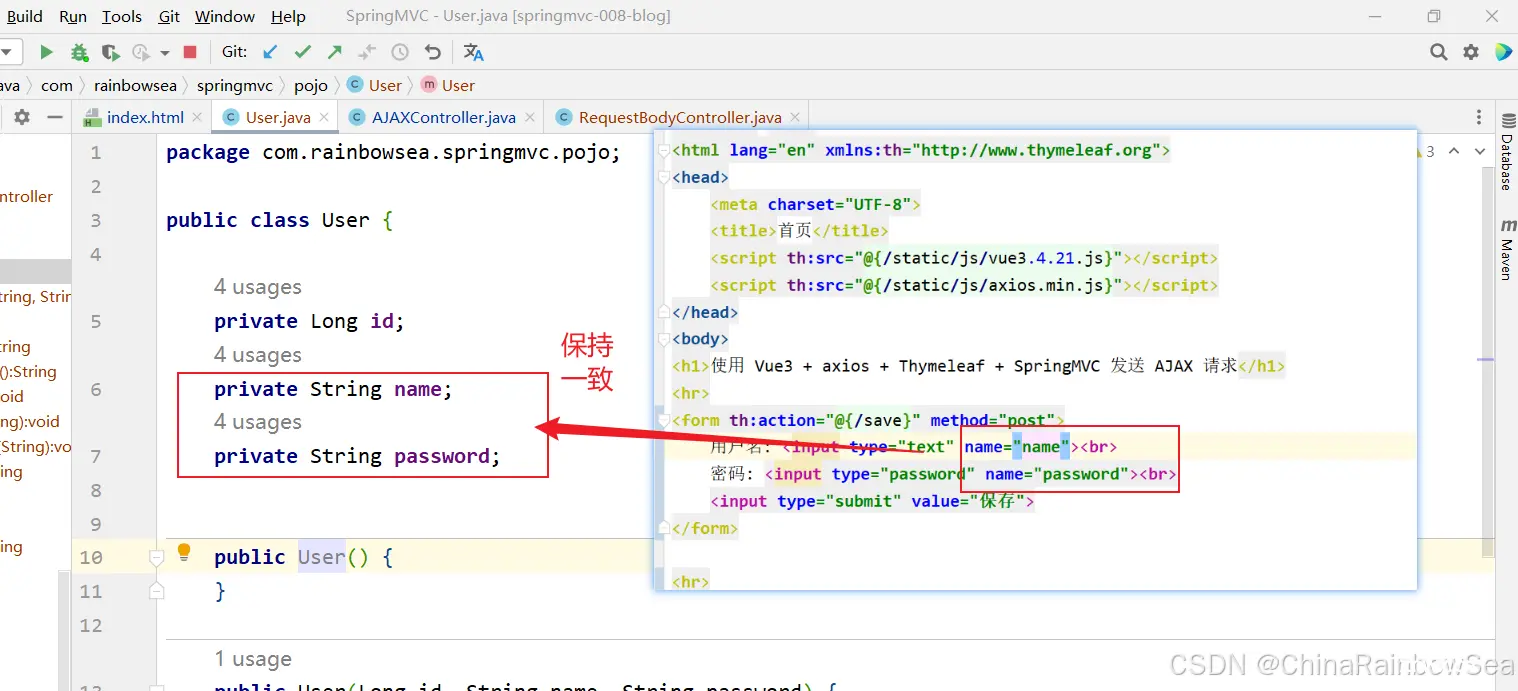
没有保持一致的话,会赋值失败。
在没有使用 <code>@RequestBody 这个注解的时候:
当请求体提交的数据是:
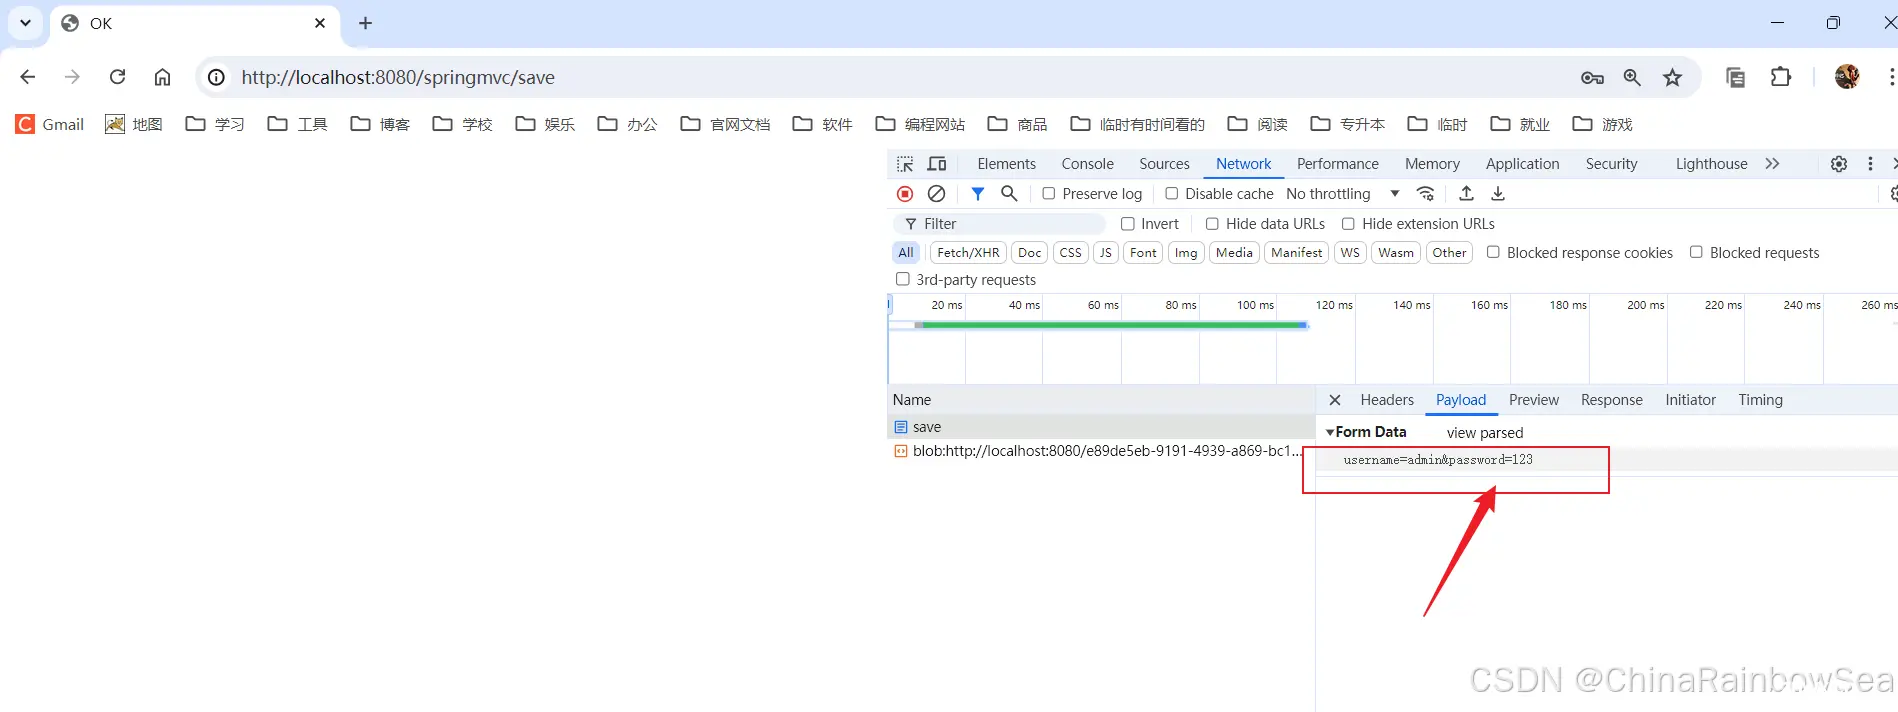
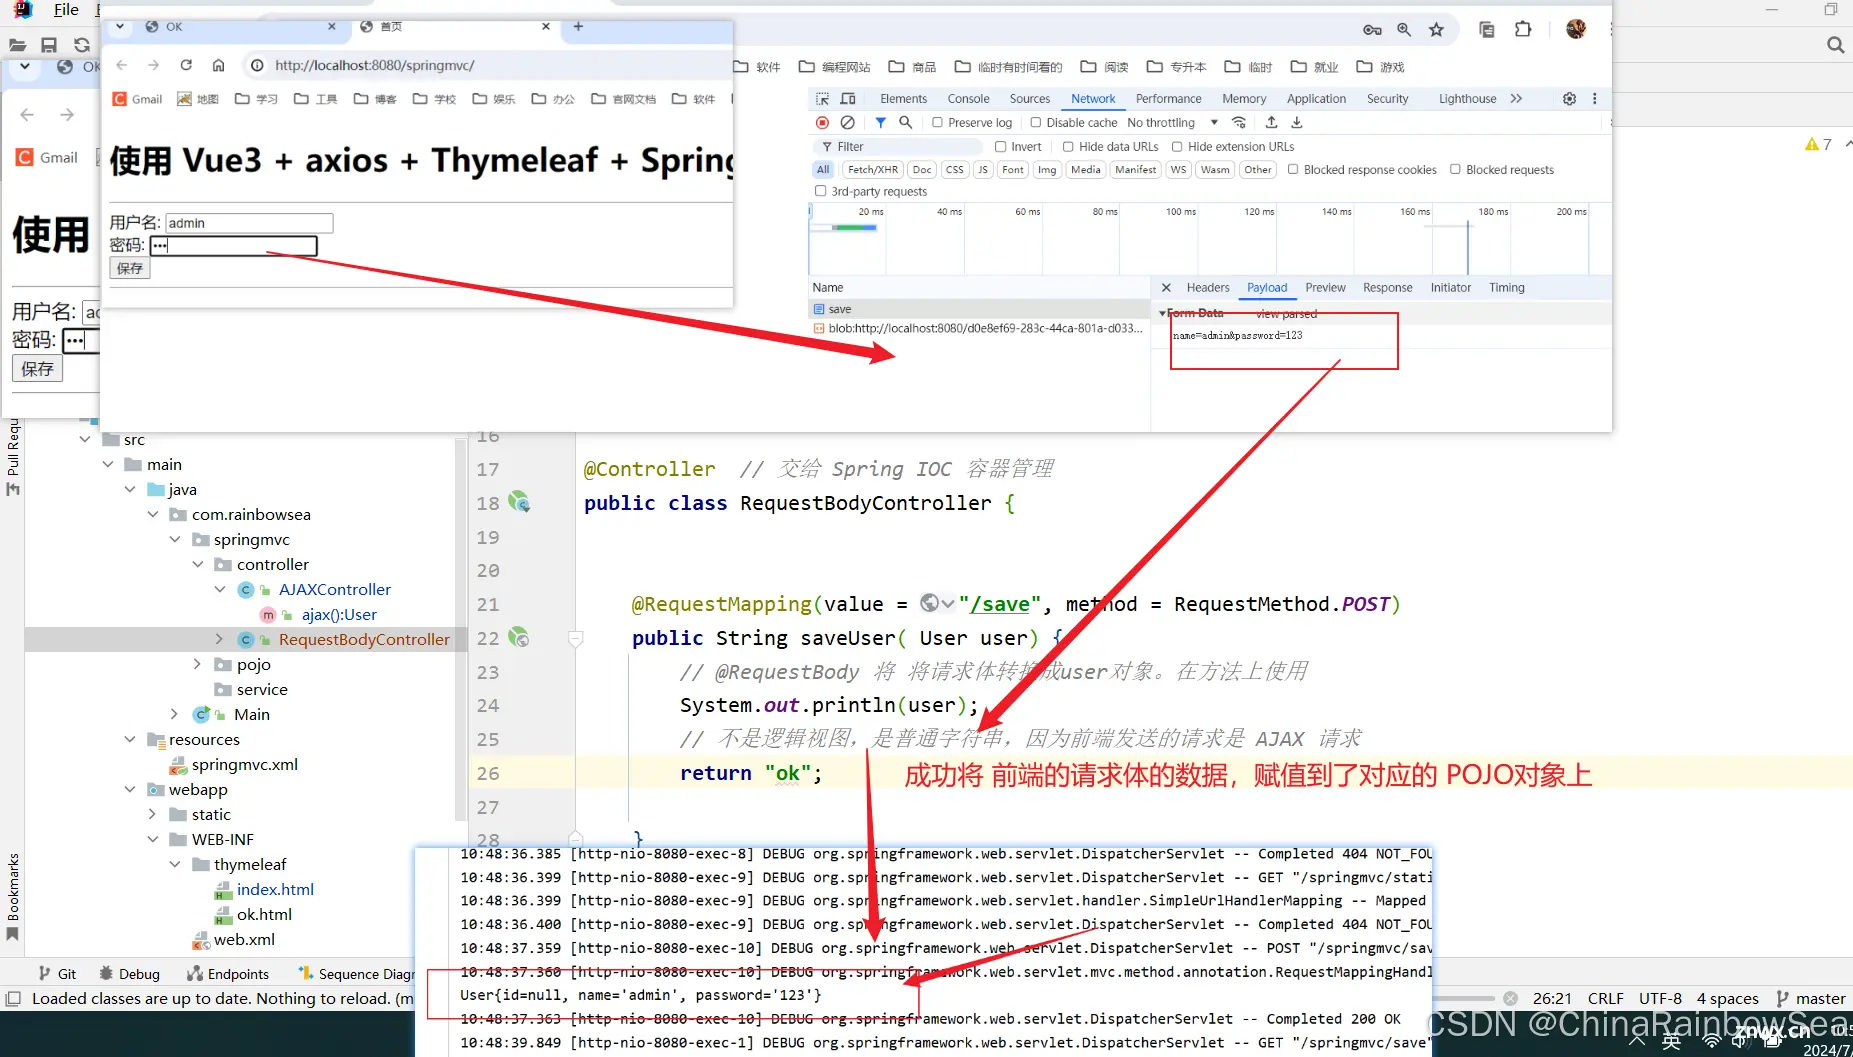
<code>username=admin&password=123
那么 Spring MVC会自动使用 FormHttpMessageConverter消息转换器,将请求体转换成 对应的 POJO对象,这里是 user对象。
package com.rainbowsea.springmvc.controller;
import com.rainbowsea.springmvc.pojo.User;
import org.springframework.http.HttpHeaders;
import org.springframework.http.HttpMethod;
import org.springframework.http.MediaType;
import org.springframework.http.RequestEntity;
import org.springframework.stereotype.Controller;
import org.springframework.web.bind.annotation.RequestBody;
import org.springframework.web.bind.annotation.RequestMapping;
import org.springframework.web.bind.annotation.RequestMethod;
import java.net.URI;
@Controller // 交给 Spring IOC 容器管理
public class RequestBodyController {
@RequestMapping(value = "/save", method = RequestMethod.POST)
public String saveUser( User user) {
// @RequestBody 将 将请求体转换成user对象。在方法上使用
System.out.println(user);
// 不是逻辑视图,是普通字符串,因为前端发送的请求是 AJAX 请求
return "ok";
}
}
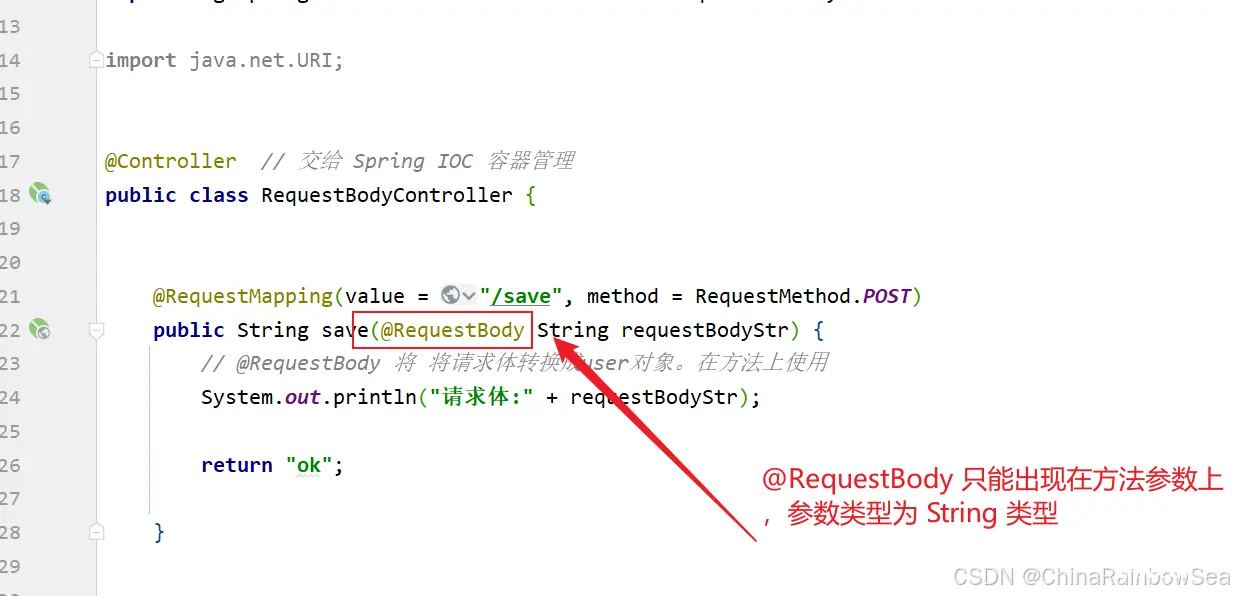
当使用这个注解的时候:这个注解只能出现在方法的参数上。
<code>
import com.rainbowsea.springmvc.bean.User;
import org.springframework.http.HttpHeaders;
import org.springframework.http.HttpMethod;
import org.springframework.http.MediaType;
import org.springframework.http.RequestEntity;
import org.springframework.stereotype.Controller;
import org.springframework.web.bind.annotation.RequestBody;
import org.springframework.web.bind.annotation.RequestMapping;
import org.springframework.web.bind.annotation.RequestMethod;
import java.net.URI;
@Controller // 交给 Spring IOC 容器管理
public class RequestBodyController {
@RequestMapping(value = "/save", method = RequestMethod.POST)
public String save(@RequestBody String requestBodyStr) {
// @RequestBody 将 将请求体转换成user对象。在方法上使用
System.out.println("请求体:" + requestBodyStr);
return "ok";
}
}
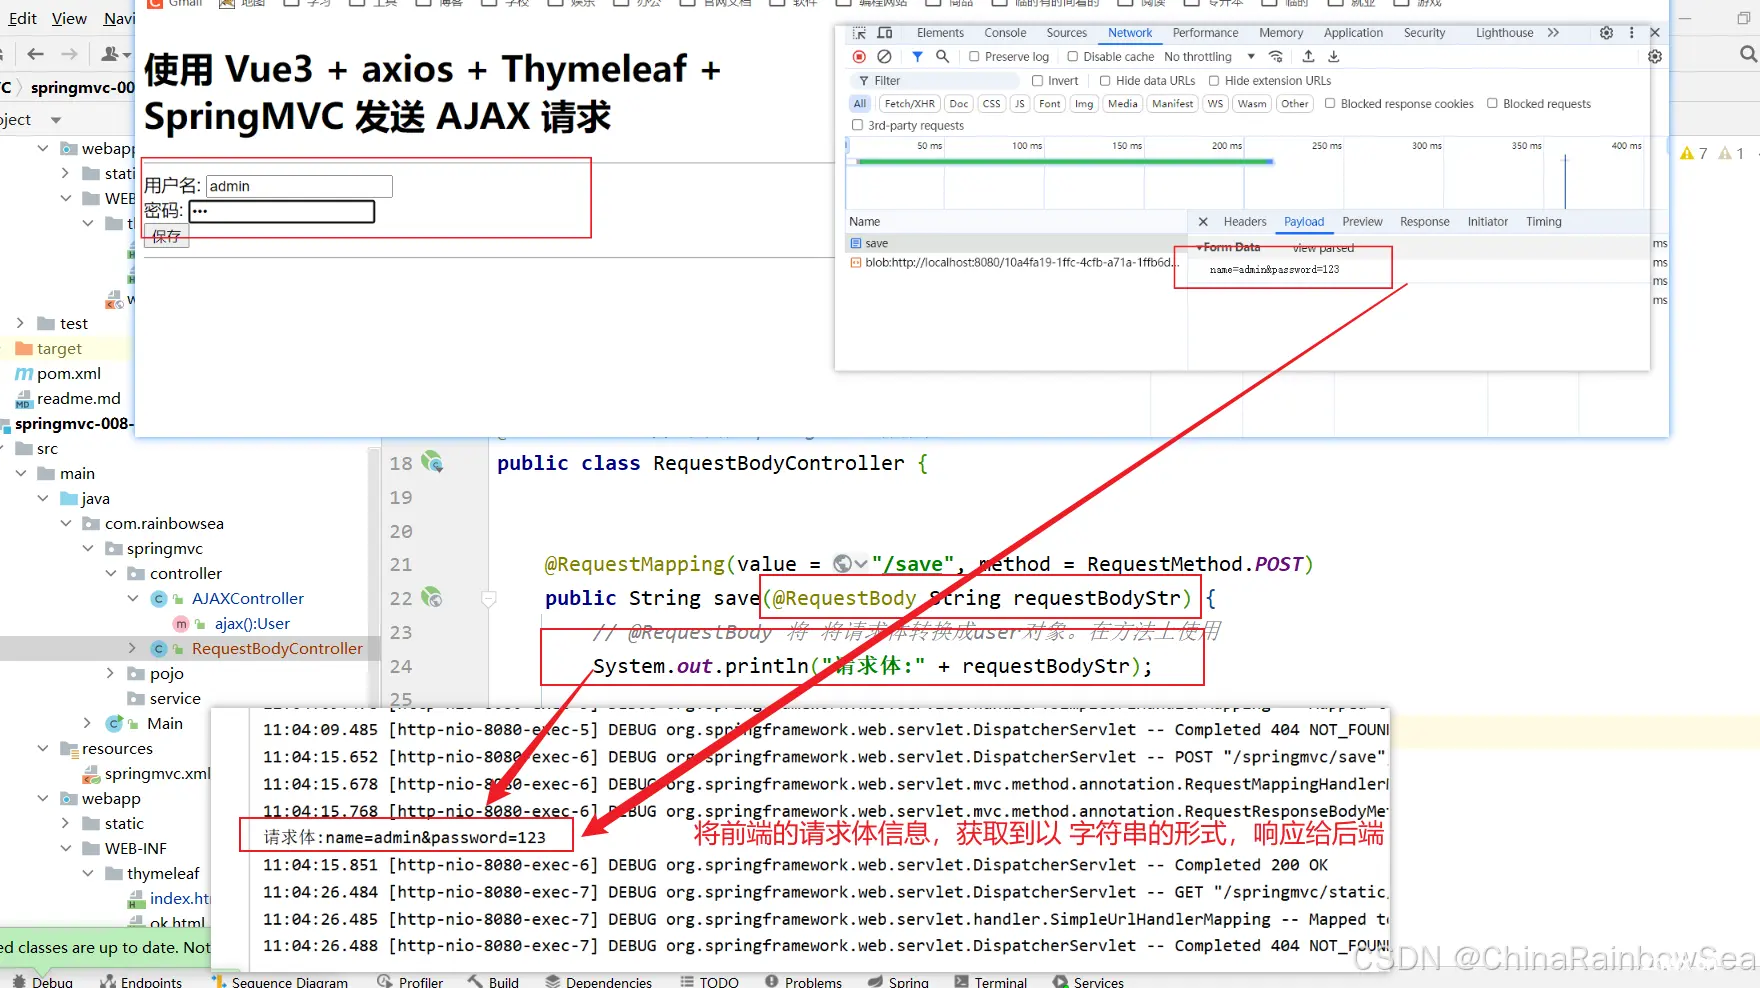
Spring MVC仍然会使用 <code>FormHttpMessageConverter消息转换器,将请求体直接以字符串形式传递给 requestBodyStr 变量。
7.1 MappingJackson2HttpMessageConverter 将前端提交的 JSON 格式的字符串,转换为 Java程序中的POJO对象
如果在请求体中提交的是一个 JSON 格式的字符串,这个 JSON 字符串传递给 Spring MVC 之后,能不能将 JSON 字符串转换成 POJO 对象呢?
答案是:可以的
此时必须使用
@RequetBody注解来完成,并且底层使用的消息转换器是:MappingJackson2HttpMessageConverter。实现步骤如下:
- 第一步:引入 jackson 依赖
- 第二步:开启注解驱动
- 第三步:创建POJO类,将POJO类作为控制器方法的参数,并使用 @RequestBody 注解标注该参数。
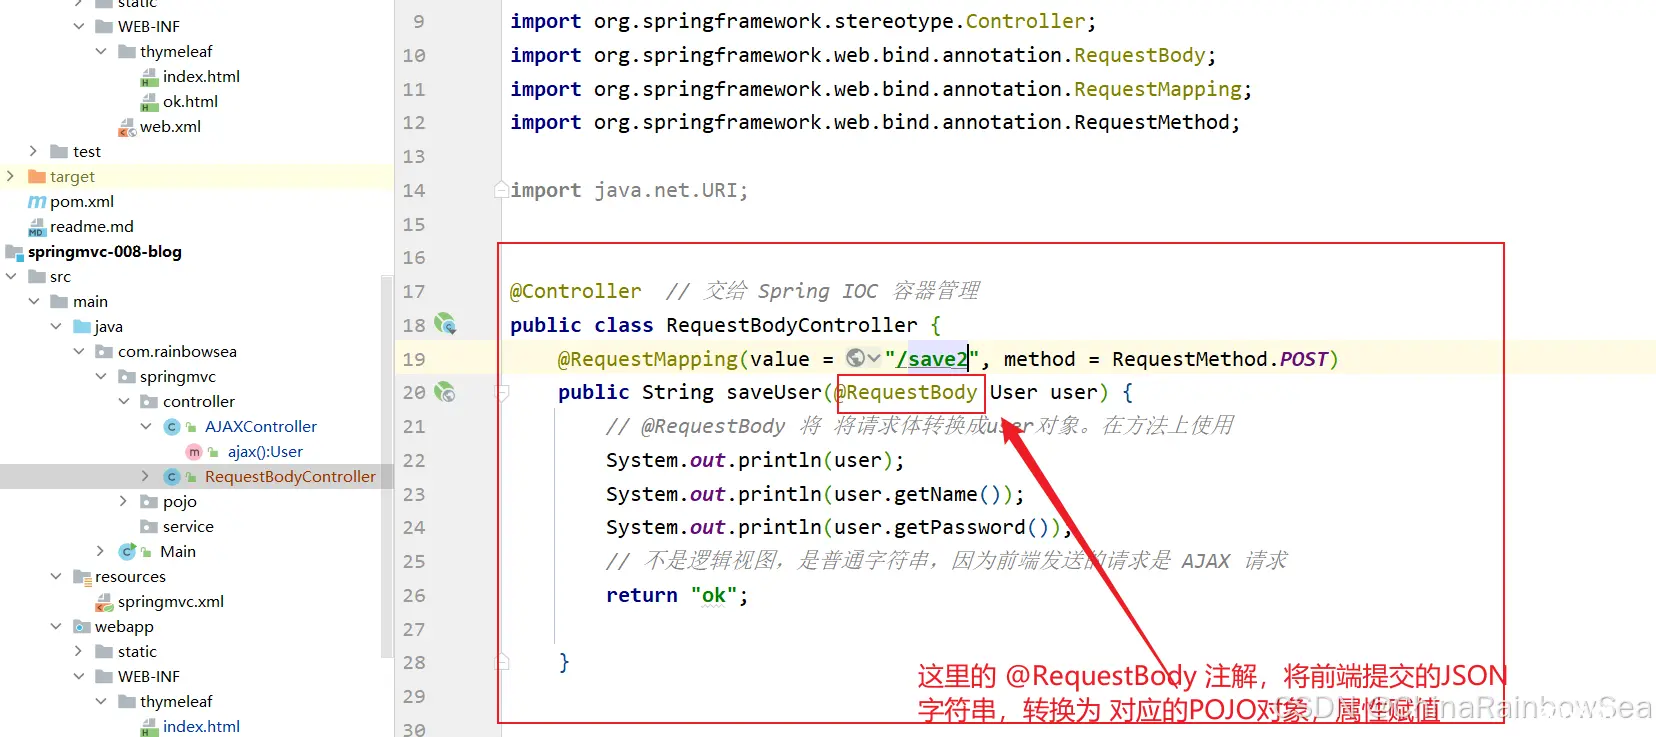
<code>
import com.rainbowsea.springmvc.pojo.User;
import org.springframework.http.HttpHeaders;
import org.springframework.http.HttpMethod;
import org.springframework.http.MediaType;
import org.springframework.http.RequestEntity;
import org.springframework.stereotype.Controller;
import org.springframework.web.bind.annotation.RequestBody;
import org.springframework.web.bind.annotation.RequestMapping;
import org.springframework.web.bind.annotation.RequestMethod;
import java.net.URI;
@Controller // 交给 Spring IOC 容器管理
public class RequestBodyController {
@RequestMapping(value = "/save2", method = RequestMethod.POST)
public String saveUser(@RequestBody User user) {
// @RequestBody 将 将请求体转换成user对象。在方法上使用
System.out.println(user);
System.out.println(user.getName());
System.out.println(user.getPassword());
// 不是逻辑视图,是普通字符串,因为前端发送的请求是 AJAX 请求
return "ok";
}
}
第四步:在前端 请求体中提交 json格式 的数据。
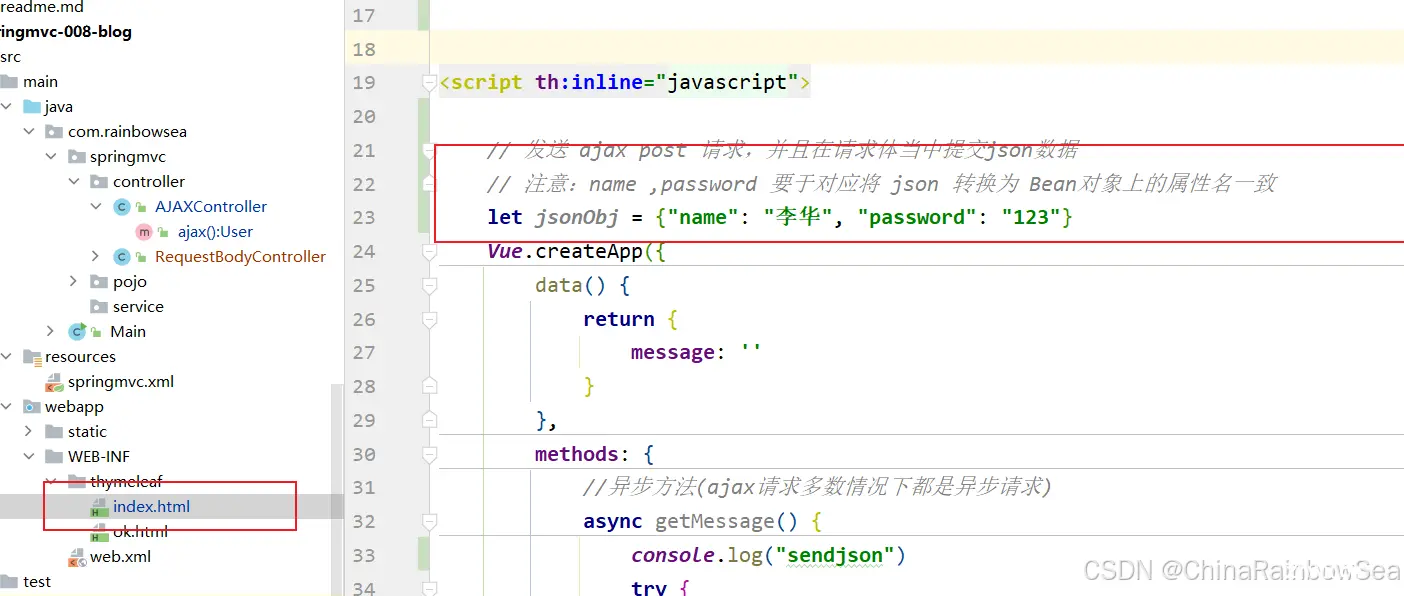
<code><!DOCTYPE html>
<html lang="en" xmlns:th="http://www.thymeleaf.org">code>
<head>
<meta charset="UTF-8">code>
<title>首页</title>
<script th:src="@{/static/js/vue3.4.21.js}"></script>code>
<script th:src="@{/static/js/axios.min.js}"></script>code>
</head>
<body>
<h1>使用 Vue3 + axios + Thymeleaf + SpringMVC 发送 AJAX 请求</h1>
<hr>
<div >
<h1>{{message}}</h1>
<button @click="getMessage">获取消息</button>code>
</div>
<script th:inline="javascript">code>
// 发送 ajax post 请求,并且在请求体当中提交json数据
// 注意:name ,password 要于对应将 json 转换为 Bean对象上的属性名一致
let jsonObj = {"name": "李华", "password": "123"}
Vue.createApp({
data() {
return {
message: ''
}
},
methods: {
//异步方法(ajax请求多数情况下都是异步请求)
async getMessage() {
console.log("sendjson")
try {
// 发送 ajax请求
// await axios.get('/springmvc/ajax')
//动态获取 应用的根/springmvc/
const response = await axios.post([[@{/}]] + 'save2',JSON.stringify(jsonObj),{
headers
:
{
// 请求体的状态信息
"Content-Type"
:
"application/json"
}
})
// 将返回的数据交给 message
this.message = response.data
} catch
(e) {
console.error(e)
}
}
}
}).mount("#app")
</script>
</body>
</html>
测试结果:
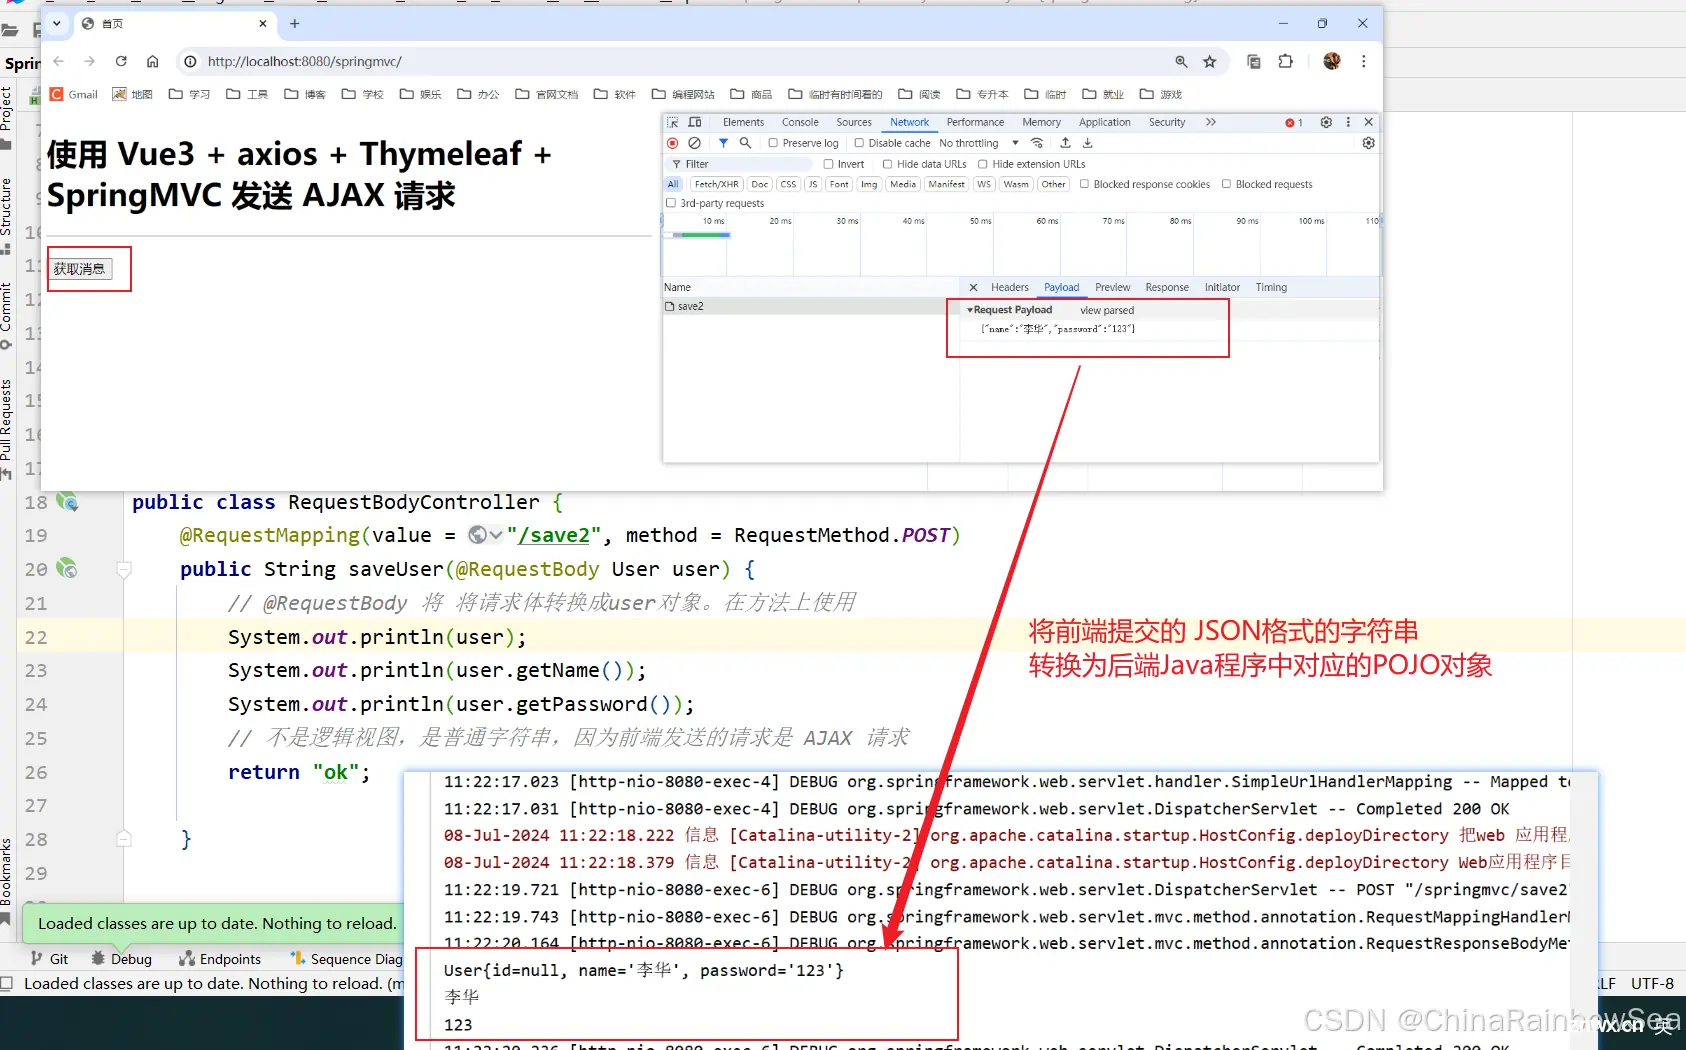
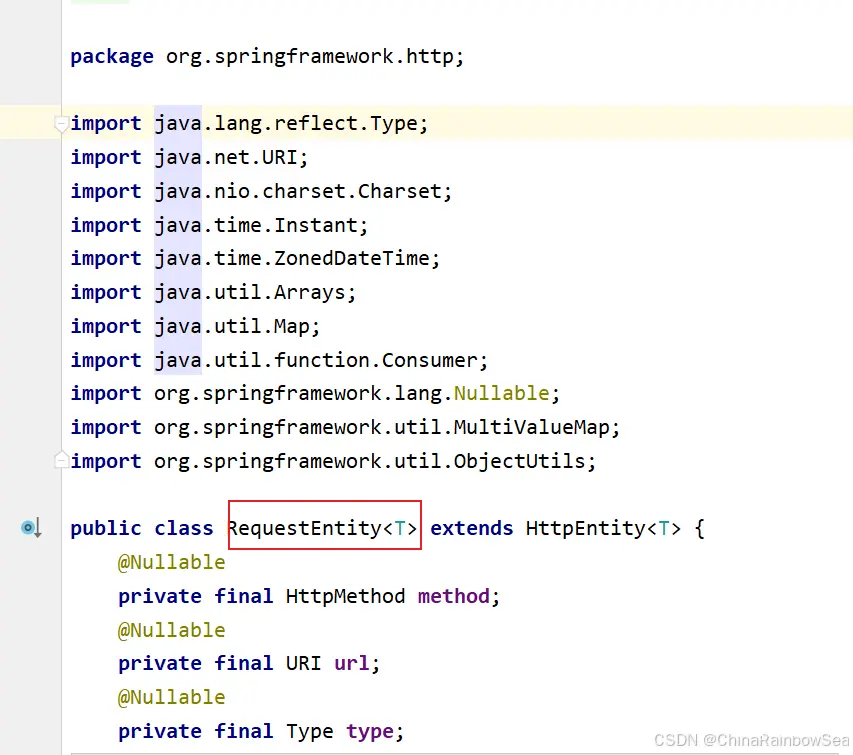
8. RequestEntity 类
RequestEntity 不是一个注解,是一个普通的类,这个类的实例封装了整个请求协议:包括请求行,请求头,请求体所有信息。
该 RequestEntity 类出现在控制器方法的参数上。
使用测试:如下是对应的 html 页面
<code><!DOCTYPE html>
<html lang="en" xmlns:th="http://www.thymeleaf.org">code>
<head>
<meta charset="UTF-8">code>
<title>首页</title>
<script th:src="@{/static/js/vue3.4.21.js}"></script>code>
<script th:src="@{/static/js/axios.min.js}"></script>code>
</head>
<body>
<h1>使用 Vue3 + axios + Thymeleaf + SpringMVC 发送 AJAX 请求</h1>
<hr>
<div >
<h1>{{message}}</h1>
<button @click="getMessage">获取消息</button>code>
</div>
<script th:inline="javascript">code>
// 发送 ajax post 请求,并且在请求体当中提交json数据
// 注意:name ,password 要于对应将 json 转换为 Bean对象上的属性名一致
let jsonObj = {"name": "李华", "password": "123"}
Vue.createApp({
data() {
return {
message: ''
}
},
methods: {
//异步方法(ajax请求多数情况下都是异步请求)
async getMessage() {
console.log("sendjson")
try {
// 发送 ajax请求
// await axios.get('/springmvc/ajax')
//动态获取 应用的根/springmvc/
const response = await axios.post([[@{/}]] + 'save2',JSON.stringify(jsonObj),{
headers
:
{
// 请求体的状态信息
"Content-Type"
:
"application/json"
}
})
// 将返回的数据交给 message
this.message = response.data
} catch
(e) {
console.error(e)
}
}
}
}).mount("#app")
</script>
</body>
</html>
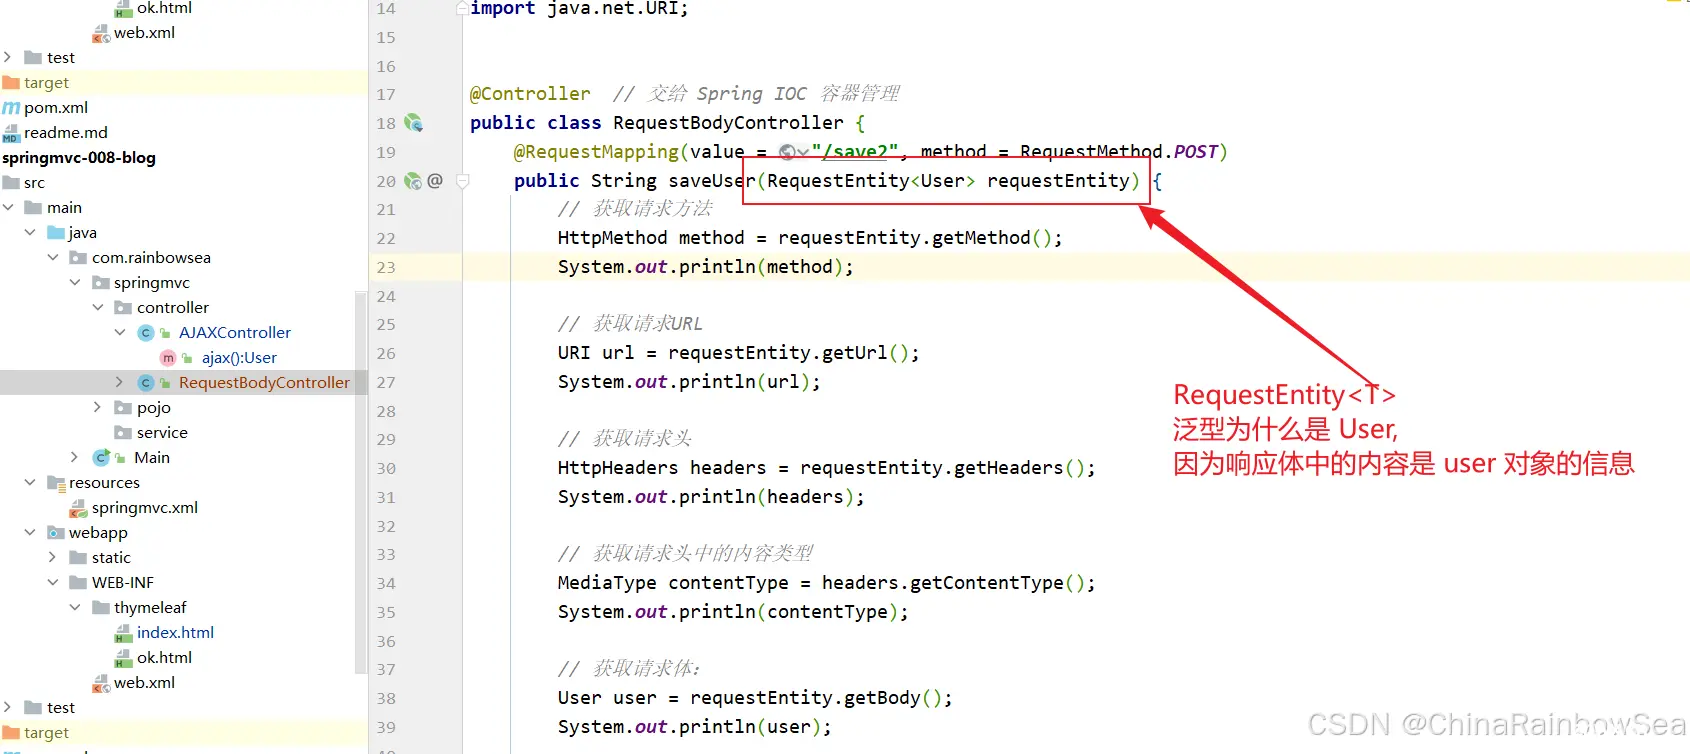
<code>package com.rainbowsea.springmvc.controller;
import com.rainbowsea.springmvc.pojo.User;
import org.springframework.http.HttpHeaders;
import org.springframework.http.HttpMethod;
import org.springframework.http.MediaType;
import org.springframework.http.RequestEntity;
import org.springframework.stereotype.Controller;
import org.springframework.web.bind.annotation.RequestBody;
import org.springframework.web.bind.annotation.RequestMapping;
import org.springframework.web.bind.annotation.RequestMethod;
import java.net.URI;
@Controller // 交给 Spring IOC 容器管理
public class RequestBodyController {
@RequestMapping(value = "/save2", method = RequestMethod.POST)
public String saveUser(RequestEntity<User> requestEntity) {
// 获取请求方法
HttpMethod method = requestEntity.getMethod();
System.out.println(method);
// 获取请求URL
URI url = requestEntity.getUrl();
System.out.println(url);
// 获取请求头
HttpHeaders headers = requestEntity.getHeaders();
System.out.println(headers);
// 获取请求头中的内容类型
MediaType contentType = headers.getContentType();
System.out.println(contentType);
// 获取请求体:
User user = requestEntity.getBody();
System.out.println(user);
return "ok";
}
}
测试结果:
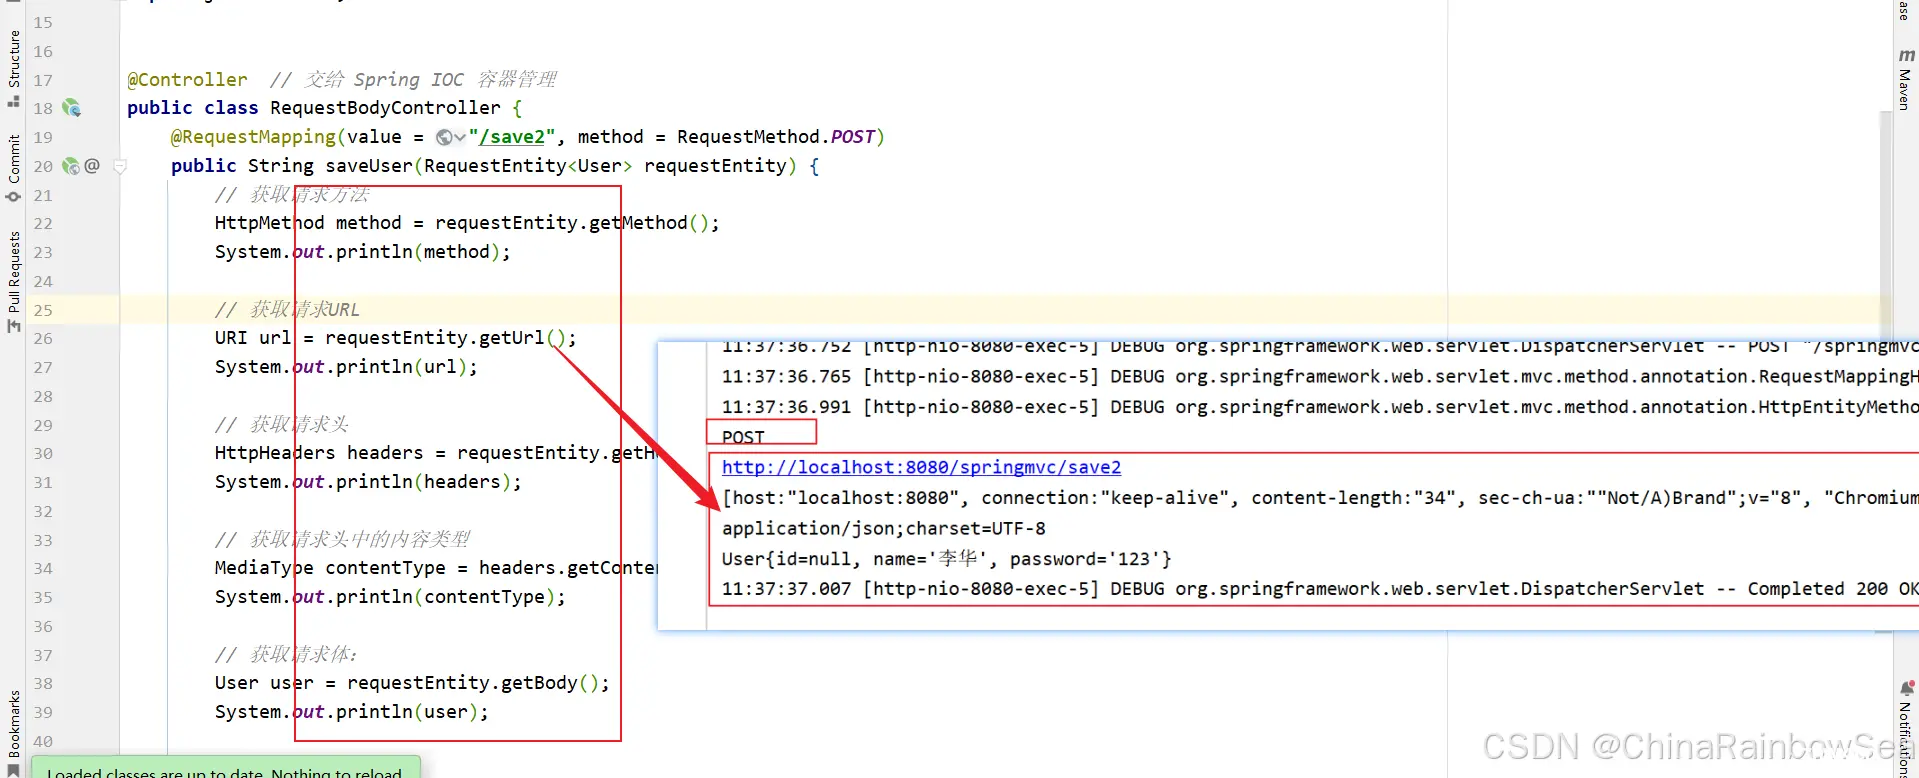
9. ResponseEntity 类
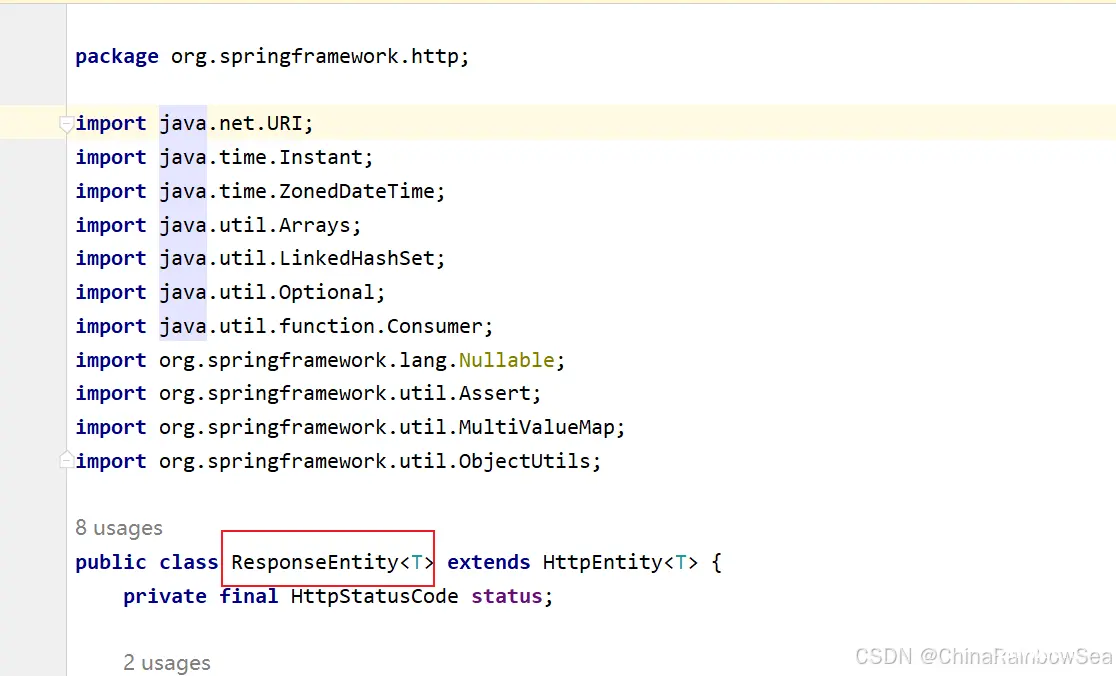
ResponseEntity 不是注解,而是一个类。使用该类的实例可以封装响应协议,包括:状态行,响应头,响应体。 也就是说:如果你想定制属于自己的响应协议,可以使用该类。
举例:这里假如我们有这么一个需求:
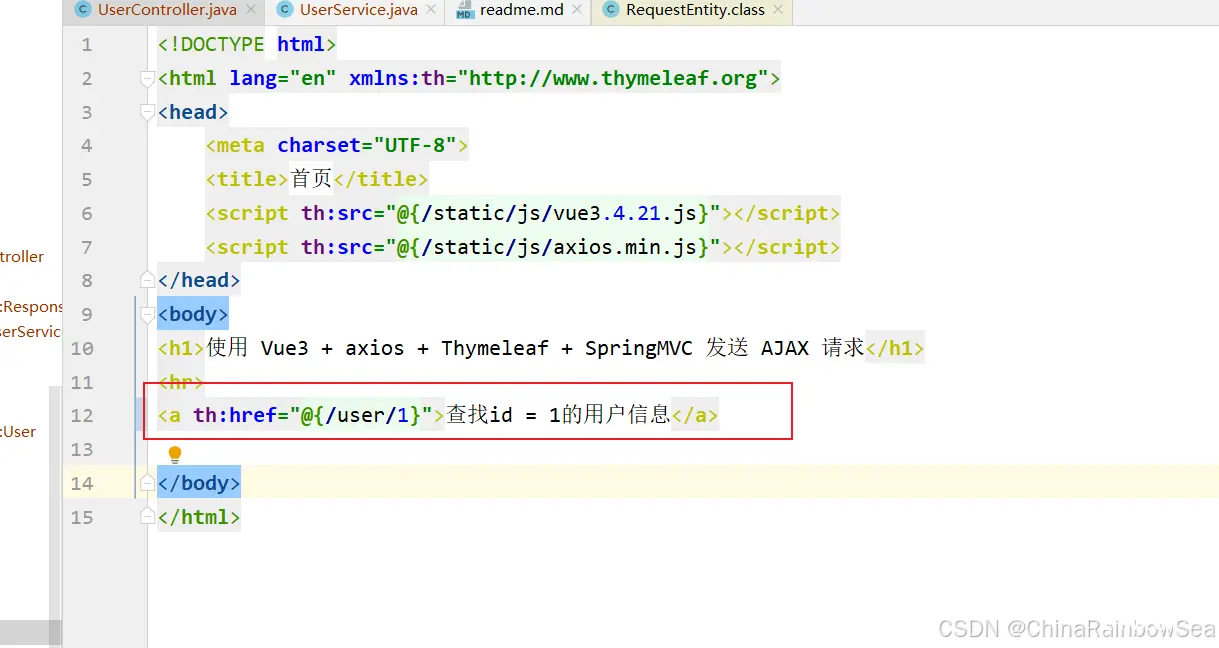
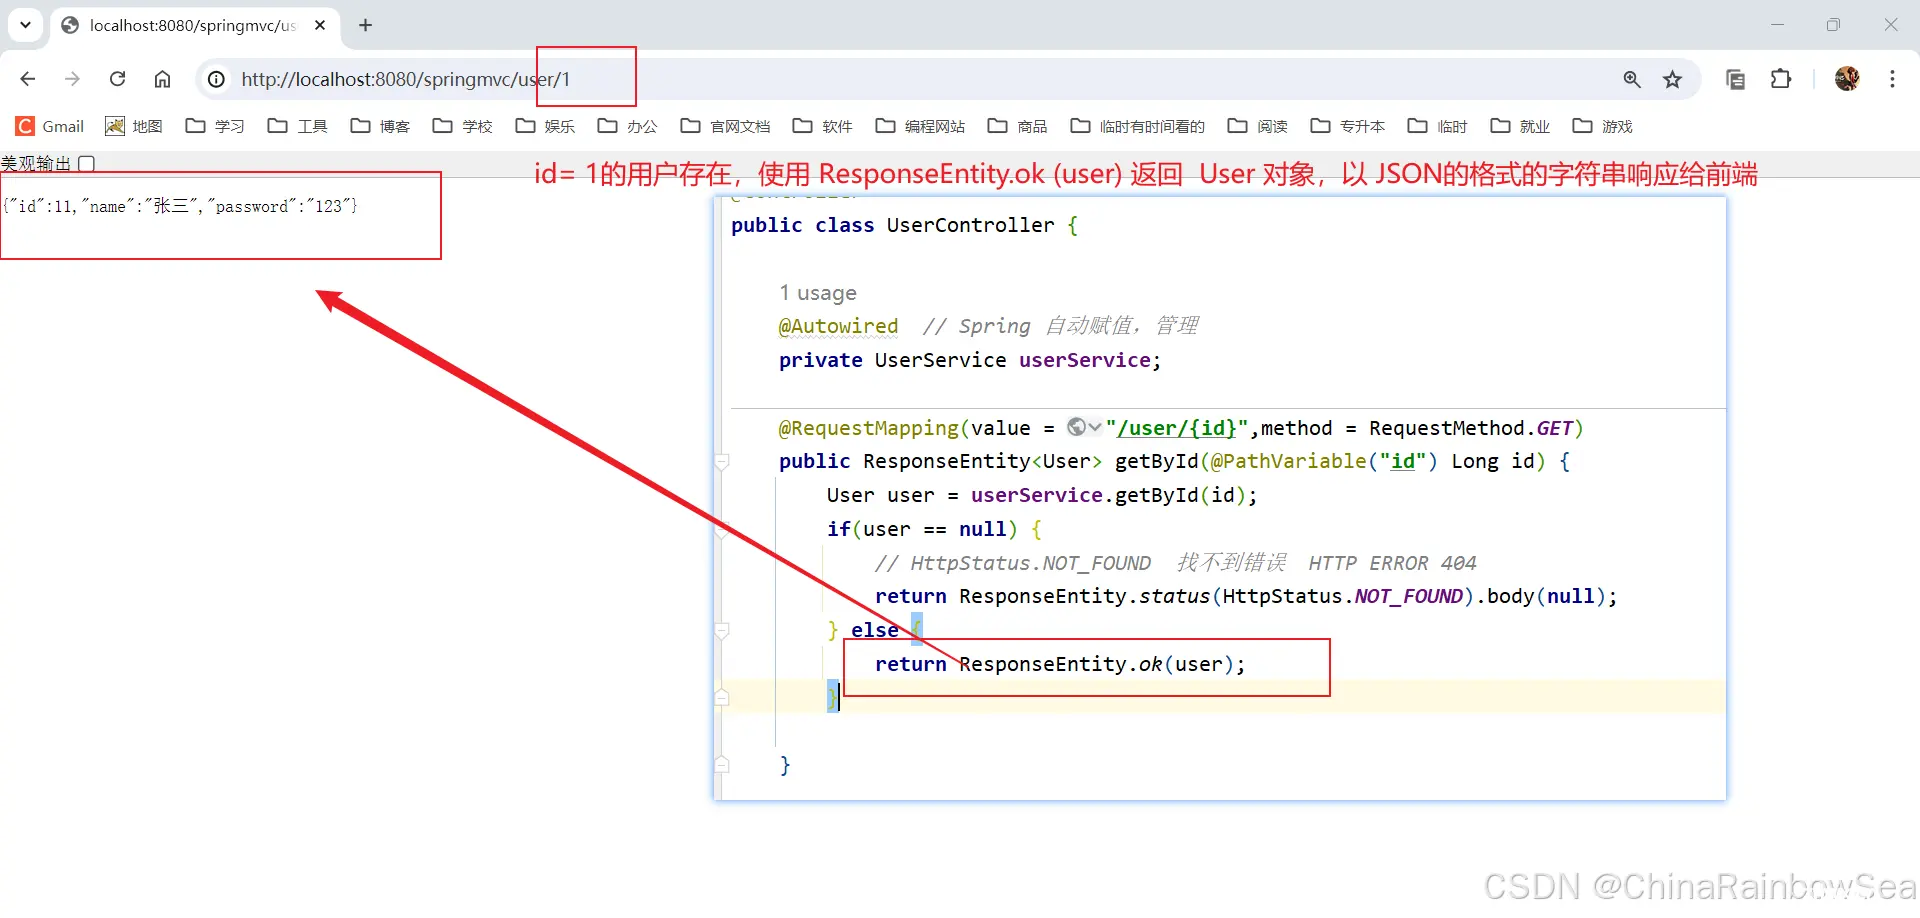
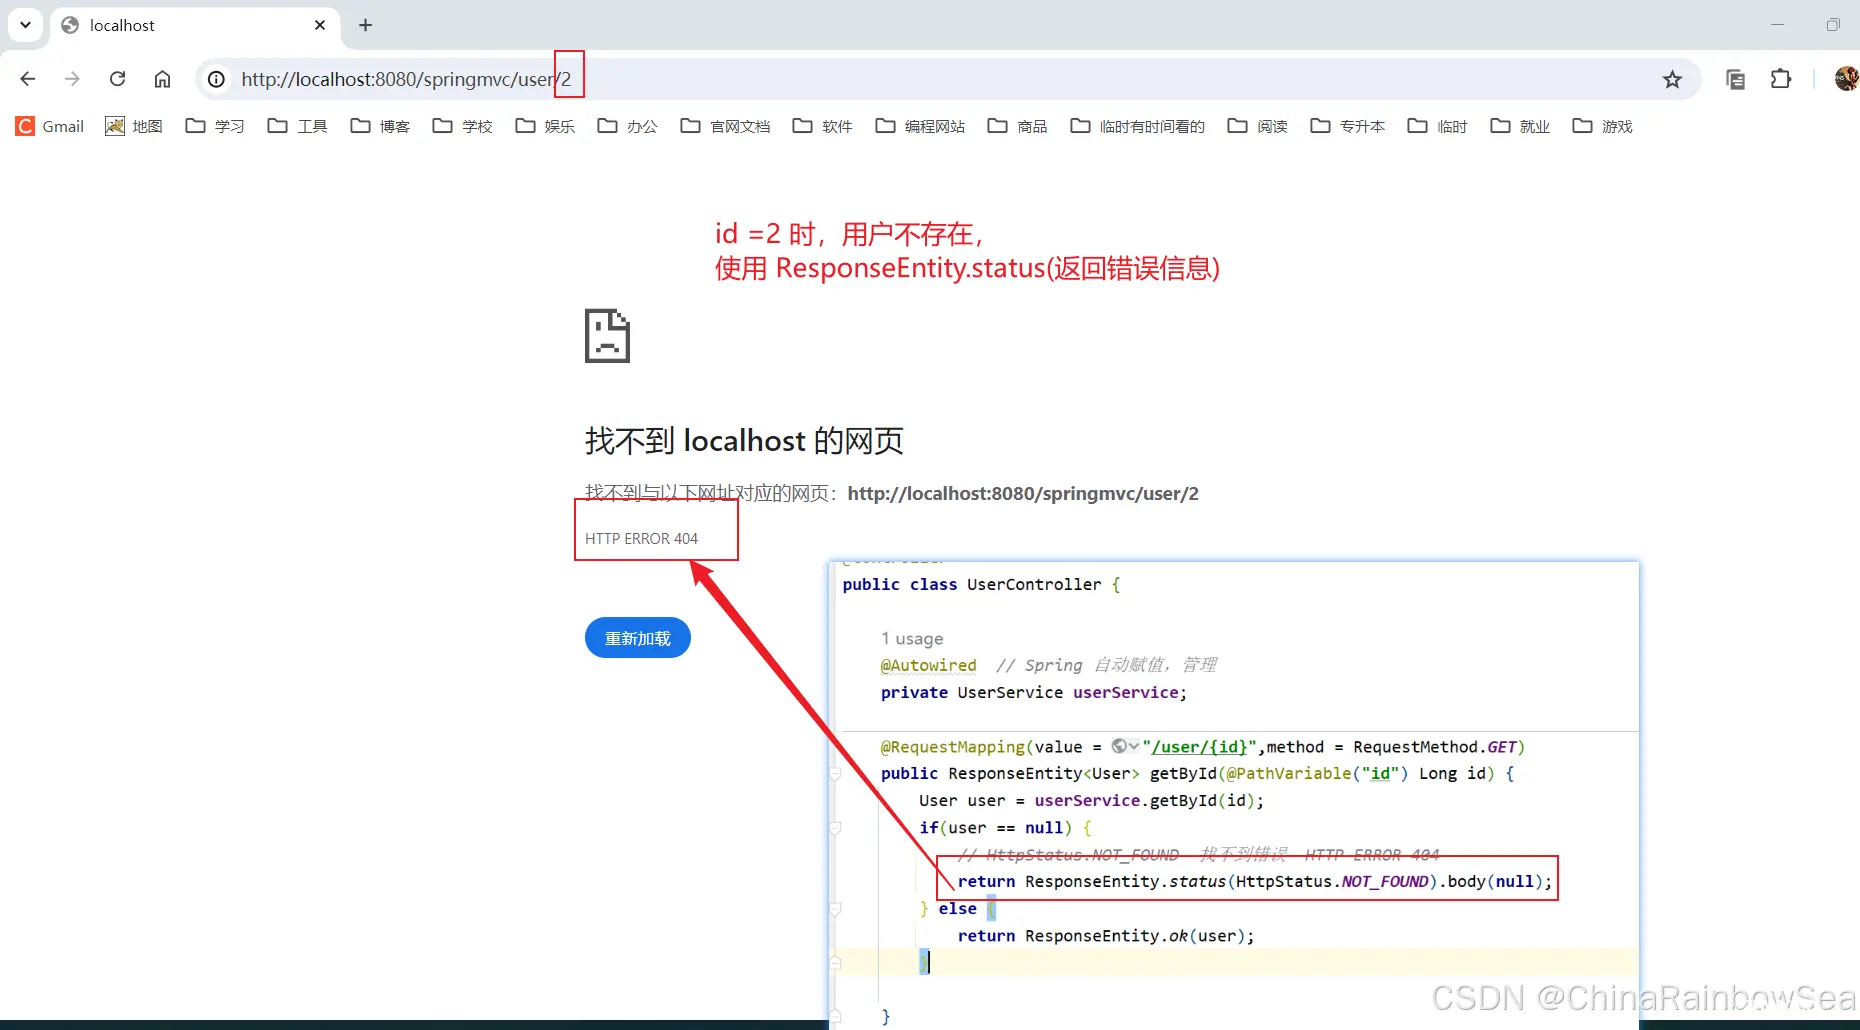
前端提交一个 id,后端根据 id 进行查询,如果返回 null,请在前端显示 404 错误,如果返回不是 null,则输出返回 User 对象。
前端页面设置:
后端处理:
首先编写一个 Service 进行一个查询处理,这里我们就简单判断一下,就不连接数据库了。
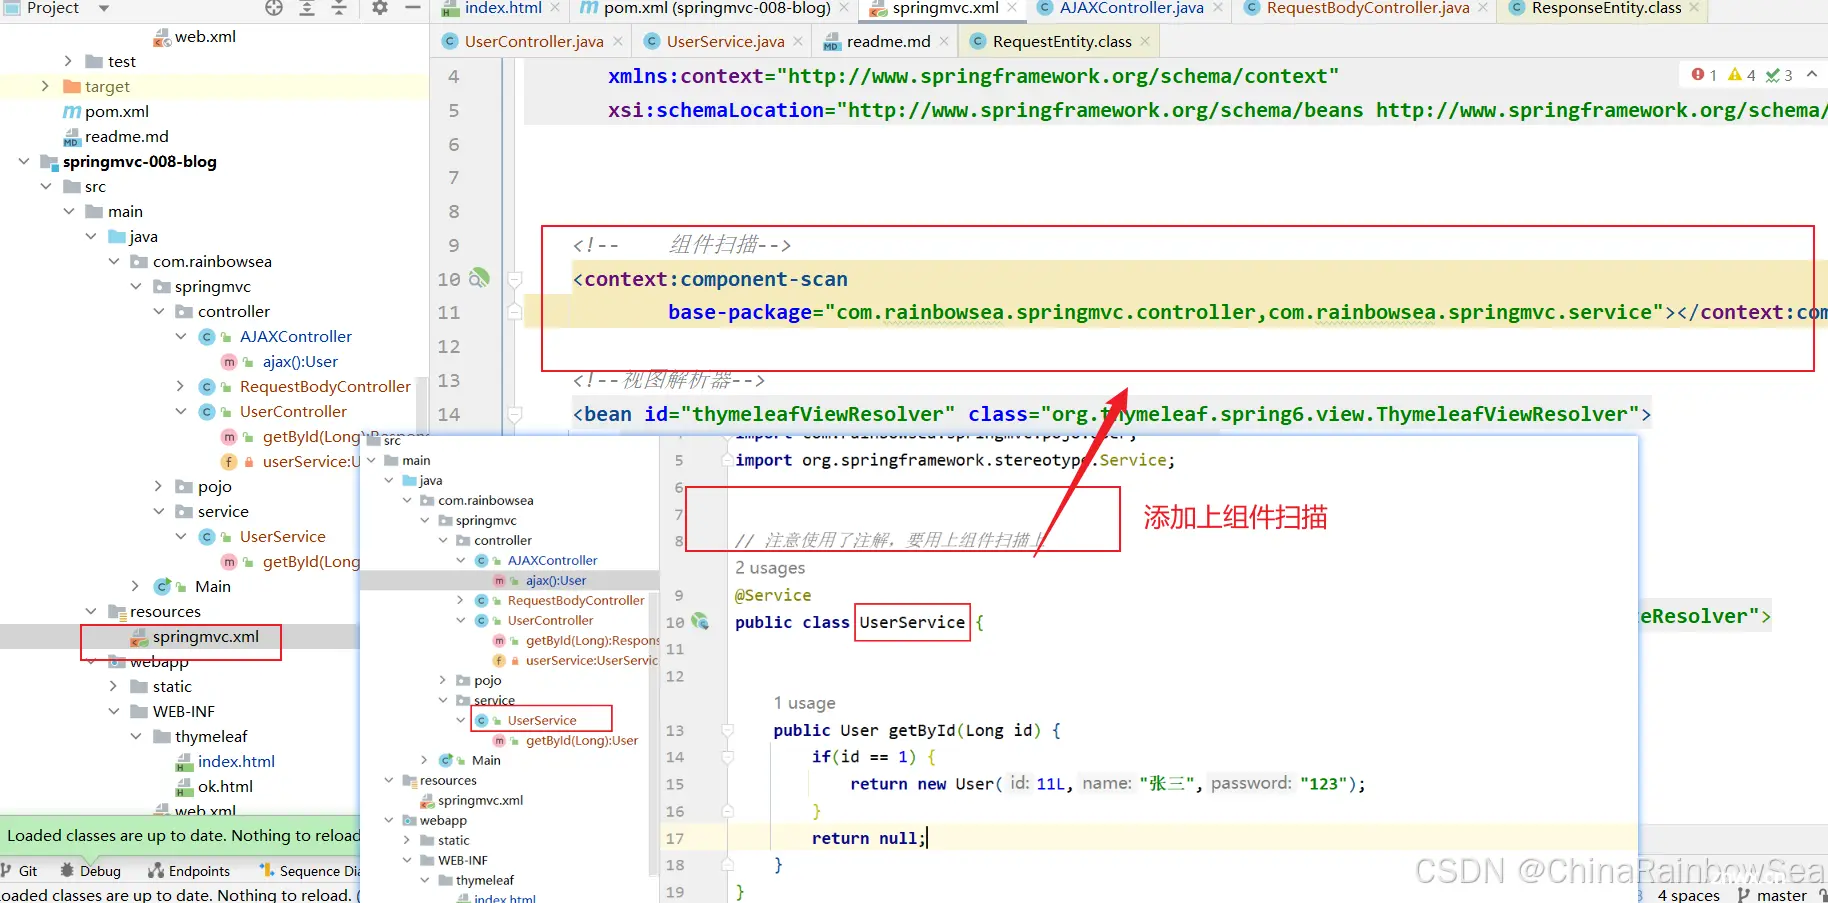
<code>package com.rainbowsea.springmvc.service;
import com.rainbowsea.springmvc.pojo.User;
import org.springframework.stereotype.Service;
// 注意使用了注解,要用上组件扫描上
@Service
public class UserService {
public User getById(Long id) {
if(id == 1) {
return new User(11L,"张三","123");
}
return null;
}
}
最后是对应 Controller 控制器的编写
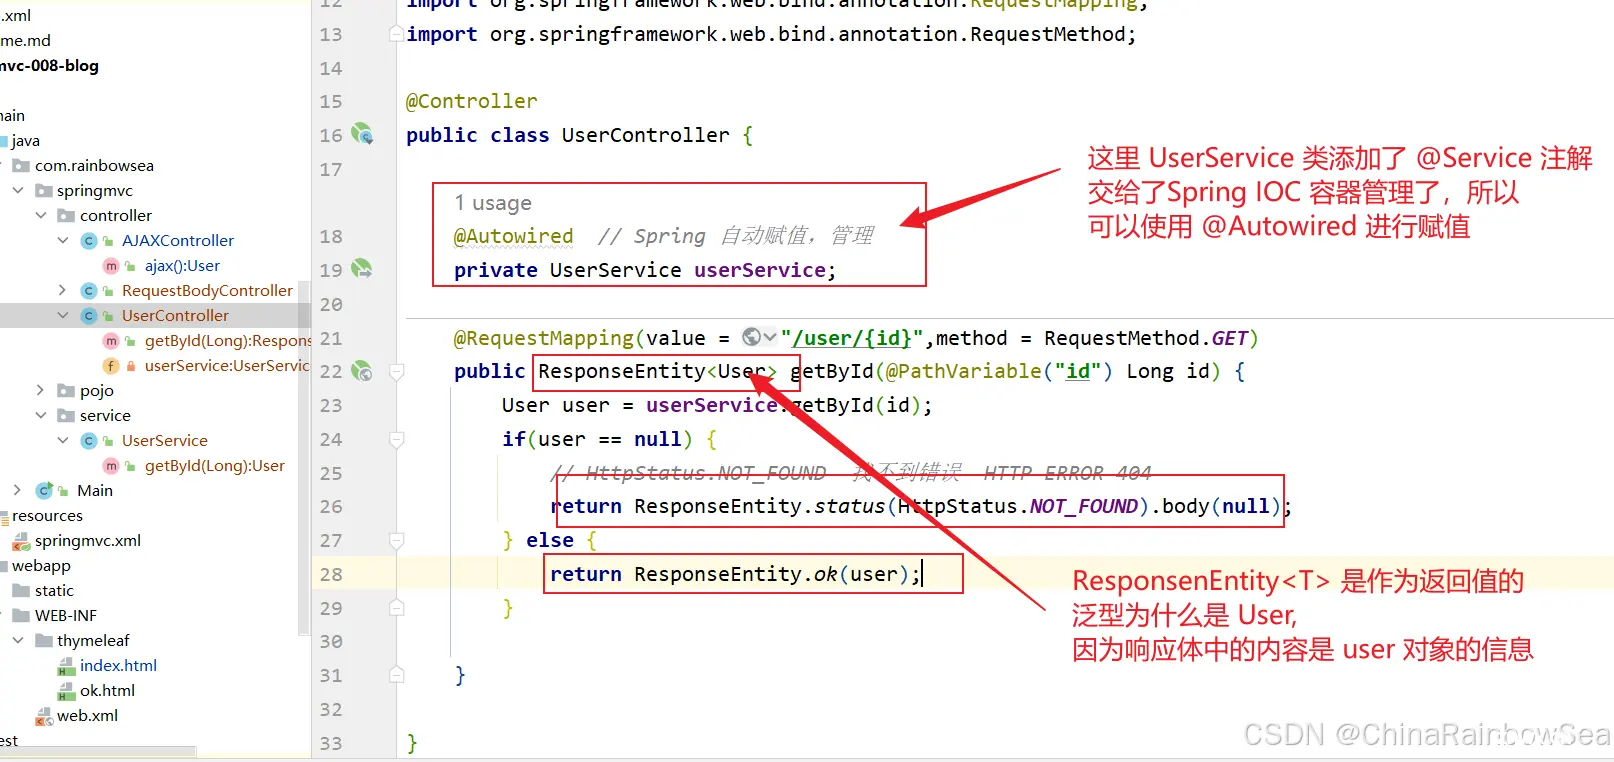
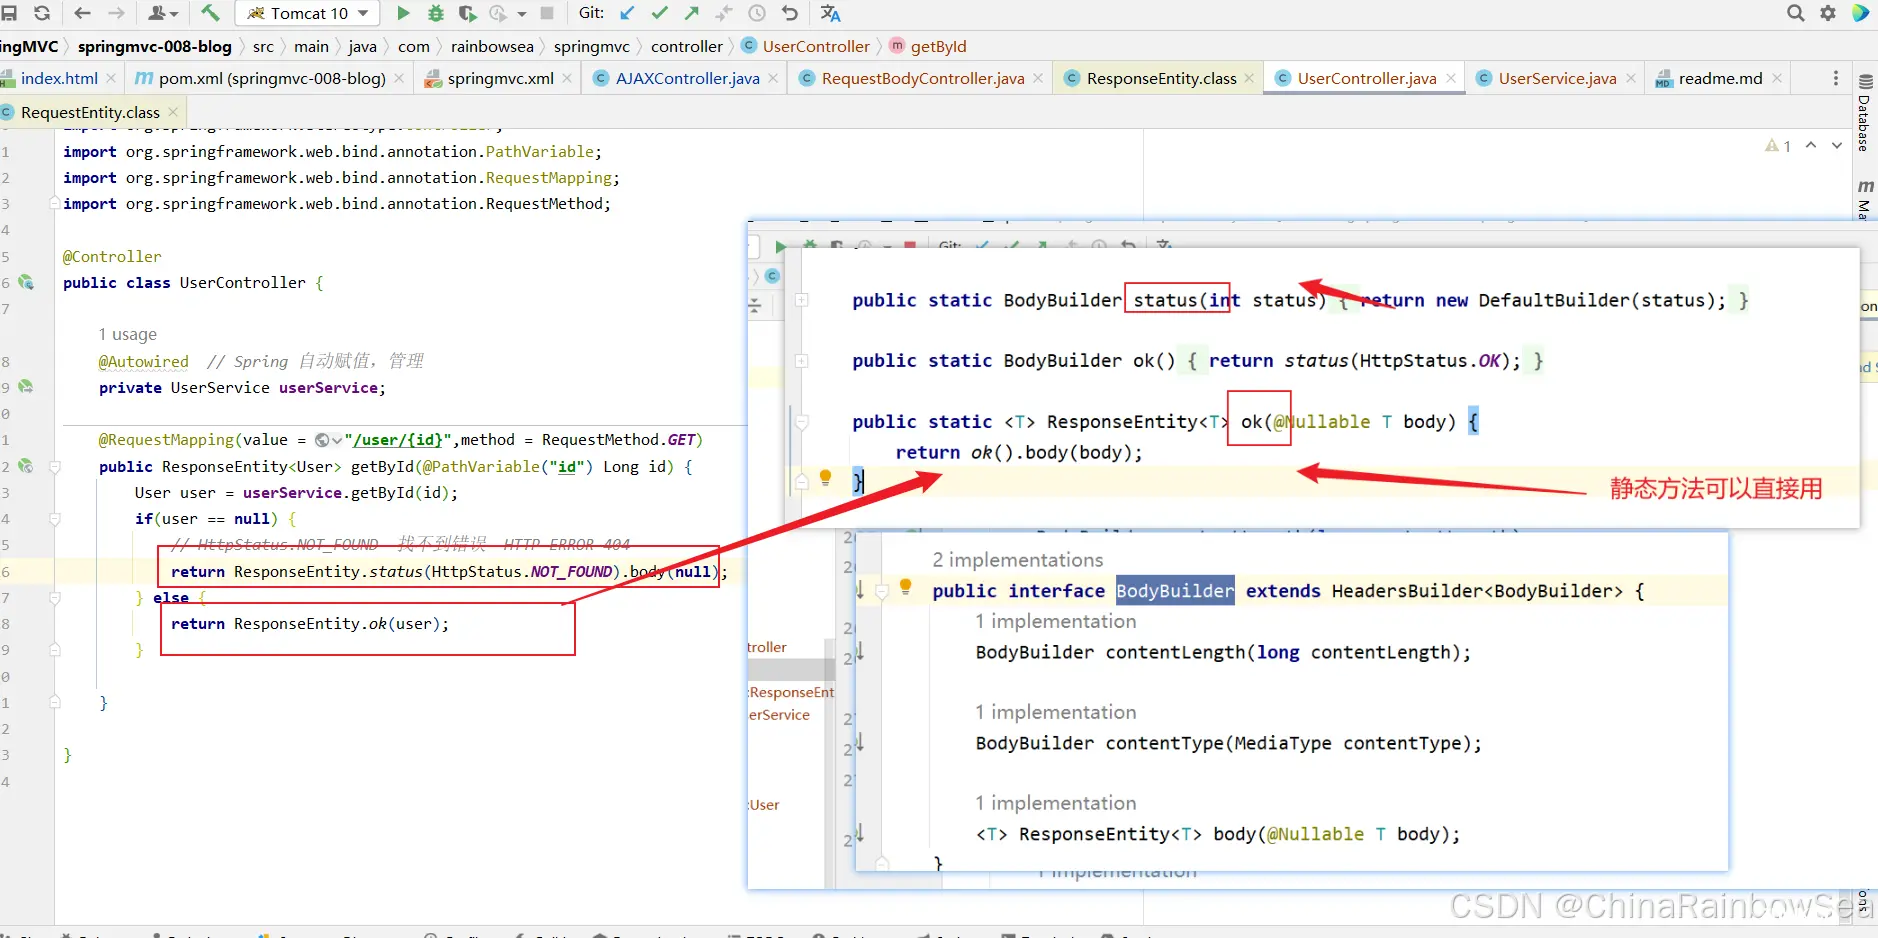
<code>package com.rainbowsea.springmvc.controller;
import com.rainbowsea.springmvc.pojo.User;
import com.rainbowsea.springmvc.service.UserService;
import org.springframework.beans.factory.annotation.Autowired;
import org.springframework.http.HttpStatus;
import org.springframework.http.ResponseEntity;
import org.springframework.stereotype.Controller;
import org.springframework.web.bind.annotation.PathVariable;
import org.springframework.web.bind.annotation.RequestMapping;
import org.springframework.web.bind.annotation.RequestMethod;
@Controller
public class UserController {
@Autowired // Spring 自动赋值,管理
private UserService userService;
@RequestMapping(value = "/user/{id}",method = RequestMethod.GET)
public ResponseEntity<User> getById(@PathVariable("id") Long id) {
User user = userService.getById(id);
if(user == null) {
// HttpStatus.NOT_FOUND 找不到错误 HTTP ERROR 404
return ResponseEntity.status(HttpStatus.NOT_FOUND).body(null);
} else {
return ResponseEntity.ok(user);
}
}
}
测试:当用户存在时
测试:当用户不存在时
10. 总结:
- HTTP 协议包括 <code>请求协议 和
响应协议。- @ResponseBody 将服务器端的 return 返回值转化为“字符串(JSON格式的字符串)”再返回给客户端。
- @ResponseBody 将POJO对象 以 JSON格式 的字符串响应给浏览器
- 第一种方式:自己写代码 将POJO对象 转换成JSON格式的字符串(如上面所示 return "{"username":"zhangsan","password":"1234"}"; ),用上面的方式直接 return即可。
- 第二种方式:启用
MappingJackson2HttpMessageConverter消息转换器。- 需要注意的时需要添加:涉及到 JSON格式的转换,都需要导入相关的jar包,以及开启注解驱动。
- @RestController = (@Controller + @ResponseBody ), 被它标注的@RestController中所有的方法上都会自动标注 @ResponseBody
- @RequestBody 将前端的请求体的信息转换Java程序中的 POJO对象,该注解只能使用在处理器方法的形参上,还可以将 前端的请求体直接以字符串形式传递给 requestBodyStr 变量。
@RequetBody注解将前端提交的 JSON 格式的字符串,转换为 Java程序中的POJO对象,涉及到 JSON格式的转换,都需要导入相关的jar包,以及开启注解驱动。- RequestEntity 类是一个普通的类,这个类的实例封装了整个请求协议:包括请求行,请求头,请求体所有信息。 该 RequestEntity 类出现在控制器方法的参数上。
- ResponseEntity 是一个类。使用该类的实例可以封装响应协议,包括:状态行,响应头,响应体。 也就是说:如果你想定制属于自己的响应协议,可以使用该类。
- 无论是那个,只要涉及到 JSON格式的转换,都需要导入相关的jar包,以及开启注解驱动。
11. 最后:
“在这个最后的篇章中,我要表达我对每一位读者的感激之情。你们的关注和回复是我创作的动力源泉,我从你们身上吸取了无尽的灵感与勇气。我会将你们的鼓励留在心底,继续在其他的领域奋斗。感谢你们,我们总会在某个时刻再次相遇。”
声明
本文内容仅代表作者观点,或转载于其他网站,本站不以此文作为商业用途
如有涉及侵权,请联系本站进行删除
转载本站原创文章,请注明来源及作者。
