Vitis AI 环境搭建 & KV260 PYNQ 安装 & 要点总结
hi94 2024-07-14 14:31:01 阅读 76
目录
1. 环境
2. 工具及版本介绍
2.1 工具版本兼容性
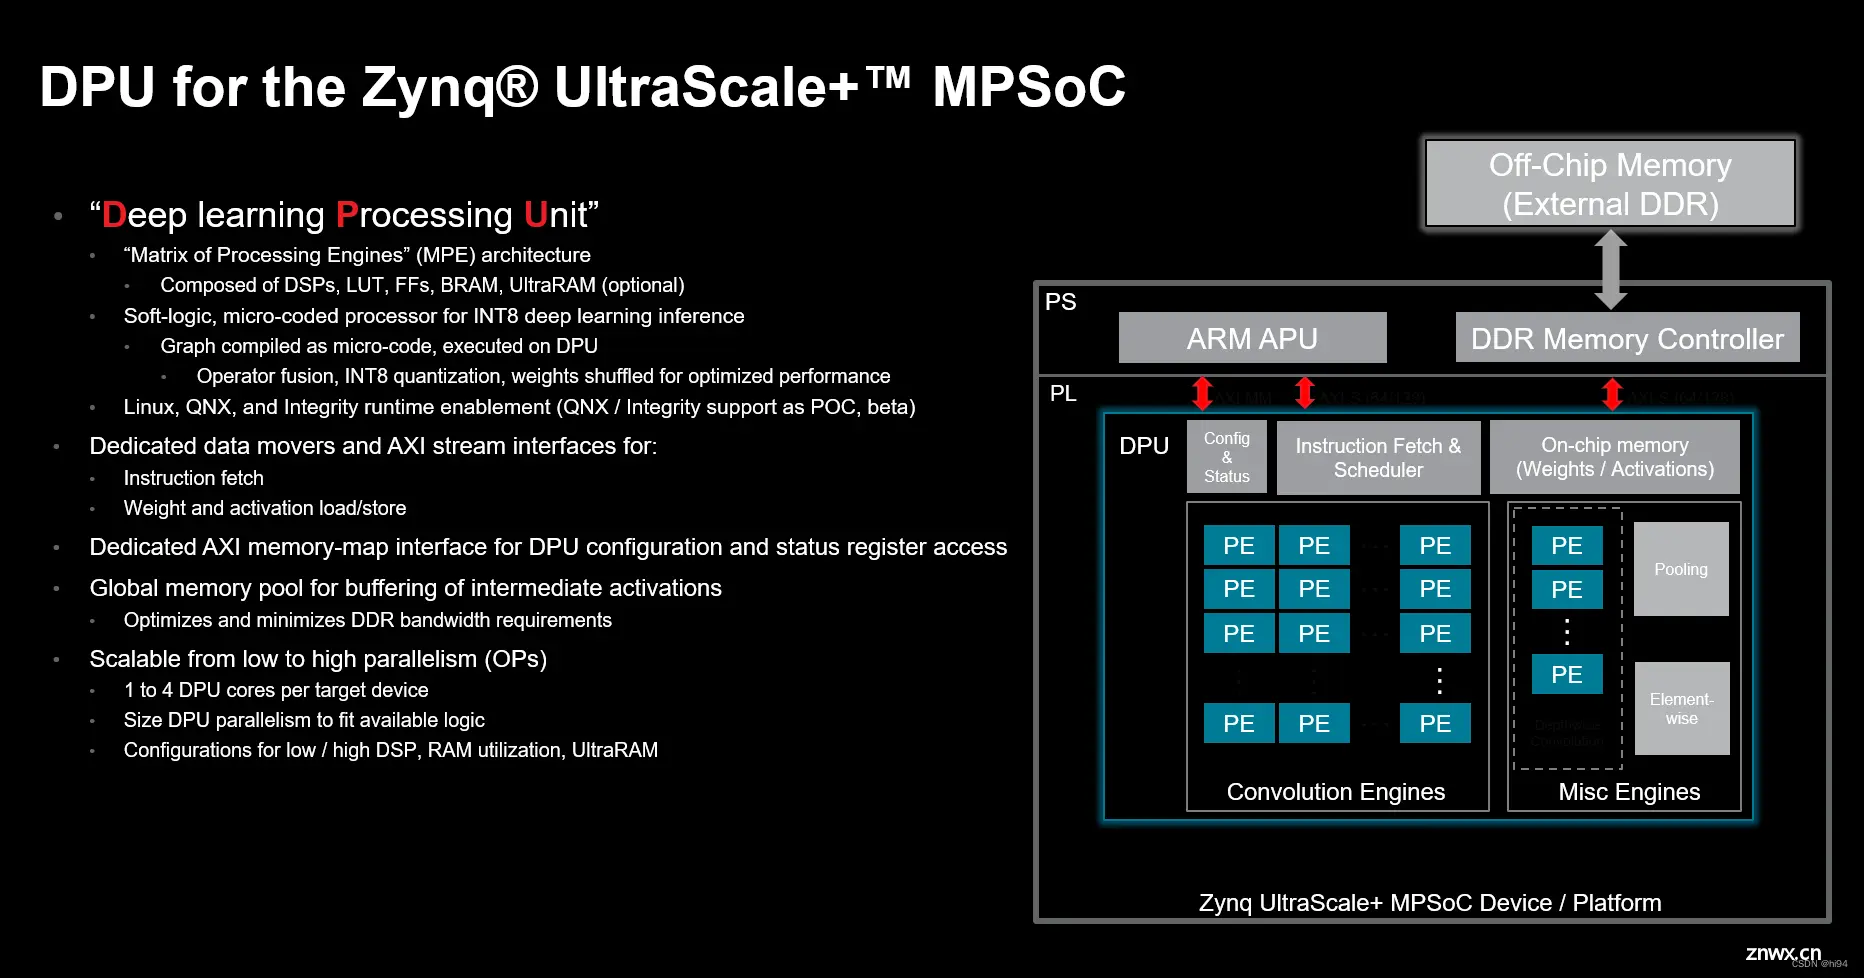
2.2 DPU结构
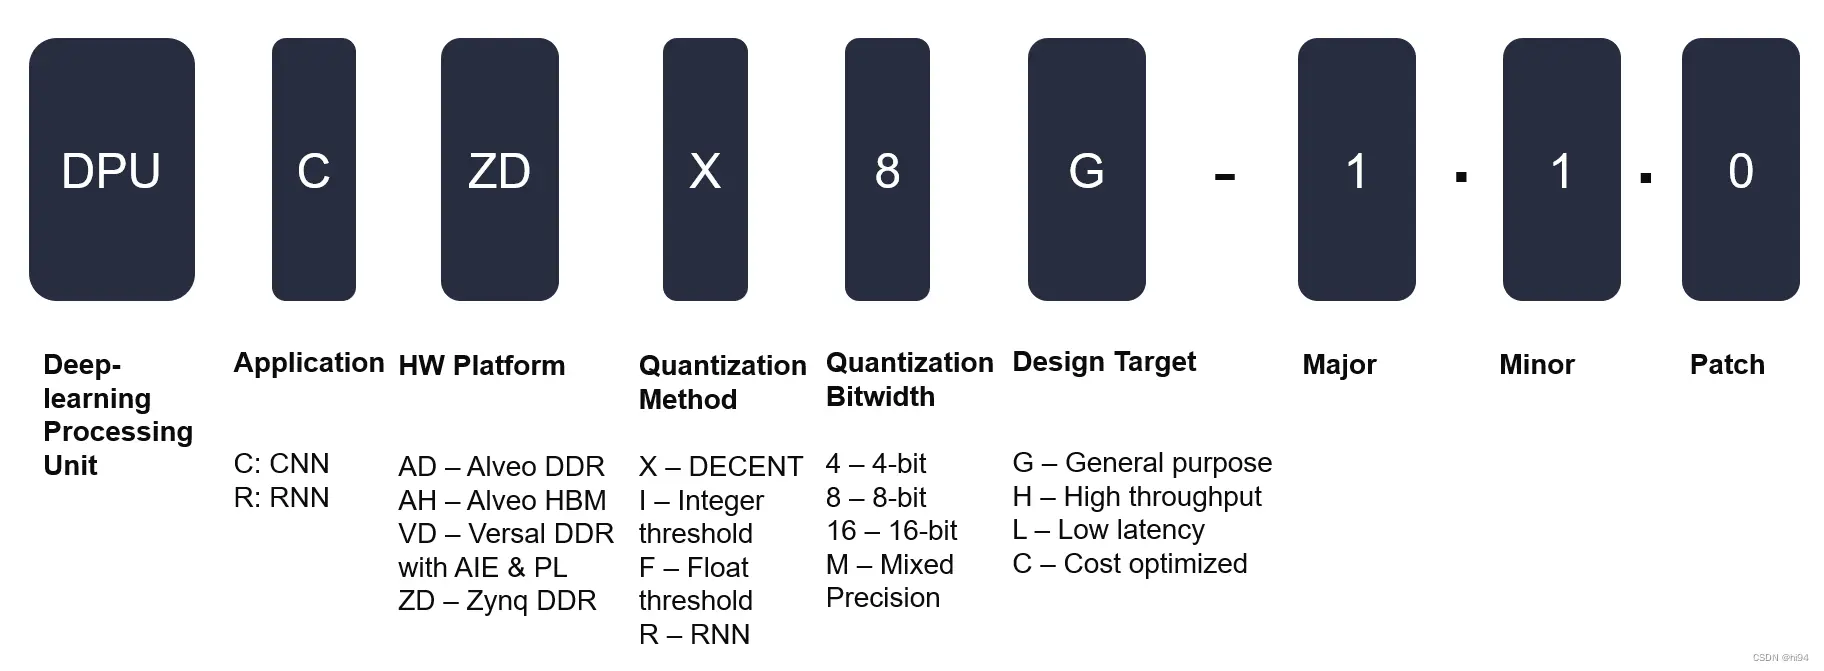
2.3 DPU命名规则
3. Vitis AI 配置要点
3.1 配置安装 Docker 库
3.2 Install Docker Engine
3.3 添加 Docker 用户组并测试
3.4 克隆 Vitis AI 库
3.5 构建 Docker (直接抓取)
3.6 运行 Docker
3.7 安装 Jupyter Lab
4. PYNQ for KV260 配置要点
4.1 烧录 Ubuntu 22.04 LTS
4.2 配置网络
4.3 关闭图形桌面
4.4 添加 AMD 软件源并更新升级 Kernel
4.5 配置 Docker (optional)
4.6 安装 xrt zocl driver (optional)
4.7 安装 Pynq (需配置代理)
4.8 Jupyter Lab 安装中文支持包
4.9 域名解析
1. 环境
Host: Ubuntu 22.04.4 LTS
Embeded: kv260 with Ubuntu 22.04
AMD KV260 starts with Ubuntu 22.04

https://www.amd.com/zh-cn/products/system-on-modules/kria/k26/kv260-vision-starter-kit/getting-started-ubuntu/getting-started.html
2. 工具及版本介绍
GitHub - Xilinx/Vitis-AI at 2.5Vitis AI is Xilinx’s development stack for AI inference on Xilinx hardware platforms, including both edge devices and Alveo cards. - GitHub - Xilinx/Vitis-AI at 2.5

https://github.com/Xilinx/Vitis-AI/tree/2.5
2.1 工具版本兼容性
IP and Tool Version Compatibility — Vitis™ AI 3.0 documentation
| Software Tools Version | DPUCDZX8G IP Version | ViTis AI Release Version |
| Vivado / Vitis / Petalinux 2022.2 | 4.1 | v3.0 |
| Vivado / Vitis / Petalinux 2022.1 | 4 | v2.5 |
| Vivado / Vitis / Petalinux 2021.2 | 3.4 | v2.0 |
| Vivado / Vitis / Petalinux 2021.1 | 3.3 | v1.4 |
| Vivado / Vitis / Petalinux 2020.2 | 3.3 | v1.3 |
| Vivado / Vitis / Petalinux 2020.1 | 3.2 | v1.2 |
| Vivado / Vitis / Petalinux 2019.2 | 3.2 | v1.1 |
| Vivado / Vitis / Petalinux 2019.1 | 3.1 | v1.0 |
| Vivado / Petalinux 2019.1 | 3 | N/A |
| Vivado / Petalinux 2018.2 | 2 | N/A |
| Vivado / Petalinux 2018.1 | 1 | First Release |
PYNQ for Kria SOMs:
PYNQ for Kria SOMsPYNQ support and examples for Kria SOMs. Contribute to Xilinx/Kria-PYNQ development by creating an account on GitHub.

https://github.com/Xilinx/Kria-PYNQ
DPU-PYNQ (v2.5)
This overlay contains a Vitis-AI 2.5.0 Deep Learning Processor Unit (DPU) and comes with a variety of notebook examples with pre-trained ML models.
Supported boards: KV260, KR260, KD240
从官方给的信息可以看出,KV260 PYNQ Installation 使用的是 Vitis-AI 2.5.0,对应的工具版本Vivado / Vitis / Petalinux 2022.1。
2.2 DPU结构

2.3 DPU命名规则

KV260使用DPUCZDX8G IP,表示:
应用领域:CNN
硬件平台:Zynq DDR
量化方法:decent
Decent:一种量化与优化工具,主要用于对神经网络模型进行压缩和量化,以适配于赛灵思的DPU硬件。Decent支持多种量化策略,包括定点量化(通常为INT8量化)。这种工具的目的是通过减小模型的存储与计算需求来优化执行效率,同时尽量保持推理精度。
Integer threshold:一种量化方法,使用整数阈值来确定量化的位宽和位置。
Float threshold:这种方法使用浮点数阈值来进行量化,与整数阈值类似,但使用的是浮点数。
RNN:循环神经网络(Recurrent Neural Network)的缩写,这是一种用于处理序列数据的神经网络结构,通常在量化时需要特别考虑,因为它们的时间依赖性。
量化精度:8 bit
设计目标:通用
3. Vitis AI 配置要点
3.1 配置安装 Docker 库
sudo apt updatesudo apt install ca-certificates curl gnupgsudo install -m 0755 -d /etc/apt/keyringscurl -fsSL https://download.docker.com/linux/ubuntu/gpg | sudo gpg --dearmor -o /etc/apt/keyrings/docker.gpgsudo chmod a+r /etc/apt/keyrings/docker.gpgecho "deb [arch="$(dpkg --print-architecture)" signed-by=/etc/apt/keyrings/docker.gpg] https://download.docker.com/linux/ubuntu \"$(. /etc/os-release && echo "$VERSION_CODENAME")" stable" | sudo tee /etc/apt/sources.list.d/docker.list > /dev/nullsudo apt update
参考:Install Docker Engine on Ubuntu | Docker Docs
3.2 Install Docker Engine
sudo apt install docker-ce docker-ce-cli containerd.io docker-buildx-plugin docker-compose-plugin
docker-ce: 这是Docker社区版(Community Edition)的包名。docker-ce-cli: 这是Docker社区版的命令行界面工具的包名,允许用户通过命令行与Docker交互。containerd.io: 这是一个开源容器运行时,Docker用它来管理容器的生命周期。它负责镜像的传输和存储、容器的执行和监控以及任务的分配。docker-buildx-plugin: 这是Docker的一个插件,允许用户通过使用Buildx构建功能,构建多平台镜像、利用缓存等高级构建功能。docker-compose-plugin: 这是Docker Compose的插件,Docker Compose是一个用于定义和运行多容器Docker应用程序的工具。通过一个YAML文件来配置应用服务,然后使用一个单一的命令,就可以创建并启动所有的服务。
3.3 添加 Docker 用户组并测试
sudo groupadd dockersudo usermod -aG docker $USERnewgrp docker
运行:docker run hello-world,进行测试,打印 “hello world” 则成功。
3.4 克隆 Vitis AI 库
git clone https://github.com/Xilinx/Vitis-AI/tree/2.5cd Vitis-AI
3.5 构建 Docker (直接抓取)
docker pull xilinx/vitis-ai-cpu:latest
3.6 运行 Docker
./docker_run.sh xilinx/vitis-ai-cpu:latest
<code>ubuntu@ubuntu:$ ./docker_run.sh xilinx/vitis-ai-cpu:latest
Setting up ubuntu's environment in the Docker container...
usermod: no changes
Running as vitis-ai-user with ID 0 and group 0
==========================================
__ ___ _ _ _____
\ \ / (_) | (_) /\ |_ _|
\ \ / / _| |_ _ ___ ______ / \ | |
\ \/ / | | __| / __|______/ /\ \ | |
\ / | | |_| \__ \ / ____ \ _| |_
\/ |_|\__|_|___/ /_/ \_\_____|
==========================================
Docker Image Version: 2.5.0.1260 (CPU)
Vitis AI Git Hash: 502703c
Build Date: 2022-06-12
For TensorFlow 1.15 Workflows do:
conda activate vitis-ai-tensorflow
For PyTorch Workflows do:
conda activate vitis-ai-pytorch
For TensorFlow 2.8 Workflows do:
conda activate vitis-ai-tensorflow2
For WeGo Tensorflow 1.15 Workflows do:
conda activate vitis-ai-wego-tf1
For WeGo Tensorflow 2.8 Workflows do:
conda activate vitis-ai-wego-tf2
For WeGo Torch Workflows do:
conda activate vitis-ai-wego-torch
Vitis-AI /workspace >
出现如上结果,表示启动docker成功,注意版本信息。
3.7 安装 Jupyter Lab
jupyter --version # 查看是否安装jupyterlab
jupyter --version
Selected Jupyter core packages...
IPython : 8.12.2
ipykernel : 6.23.3
ipywidgets : 8.0.6
jupyter_client : 8.3.0
jupyter_core : 5.3.0
jupyter_server : 2.6.0
jupyterlab : not installed
nbclient : 0.8.0
nbconvert : 7.6.0
nbformat : 5.9.0
notebook : 6.5.4
qtconsole : 5.4.3
traitlets : 5.9.0
pip install jupyterlabjupyter lab # 进入jupyterlabpip install jupyterlab-language-pack-zh-CN
4. PYNQ for KV260 配置要点
4.1 烧录 Ubuntu 22.04 LTS
烧录 Ubuntu 22.04 LTS

https://www.amd.com/zh-cn/products/system-on-modules/kria/k26/kv260-vision-starter-kit/getting-started-ubuntu/getting-started.html
4.2 配置网络

4.3 关闭图形桌面
xmutil desktop_disable
4.4 添加 AMD 软件源并更新升级 Kernel
sudo add-apt-repository ppa:xilinx-appssudo add-apt-repository ppa:ubuntu-xilinx/sdksudo apt updatesudo apt upgrade
4.5 配置 Docker (optional)
sudo groupadd dockersudo usermod -a -G docker $USERnewgrp docker
4.6 安装 xrt zocl driver (optional)
sudo apt install xrt-dkms
4.7 安装 Pynq (需配置代理)
git clone https://github.com/Xilinx/Kria-PYNQ.gitcd Kria-PYNQ需要修改install.sh文件sudo bash install.sh -b KV260
4.8 Jupyter Lab 安装中文支持包
pip install jupyterlab-language-pack-zh-CN
4.9 域名解析
C:\Windows\System32\drivers\etc\hosts添加:192.168.101.224 kria
上一篇: LivePortrait 数字人:开源的图生视频模型,本地部署和专业视频制作详细教程
下一篇: GPTs危!Claude Artifact功能现支持直接分享;谷歌视觉模型PaliGemma论文今晚发布 | AI头条...
本文标签
声明
本文内容仅代表作者观点,或转载于其他网站,本站不以此文作为商业用途
如有涉及侵权,请联系本站进行删除
转载本站原创文章,请注明来源及作者。