.NET Core Web API项目配置JWT验证
rocweichen 2024-08-01 09:03:01 阅读 87
前言
本项目在之前的文章中已搭建完成,所有内容在之前的项目中扩展
之前的文章地址:跳转地址
源码下载地址:下载地址
JSON WEB Token(JWT),是一种基于JSON的、用于在网络上声明某种主张的令牌(token)。主要用于认证和保护API之间信息交换。JWT通常由三部分组成: 头信息(header), 消息体(payload)和签名(signature)。项目多使用JWT来进行身份验证。
使用JWT步骤
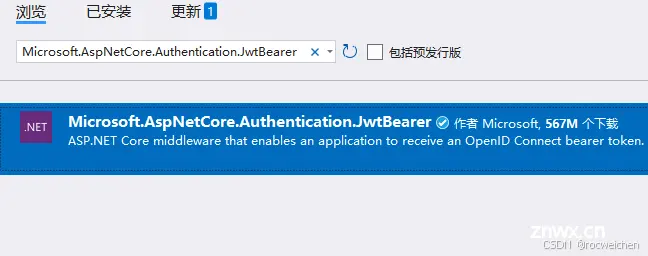
1安装 Microsoft.AspNetCore.Authentication.JwtBearer ,可通过Nuget包管理器进行安装,如下所示:
2 在appsettings.json添加JWT配置
<code>{
"Logging": {
"LogLevel": {
"Default": "Information",
"Microsoft.AspNetCore": "Warning"
}
},
"AllowedHosts": "*",
"Jwt": {
"SecretKey": "c0ecd23c-dfdb-4005-a2ea-0fea210c858d",
"Issuer": "JwtIssuer",
"Audience": "JwtAudience"
}
}
3 在Program.cs文件中添加JWT身份验证服务
using Microsoft.AspNetCore.Authentication.JwtBearer;
using Microsoft.IdentityModel.Tokens;
using System.Text;
var builder = WebApplication.CreateBuilder(args);
builder.Services.AddAuthentication(options =>
{
options.DefaultAuthenticateScheme = JwtBearerDefaults.AuthenticationScheme;
options.DefaultChallengeScheme = JwtBearerDefaults.AuthenticationScheme;
options.DefaultScheme = JwtBearerDefaults.AuthenticationScheme;
}).AddJwtBearer(o =>
{
o.TokenValidationParameters = new TokenValidationParameters
{
ValidIssuer = TS.Common.Helpers.Appsettings.GetValue("Jwt", "Issuer"),
ValidAudience = TS.Common.Helpers.Appsettings.GetValue("Jwt", "Audience"),
IssuerSigningKey = new SymmetricSecurityKey(Encoding.UTF8.GetBytes(TS.Common.Helpers.Appsettings.GetValue("Jwt", "SecretKey"))),
ValidateIssuer = true,
ValidateAudience = true,
ValidateLifetime = false,
ValidateIssuerSigningKey = true
};
});
builder.Services.AddAuthorization();
// Add services to the container.
builder.Services.AddControllers();
// Learn more about configuring Swagger/OpenAPI at https://aka.ms/aspnetcore/swashbuckle
builder.Services.AddEndpointsApiExplorer();
builder.Services.AddSwaggerGen(options =>
{
options.AddSecurityDefinition("Bearer", new OpenApiSecurityScheme
{
Description = "请输入token,格式为 Bearer xxxxxxxx",
Name = "Authorization",
In = ParameterLocation.Header,
Type = SecuritySchemeType.ApiKey,
BearerFormat = "JWT",
Scheme = "Bearer"
});
//添加安全要求
options.AddSecurityRequirement(new OpenApiSecurityRequirement {
{
new OpenApiSecurityScheme{
Reference =new OpenApiReference{
Type = ReferenceType.SecurityScheme,
Id ="Bearer"
}
},new string[]{ }
}
});
});
var app = builder.Build();
// Configure the HTTP request pipeline.
if (app.Environment.IsDevelopment())
{
app.UseSwagger();
app.UseSwaggerUI();
}
app.UseHttpsRedirection();
app.UseAuthentication();
app.UseAuthorization();
app.MapControllers();
app.Run();
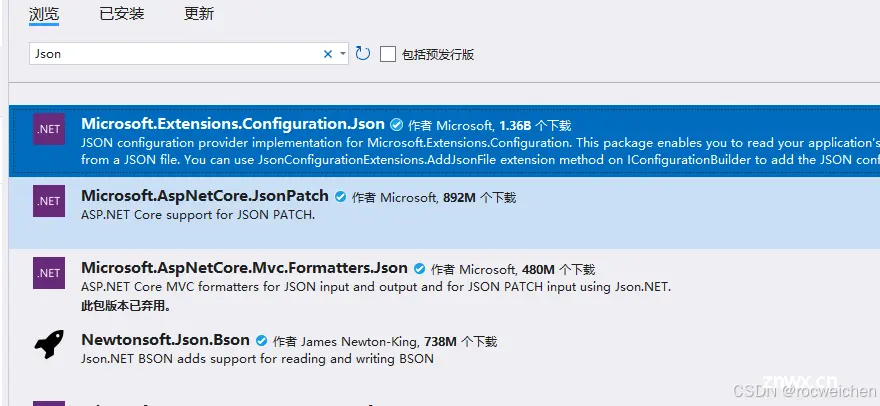
4 在TS.Common中添加Microsoft.Extensions.Configuration.Json包
5 在TS.Common中添加Appsettings.cs
代码如下:
<code>using Microsoft.Extensions.Configuration.Json;
using Microsoft.Extensions.Configuration;
namespace TS.Common.Helpers
{
/// <summary>
/// appsettings.json操作类
/// </summary>
public class Appsettings
{
static IConfiguration? configuration { get; set; }
static string? contentPath { get; set; }
public Appsettings(string contentPath)
{
string Path = "appsettings.json";
configuration = new ConfigurationBuilder()
.SetBasePath(contentPath)
.Add(new JsonConfigurationSource { Path = Path, Optional = false, ReloadOnChange = true })
.Build();
}
/// <summary>
///
/// </summary>
/// <param name="sections"></param>code>
/// <returns>String</returns>
public static string GetValue(params string[] sections)
{
Appsettings appsettingsinfo = new Appsettings(AppContext.BaseDirectory);
return configuration?[string.Join(":", sections)] ?? String.Empty;
}
}
}
6 创建Token,代码如下
private static string GenerateJsonWebToken()
{
var securityKey = new SymmetricSecurityKey(Encoding.UTF8.GetBytes(TS.Common.Helpers.Appsettings.GetValue("Jwt", "SecretKey")));
var credentials = new SigningCredentials(securityKey, SecurityAlgorithms.HmacSha256);
var claimsIdentity = new ClaimsIdentity(CookieAuthenticationDefaults.AuthenticationScheme);
claimsIdentity.AddClaim(new Claim("userid", "1"));
var token = new JwtSecurityToken(TS.Common.Helpers.Appsettings.GetValue("Jwt", "Issuer"),
TS.Common.Helpers.Appsettings.GetValue("Jwt", "Audience"),
claimsIdentity.Claims,
expires: DateTime.Now.AddMinutes(120),
signingCredentials: credentials);
return new JwtSecurityTokenHandler().WriteToken(token);
}
/// <summary>
/// 创建Token
/// </summary>
/// <returns></returns>
[HttpPost("GenerateToken")]
public ActionResult GetToken()
{
string token = GenerateJsonWebToken();
return Ok(token);
}
7 验证JWT是否配置成功,编写验证接口
/// <summary>
/// 验证Token
/// </summary>
/// <returns></returns>
[Authorize] //开启授权验证
[HttpPost("TestToken")]
public ActionResult Test()
{
return Ok("成功进入");
}
8 Herder中带验证参数(GetToken接口获取的参数 前面加上 Bearer )
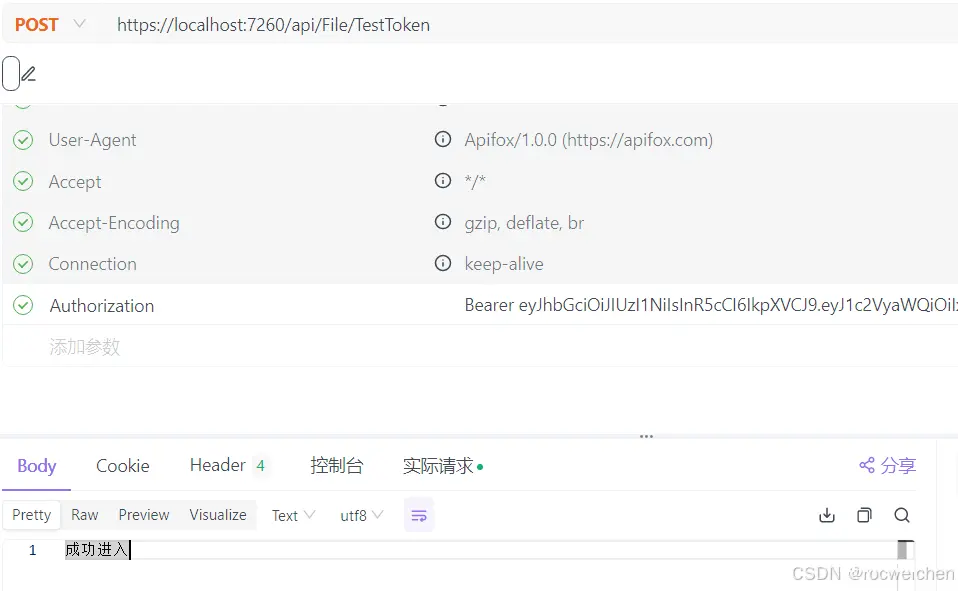
9 如果没有传入Token 调用接口将报401错误。
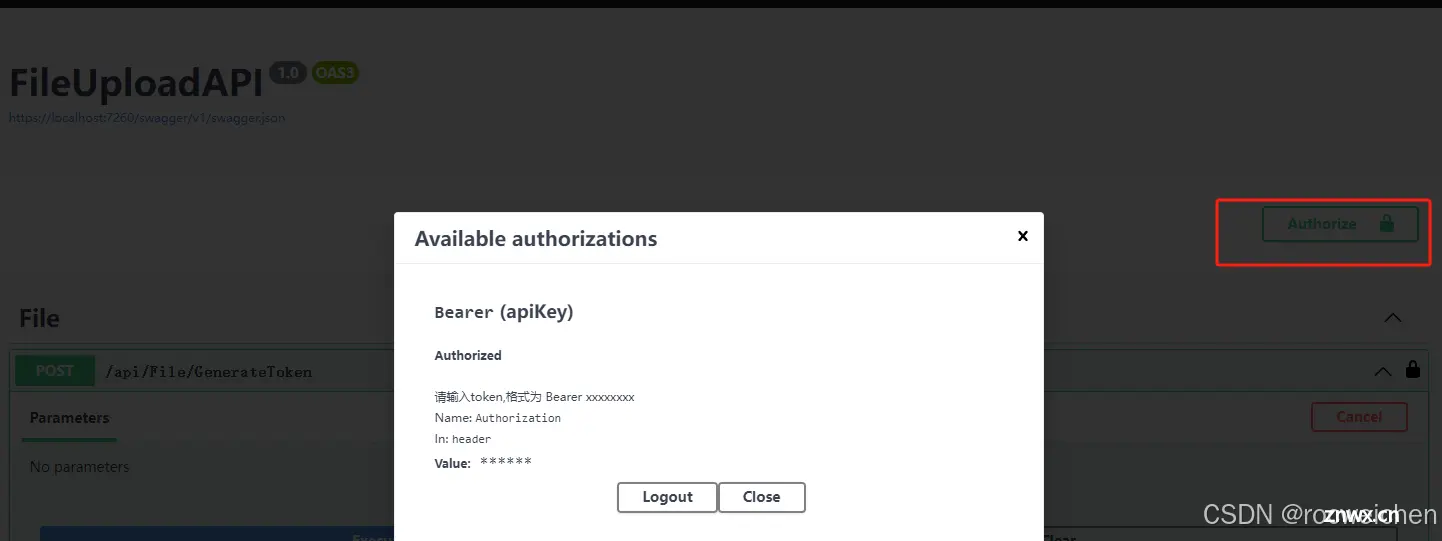
10 当然直接在swagger中调用也可以,需要配置Authorization参数
总结
使用JWT进行身份验证有很多优点,当然JWT也有缺点
例如 更多的空间占用、无法作废已颁布的令牌、Payload 存储的一些用户信息,它是通过Base64加密的,可以直接解密等
声明
本文内容仅代表作者观点,或转载于其他网站,本站不以此文作为商业用途
如有涉及侵权,请联系本站进行删除
转载本站原创文章,请注明来源及作者。