MinIO - 服务端签名直传(前端 + 后端 + 效果演示)
陈亦康 2024-08-05 13:33:02 阅读 100
目录
开始
服务端签名直传概述
代码实现
后端实现
前端实现
效果演示
开始
服务端签名直传概述
传统的,我们有两种方式将图片上传到 OSS:
a)前端请求 -> 后端服务器 -> OSS
好处:在服务端上传,更加安全.
坏处:给服务器带来压力.
b)直接写在前端 js 代码中
好处:效率高,不用给服务器带来额外压力.
坏处:危险,用户直接可以看得到 OSS账号密码 信息.
因此最好的方式就是 服务端签名直传:用户直接去服务器请求获取上传签名(账号密码加密生成的防伪签名,一般有过期时间),服务器就返回防伪签名,然后用户就可以拿着签名和要上传的文件,通过表单直接上传到 OSS 中.
此时既不需要服务端承担上传文件到 OSS 中的压力,也保证了 OSS账号密码 信息的安全性.
代码实现
后端实现
a)配置文件
<code>minio:
access-key: root
secret-key: rootroot
endpoint: http://100.105.180.32:9001
bucket: dir1
b)Bean 配置
import org.springframework.context.annotation.Configuration
import io.minio.MinioClient
import org.springframework.beans.factory.annotation.Value
import org.springframework.context.annotation.Bean
@Configuration
class MinioConfig {
@Value("\${minio.access-key}")
private lateinit var accessKey: String
@Value("\${minio.secret-key}")
private lateinit var secretKey: String
@Value("\${minio.endpoint}")
private lateinit var endpoint: String
@Bean
fun minioClient(): MinioClient = MinioClient.builder()
.endpoint(endpoint) //格式必须是 http://ip:port 注意: 这里使用的 9001 端口,而不是 9000
.credentials(accessKey, secretKey) //用户名 和 密码
.build()
}
c)核心代码
@RestController
@RequestMapping("/third/minio")
class MinioApi(
private val minioClient: MinioClient
) {
@Value("\${minio.endpoint}")
private lateinit var endpoint: String
@Value("\${minio.bucket}")
private lateinit var bucket: String
@GetMapping("/policy")
fun policy(): Map<String, String> {
val objectNamePrefix = "uploads/"
// 设置过期时间为当前时间加1小时
val expiration = ZonedDateTime.now().plusHours(1)
val postPolicy = PostPolicy(bucket, expiration)
postPolicy.run {
//添加条件,确保字段的值以指定前缀开头,前端指定 key 时,也需要加上该前缀,否则 403
addStartsWithCondition("key", objectNamePrefix)
//添加条件,将文件大小范围限制在 1 ~ 10485760 (1 到 10 MB)
addContentLengthRangeCondition(1, 10485760)
}
val result = minioClient.getPresignedPostFormData(postPolicy).apply {
//这里是给前端构造 Minio 请求的
this["url"] = "$endpoint/$bucket"
}
return result
}
}
前端实现
<!DOCTYPE html>
<html lang="en">code>
<head>
<meta charset="UTF-8">code>
<meta name="viewport" content="width=device-width, initial-scale=1.0">code>
<title>Minio File Upload</title>
</head>
<body>
<h2>Minio 文件上传</h2>
<input type="file" id="fileInput" />code>
<button onclick="uploadFile()">上传</button>code>
<script>
async function uploadFile() {
const fileInput = document.getElementById('fileInput');
if (!fileInput.files.length) {
alert('请选择文件');
return;
}
const file = fileInput.files[0];
const response = await fetch('http://localhost:10010/third/minio/policy');
const formData = await response.json();
const data = new FormData();
for (const [key, value] of Object.entries(formData)) {
data.append(key, value);
}
// 构建对象键(这里一定要和 后端 那里的设定的前缀一致,否则 403)
const objectName = 'uploads/' + file.name;
data.append('key', objectName);
data.append('file', file);
// 上传 URL
const uploadUrl = formData['url'];
const uploadResponse = await fetch(uploadUrl, {
method: 'POST',
body: data,
});
if (uploadResponse.ok) {
alert('上传成功');
} else {
alert('上传失败');
}
}
</script>
</body>
</html>
效果演示
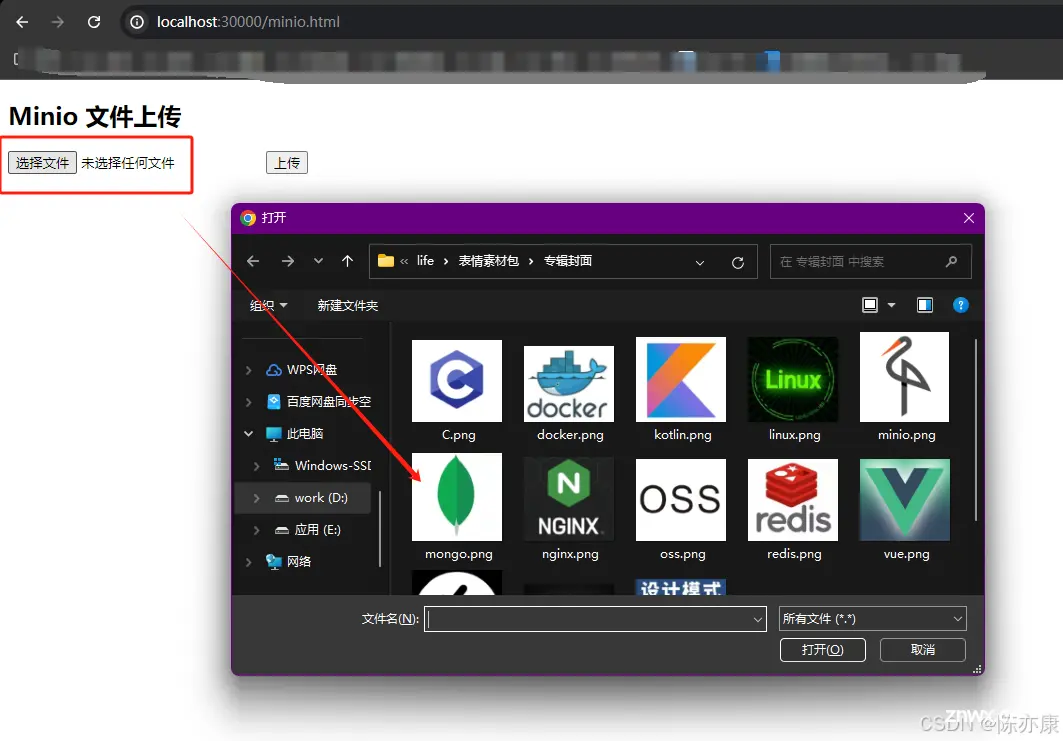
a)点击选择文件,选择 mongo.png
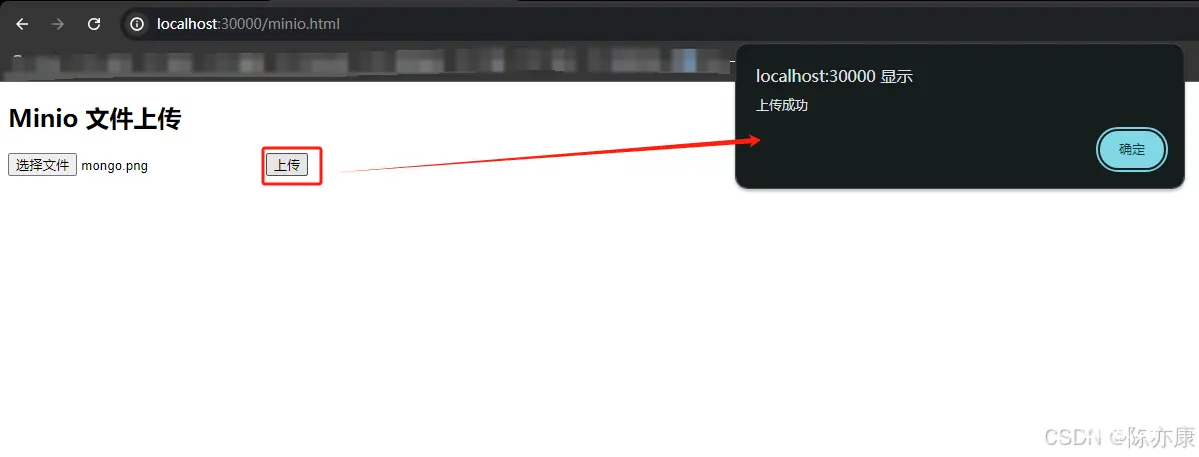
b)点击上传
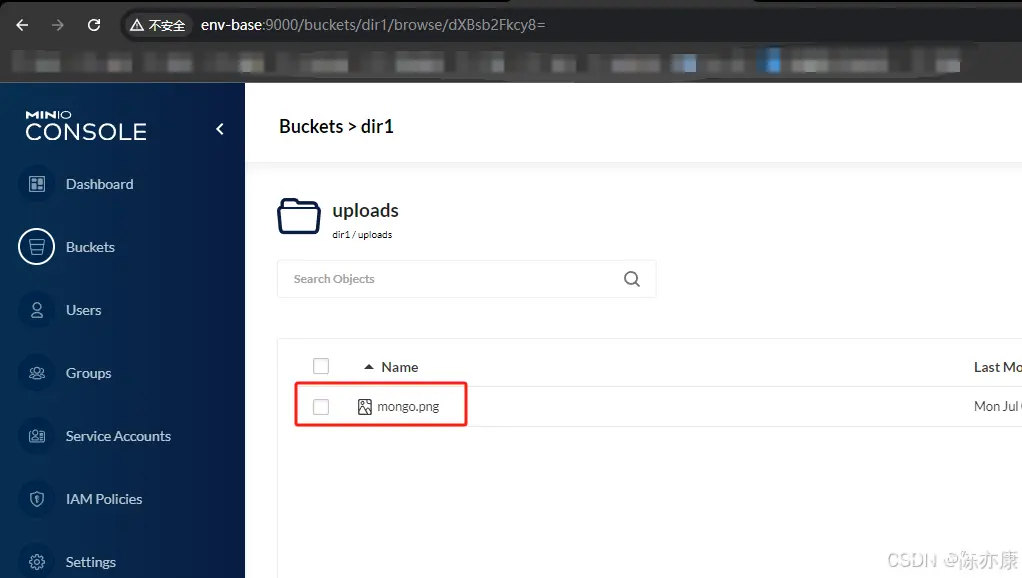
c)返回 MinIO 控制台,就可以看到文件已经长传成功~


声明
本文内容仅代表作者观点,或转载于其他网站,本站不以此文作为商业用途
如有涉及侵权,请联系本站进行删除
转载本站原创文章,请注明来源及作者。