canvas绘制仪表盘/刻度盘
指间行走 2024-08-17 12:33:02 阅读 73
<code>canvas画布可以实现在网页上绘制图形的方法,比如图表、图片处理、动画、游戏等。今天我们在vue模板下用canvas实现仪表盘的绘制。

对canvas不熟悉的同学可以先了解下canvas的API文档:canvas API中文网 - Canvas API中文文档首页地图
一、创建模板,创建canvas标签
<code><template>
<canvas ref="gauge"></canvas>code>
</template>
<script>
export default {
name: 'Gauge',
data() {
return {
width:220, // 画布的宽度
height:220, // 画布的高度
progress:0.6 // 值-进度
}
},
mounted(){
this.draw()
},
methods:{
draw(){}
},
}
</script>
二、初始化画布,并绘制背景圆弧
draw(){
// 获取canvas元素和上下文
let canvas = this.$refs.gauge
let ctx = canvas.getContext("2d")
// 获取设备像素比,解决移动端显示锯齿、模糊等问题
const dpr = window.devicePixelRatio || 1
canvas.style.width = this.width + "px"
canvas.style.height = this.height + "px"
canvas.height = this.height * dpr
canvas.width = this.width * dpr
ctx.scale(dpr, dpr)
// 清除画布--更新画布前需要清除之前的画布内容
ctx.clearRect(0, 0, canvas.width, canvas.height)
// 圆心位置-宽高的一半
const centerX = this.width / 2
const centerY = this.height / 2
const startAngle = (3 * Math.PI) / 4 // 仪表盘的初始角度
const endAngle = Math.PI / 4 // 仪表盘的结束角度
const totalAngle = (3 * Math.PI) / 2 // 仪表盘的总角度
// 绘制背景圆弧
ctx.beginPath()
ctx.arc(centerX, centerY, (this.width-20)/2, startAngle, endAngle)
ctx.lineWidth = 16
ctx.lineCap = 'round'
ctx.strokeStyle = '#FAFAFA '
ctx.stroke()
}
详解:
1、仪表盘的初始角度、结束角度、总角度根据你需要的弧形进行配置。
可以参照arc api 的此图进行理解。
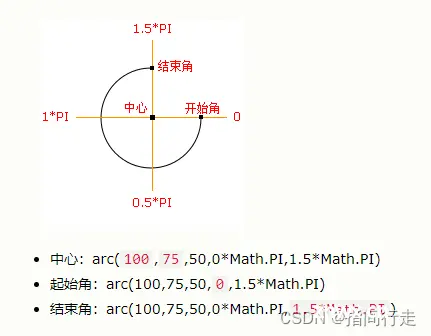
| 角度 | 180 | 270 | 360 |
| 初始角度 | 1 * Math.PI | (3 * Math.PI) / 4 | 0.5 * Math.PI |
| 结束角度 | 0 | Math.PI / 4 | -0.5 * Math.PI |
| 总角度 | 1 * Math.PI | (3 * Math.PI) / 2 | 2 * Math.PI |
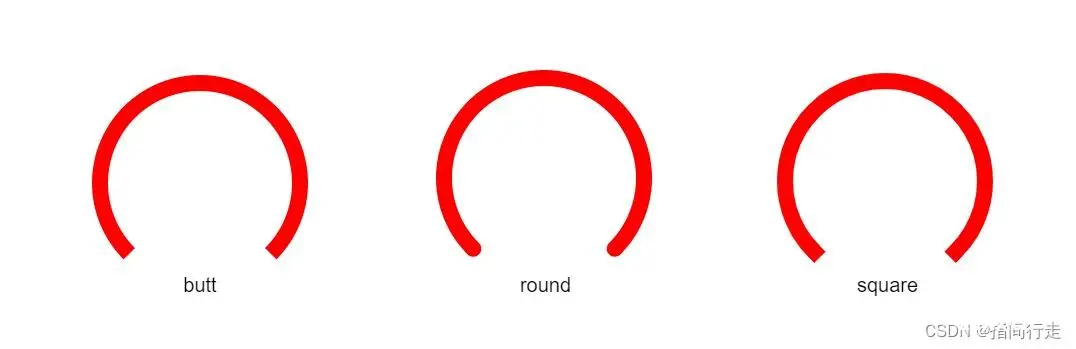
2、lineCap:设置或返回线条的结束端点样式;
| butt | 默认。向线条的每个末端添加平直的边缘。 |
| round | 向线条的每个末端添加圆形线帽。 |
| square | 向线条的每个末端添加正方形线帽。 |
三、绘制上层圆弧
<code> // 绘制上层圆弧
const endAngle1 = startAngle + (totalAngle * this.progress)
ctx.save()
ctx.beginPath()
ctx.arc(centerX, centerY, (this.width-20)/2, startAngle, endAngle1)
ctx.lineWidth = 16
ctx.lineCap = 'round'
var gradient = ctx.createLinearGradient(0, this.height/2*Math.sqrt(2), this.width/2*Math.sqrt(2), 0);
gradient.addColorStop(0, '#DDF5EC');
gradient.addColorStop(1, '#04FACF');
ctx.strokeStyle = gradient
ctx.stroke()
详解:
1、颜色设置渐变,渐变色x轴、y轴的起点和终点。根据勾股定理计算为半径的平方根。
四、绘制刻度、刻度值
// 绘制刻度
ctx.save()
// 将原点移到圆心处
ctx.translate(centerX, centerY)
const numTicks = 100 // 刻度数量
let tickLength = 0 // 刻度长度
let tickWidth = 0 // 刻度宽度
const scaleRadius = (this.width-50)/2 // 刻度半径
let angleStep = totalAngle / numTicks
for (let i = 0; i <= numTicks; i++) {
let angle = startAngle + (i * angleStep)
if (i % 10 == 0) {
tickWidth = 1*2 // 长刻度线的宽是小刻度的2倍
tickLength = 6*1.5 // 长刻度线的长是小刻度的1.5倍
} else {
tickWidth = 1
tickLength = 6
}
ctx.beginPath();
ctx.lineWidth = tickWidth
ctx.strokeStyle = '#cccccc'
// 计算刻度起点和终点的坐标
let startX = (scaleRadius - tickLength) * Math.cos(angle)
let startY = (scaleRadius - tickLength) * Math.sin(angle)
let endX = (scaleRadius) * Math.cos(angle)
let endY = (scaleRadius) * Math.sin(angle)
// 绘制刻度线段
ctx.moveTo(startX, startY)
ctx.lineTo(endX, endY)
ctx.stroke()
// 绘制刻度值文本
let text = i % 10 == 0 ? i : ''
let textX = (scaleRadius - 20) * Math.cos(angle)
let textY = (scaleRadius - 20) * Math.sin(angle)
ctx.font = "12px Arial"
ctx.fillStyle = '#666666'
ctx.textAlign = "center"
ctx.textBaseline = "middle"
ctx.fillText(text, textX, textY)
}
ctx.restore()
五、绘制指针
// 绘制指针
const angle = startAngle + (totalAngle * this.progress)
let endX = (scaleRadius - 30) * Math.cos(angle)
let endY = (scaleRadius - 30) * Math.sin(angle)
ctx.save()
ctx.translate(centerX, centerY) // 将原点移到圆心处
ctx.beginPath()
ctx.moveTo(0, 0)
ctx.lineTo(endX,endY)
ctx.lineWidth = 3
ctx.strokeStyle = '#F8E71C'
ctx.stroke()
ctx.restore()
六、绘制中心点
// 绘制中心点
ctx.save()
ctx.beginPath()
ctx.arc(centerX, centerY, 4, 0, 2*Math.PI)
ctx.fillStyle = "#666666"
ctx.fill()
ctx.restore()
如有疑问,欢迎留言交流;
如有定制需求,欢迎私信沟通~
声明
本文内容仅代表作者观点,或转载于其他网站,本站不以此文作为商业用途
如有涉及侵权,请联系本站进行删除
转载本站原创文章,请注明来源及作者。