PyQt6 使用Qt Designer实现简单的界面,以及ui文件转py文件
林茕夜 2024-08-26 10:35:01 阅读 87
前言,主要通过参考并总结两篇文章中的部分内容,参考文章一 && 参考文章二
Qt 设计师简单例子
一、需求分析二、界面设计三、生成ui文件四、ui文件转py文件1、命令行 执行 uic 生成 py代码2、PyCharm 配置 Pyuic工具2.1 配置Pyuic工具2.2 测试是否配置成功
五、运行ui文件所转的py文件六、功能实现1、编写代码2、运行代码
一、需求分析
新增一个用户注册界面,包含用户名,密码,性别,手机号,点击注册按钮时,弹出一个对话框,提示恭喜 “{用户输入的用户名}” 注册成功。但是无奈还没找出获取最新输入用户名的值,就简单做个例子,随意了。大家可以自己尝试。
二、界面设计
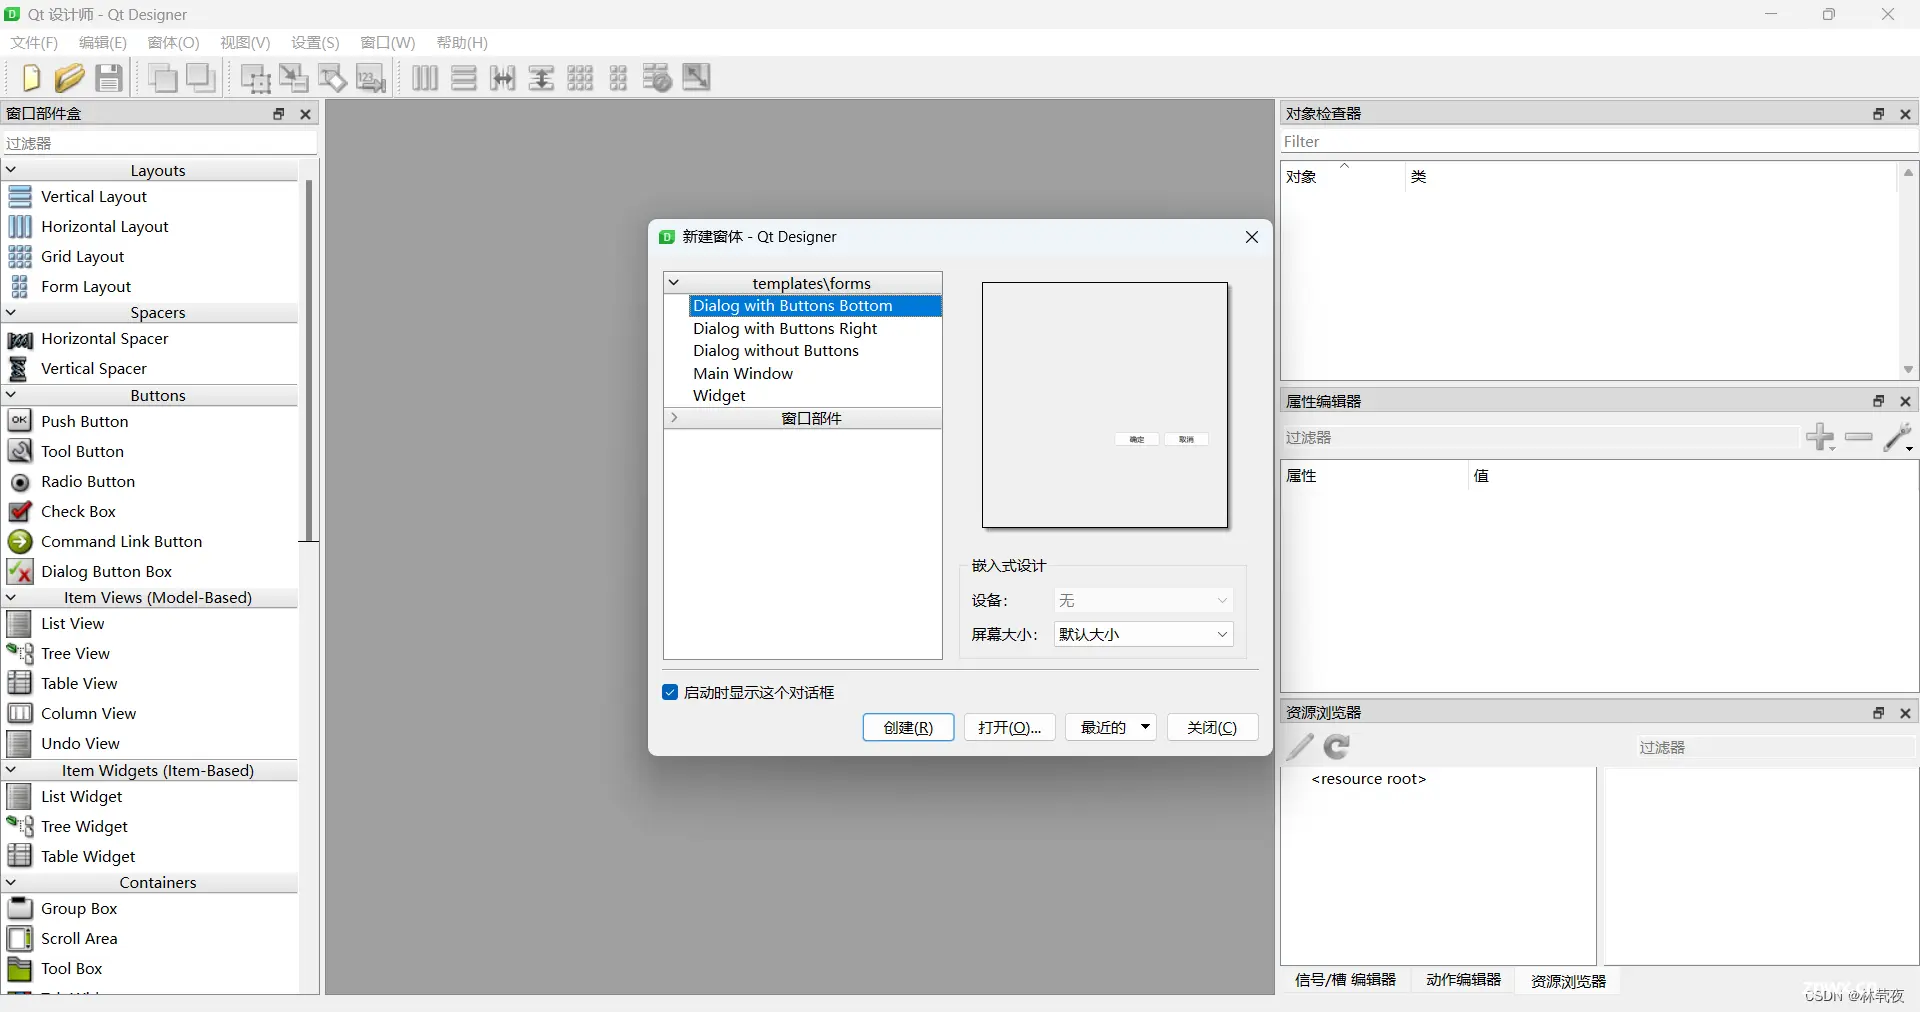
打开Qt Designer工具,如下图所示:
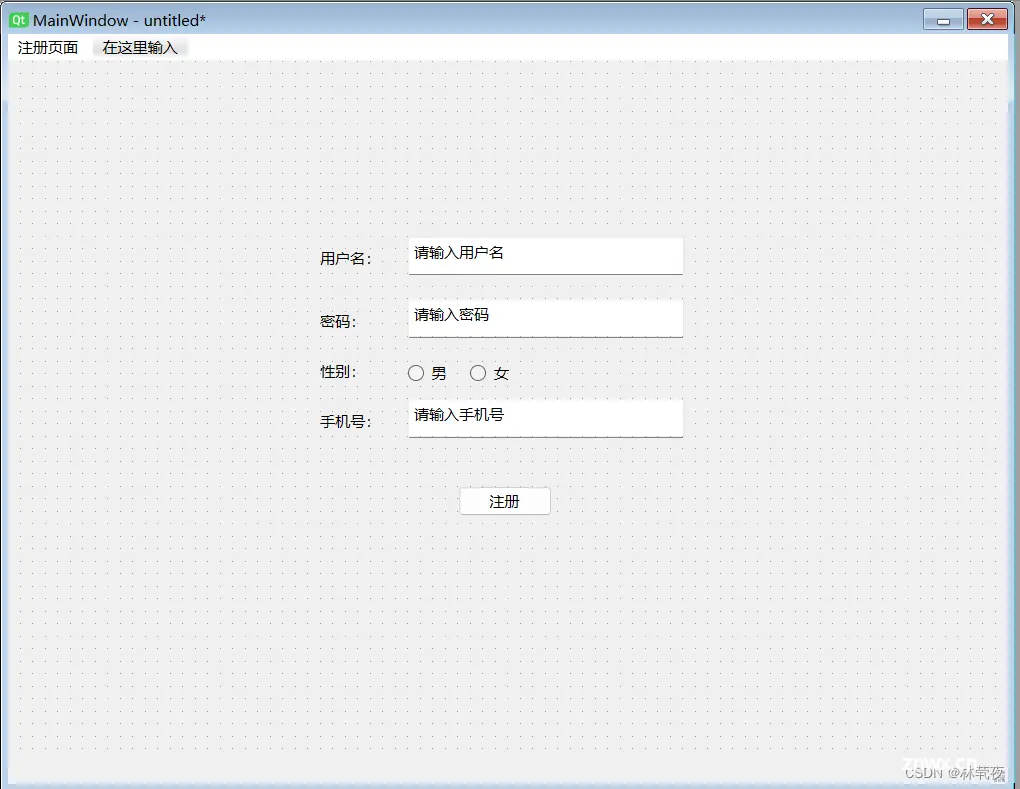
新建一个Main Window窗体,接着拖拉界面组件到Main Window窗体中,我这边拖拉好了,如下图所示:
三、生成ui文件
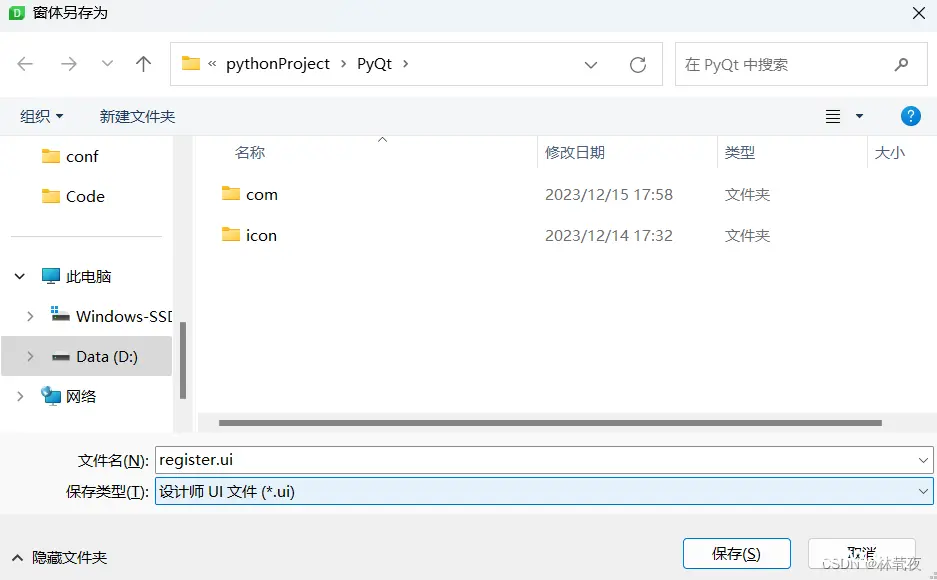
接着ctrl+s保存ui文件,这边我保存到PyQt项目底下,并命名为register.ui文件,如下图所示:
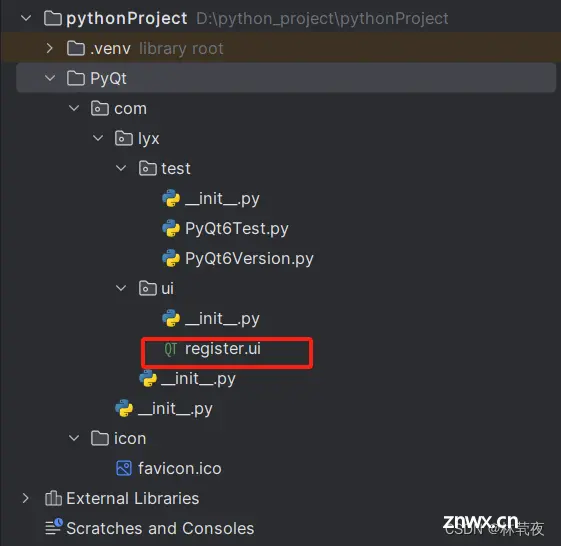
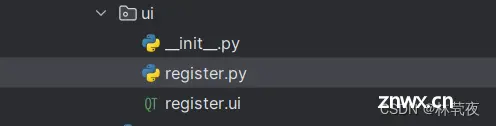
接着新建一个ui包,在com.lyx包底下,把register.ui放进去,代码目录结构如下:
打开register.ui文件,内容是一个xml格式,帮我们自动生成了,突然觉得有点像大学时期学的android,代码如下:
<code><?xml version="1.0" encoding="UTF-8"?>code>
<ui version="4.0">code>
<class>MainWindow</class>
<widget class="QMainWindow" name="MainWindow">code>
<property name="geometry">code>
<rect>
<x>0</x>
<y>0</y>
<width>800</width>
<height>600</height>
</rect>
</property>
<property name="windowTitle">code>
<string>MainWindow</string>
</property>
<widget class="QWidget" name="centralwidget">code>
<widget class="QLabel" name="label">code>
<property name="geometry">code>
<rect>
<x>250</x>
<y>150</y>
<width>54</width>
<height>16</height>
</rect>
</property>
<property name="text">code>
<string>用户名:</string>
</property>
</widget>
<widget class="QTextEdit" name="textEdit">code>
<property name="geometry">code>
<rect>
<x>320</x>
<y>140</y>
<width>221</width>
<height>31</height>
</rect>
</property>
<property name="html">code>
<string><!DOCTYPE HTML PUBLIC "-//W3C//DTD HTML 4.0//EN" "http://www.w3.org/TR/REC-html40/strict.dtd">
<html><head><meta name="qrichtext" content="1" /><meta charset="utf-8" /><style type="text/css">
p, li { white-space: pre-wrap; }
hr { height: 1px; border-width: 0; }
li.unchecked::marker { content: "\2610"; }
li.checked::marker { content: "\2612"; }
</style></head><body style=" font-family:'Microsoft YaHei UI'; font-size:9pt; font-weight:400; font-style:normal;">
<p style=" margin-top:0px; margin-bottom:0px; margin-left:0px; margin-right:0px; -qt-block-indent:0; text-indent:0px;">请输入用户名</p></body></html></string>
</property>
</widget>
<widget class="QLabel" name="label_2">code>
<property name="geometry">code>
<rect>
<x>250</x>
<y>200</y>
<width>54</width>
<height>16</height>
</rect>
</property>
<property name="text">code>
<string>密码:</string>
</property>
</widget>
<widget class="QTextEdit" name="textEdit_2">code>
<property name="geometry">code>
<rect>
<x>320</x>
<y>190</y>
<width>221</width>
<height>31</height>
</rect>
</property>
<property name="html">code>
<string><!DOCTYPE HTML PUBLIC "-//W3C//DTD HTML 4.0//EN" "http://www.w3.org/TR/REC-html40/strict.dtd">
<html><head><meta name="qrichtext" content="1" /><meta charset="utf-8" /><style type="text/css">
p, li { white-space: pre-wrap; }
hr { height: 1px; border-width: 0; }
li.unchecked::marker { content: "\2610"; }
li.checked::marker { content: "\2612"; }
</style></head><body style=" font-family:'Microsoft YaHei UI'; font-size:9pt; font-weight:400; font-style:normal;">
<p style=" margin-top:0px; margin-bottom:0px; margin-left:0px; margin-right:0px; -qt-block-indent:0; text-indent:0px;">请输入密码</p></body></html></string>
</property>
</widget>
<widget class="QLabel" name="label_3">code>
<property name="geometry">code>
<rect>
<x>250</x>
<y>240</y>
<width>54</width>
<height>16</height>
</rect>
</property>
<property name="text">code>
<string>性别:</string>
</property>
</widget>
<widget class="QRadioButton" name="radioButton">code>
<property name="geometry">code>
<rect>
<x>320</x>
<y>240</y>
<width>41</width>
<height>20</height>
</rect>
</property>
<property name="text">code>
<string>男</string>
</property>
</widget>
<widget class="QRadioButton" name="radioButton_2">code>
<property name="geometry">code>
<rect>
<x>370</x>
<y>240</y>
<width>51</width>
<height>20</height>
</rect>
</property>
<property name="text">code>
<string>女</string>
</property>
</widget>
<widget class="QLabel" name="label_4">code>
<property name="geometry">code>
<rect>
<x>250</x>
<y>280</y>
<width>54</width>
<height>16</height>
</rect>
</property>
<property name="text">code>
<string>手机号:</string>
</property>
</widget>
<widget class="QTextEdit" name="textEdit_3">code>
<property name="geometry">code>
<rect>
<x>320</x>
<y>270</y>
<width>221</width>
<height>31</height>
</rect>
</property>
<property name="html">code>
<string><!DOCTYPE HTML PUBLIC "-//W3C//DTD HTML 4.0//EN" "http://www.w3.org/TR/REC-html40/strict.dtd">
<html><head><meta name="qrichtext" content="1" /><meta charset="utf-8" /><style type="text/css">
p, li { white-space: pre-wrap; }
hr { height: 1px; border-width: 0; }
li.unchecked::marker { content: "\2610"; }
li.checked::marker { content: "\2612"; }
</style></head><body style=" font-family:'Microsoft YaHei UI'; font-size:9pt; font-weight:400; font-style:normal;">
<p style=" margin-top:0px; margin-bottom:0px; margin-left:0px; margin-right:0px; -qt-block-indent:0; text-indent:0px;">请输入手机号</p></body></html></string>
</property>
</widget>
<widget class="QPushButton" name="pushButton">code>
<property name="geometry">code>
<rect>
<x>360</x>
<y>340</y>
<width>75</width>
<height>24</height>
</rect>
</property>
<property name="text">code>
<string>注册</string>
</property>
</widget>
</widget>
<widget class="QMenuBar" name="menuBar">code>
<property name="geometry">code>
<rect>
<x>0</x>
<y>0</y>
<width>800</width>
<height>22</height>
</rect>
</property>
<property name="defaultUp">code>
<bool>false</bool>
</property>
<widget class="QMenu" name="menu">code>
<property name="title">code>
<string>注册页面 </string>
</property>
</widget>
<addaction name="menu"/>code>
</widget>
<widget class="QStatusBar" name="statusbar"/>code>
</widget>
<resources/>
<connections/>
</ui>
四、ui文件转py文件
这种界面文件要应用到Python程序中,需要把它转成.py格式文件,有两种方式,但是实现都是通过pyuic。
第一种用命令行执行uic,第二种PyCharm配置pyuic,设置其运行程序、参数和工作目录,下面依次介绍:
1、命令行 执行 uic 生成 py代码
首先,进入刚才放置register.ui的目录,在终端执行命令:
cd PyQt/com/lyx/ui
接着,执行命令:
python -m PyQt6.uic.pyuic register.ui -o register.py
可以看到,此时包底下,生成多一个register.py文件,如下图所示:
代码如下:
<code># Form implementation generated from reading ui file 'register.ui'
#
# Created by: PyQt6 UI code generator 6.4.2
#
# WARNING: Any manual changes made to this file will be lost when pyuic6 is
# run again. Do not edit this file unless you know what you are doing.
from PyQt6 import QtCore, QtGui, QtWidgets
class Ui_MainWindow(object):
def setupUi(self, MainWindow):
MainWindow.setObjectName("MainWindow")
MainWindow.resize(800, 600)
self.centralwidget = QtWidgets.QWidget(parent=MainWindow)
self.centralwidget.setObjectName("centralwidget")
self.label = QtWidgets.QLabel(parent=self.centralwidget)
self.label.setGeometry(QtCore.QRect(250, 150, 54, 16))
self.label.setObjectName("label")
self.textEdit = QtWidgets.QTextEdit(parent=self.centralwidget)
self.textEdit.setGeometry(QtCore.QRect(320, 140, 221, 31))
self.textEdit.setObjectName("textEdit")
self.label_2 = QtWidgets.QLabel(parent=self.centralwidget)
self.label_2.setGeometry(QtCore.QRect(250, 200, 54, 16))
self.label_2.setObjectName("label_2")
self.textEdit_2 = QtWidgets.QTextEdit(parent=self.centralwidget)
self.textEdit_2.setGeometry(QtCore.QRect(320, 190, 221, 31))
self.textEdit_2.setObjectName("textEdit_2")
self.label_3 = QtWidgets.QLabel(parent=self.centralwidget)
self.label_3.setGeometry(QtCore.QRect(250, 240, 54, 16))
self.label_3.setObjectName("label_3")
self.radioButton = QtWidgets.QRadioButton(parent=self.centralwidget)
self.radioButton.setGeometry(QtCore.QRect(320, 240, 41, 20))
self.radioButton.setObjectName("radioButton")
self.radioButton_2 = QtWidgets.QRadioButton(parent=self.centralwidget)
self.radioButton_2.setGeometry(QtCore.QRect(370, 240, 51, 20))
self.radioButton_2.setObjectName("radioButton_2")
self.label_4 = QtWidgets.QLabel(parent=self.centralwidget)
self.label_4.setGeometry(QtCore.QRect(250, 280, 54, 16))
self.label_4.setObjectName("label_4")
self.textEdit_3 = QtWidgets.QTextEdit(parent=self.centralwidget)
self.textEdit_3.setGeometry(QtCore.QRect(320, 270, 221, 31))
self.textEdit_3.setObjectName("textEdit_3")
self.pushButton = QtWidgets.QPushButton(parent=self.centralwidget)
self.pushButton.setGeometry(QtCore.QRect(360, 340, 75, 24))
self.pushButton.setObjectName("pushButton")
MainWindow.setCentralWidget(self.centralwidget)
self.menuBar = QtWidgets.QMenuBar(parent=MainWindow)
self.menuBar.setGeometry(QtCore.QRect(0, 0, 800, 22))
self.menuBar.setDefaultUp(False)
self.menuBar.setObjectName("menuBar")
self.menu = QtWidgets.QMenu(parent=self.menuBar)
self.menu.setObjectName("menu")
MainWindow.setMenuBar(self.menuBar)
self.statusbar = QtWidgets.QStatusBar(parent=MainWindow)
self.statusbar.setObjectName("statusbar")
MainWindow.setStatusBar(self.statusbar)
self.menuBar.addAction(self.menu.menuAction())
self.retranslateUi(MainWindow)
QtCore.QMetaObject.connectSlotsByName(MainWindow)
def retranslateUi(self, MainWindow):
_translate = QtCore.QCoreApplication.translate
MainWindow.setWindowTitle(_translate("MainWindow", "MainWindow"))
self.label.setText(_translate("MainWindow", "用户名:"))
self.textEdit.setHtml(_translate("MainWindow", "<!DOCTYPE HTML PUBLIC \"-//W3C//DTD HTML 4.0//EN\" \"http://www.w3.org/TR/REC-html40/strict.dtd\">\n"
"<html><head><meta name=\"qrichtext\" content=\"1\" /><meta charset=\"utf-8\" /><style type=\"text/css\">\n"
"p, li { white-space: pre-wrap; }\n"
"hr { height: 1px; border-width: 0; }\n"
"li.unchecked::marker { content: \"\\2610\"; }\n"
"li.checked::marker { content: \"\\2612\"; }\n"
"</style></head><body style=\" font-family:\'Microsoft YaHei UI\'; font-size:9pt; font-weight:400; font-style:normal;\">\n"
"<p style=\" margin-top:0px; margin-bottom:0px; margin-left:0px; margin-right:0px; -qt-block-indent:0; text-indent:0px;\">请输入用户名</p></body></html>"))
self.label_2.setText(_translate("MainWindow", "密码:"))
self.textEdit_2.setHtml(_translate("MainWindow", "<!DOCTYPE HTML PUBLIC \"-//W3C//DTD HTML 4.0//EN\" \"http://www.w3.org/TR/REC-html40/strict.dtd\">\n"
"<html><head><meta name=\"qrichtext\" content=\"1\" /><meta charset=\"utf-8\" /><style type=\"text/css\">\n"
"p, li { white-space: pre-wrap; }\n"
"hr { height: 1px; border-width: 0; }\n"
"li.unchecked::marker { content: \"\\2610\"; }\n"
"li.checked::marker { content: \"\\2612\"; }\n"
"</style></head><body style=\" font-family:\'Microsoft YaHei UI\'; font-size:9pt; font-weight:400; font-style:normal;\">\n"
"<p style=\" margin-top:0px; margin-bottom:0px; margin-left:0px; margin-right:0px; -qt-block-indent:0; text-indent:0px;\">请输入密码</p></body></html>"))
self.label_3.setText(_translate("MainWindow", "性别:"))
self.radioButton.setText(_translate("MainWindow", "男"))
self.radioButton_2.setText(_translate("MainWindow", "女"))
self.label_4.setText(_translate("MainWindow", "手机号:"))
self.textEdit_3.setHtml(_translate("MainWindow", "<!DOCTYPE HTML PUBLIC \"-//W3C//DTD HTML 4.0//EN\" \"http://www.w3.org/TR/REC-html40/strict.dtd\">\n"
"<html><head><meta name=\"qrichtext\" content=\"1\" /><meta charset=\"utf-8\" /><style type=\"text/css\">\n"
"p, li { white-space: pre-wrap; }\n"
"hr { height: 1px; border-width: 0; }\n"
"li.unchecked::marker { content: \"\\2610\"; }\n"
"li.checked::marker { content: \"\\2612\"; }\n"
"</style></head><body style=\" font-family:\'Microsoft YaHei UI\'; font-size:9pt; font-weight:400; font-style:normal;\">\n"
"<p style=\" margin-top:0px; margin-bottom:0px; margin-left:0px; margin-right:0px; -qt-block-indent:0; text-indent:0px;\">请输入手机号</p></body></html>"))
self.pushButton.setText(_translate("MainWindow", "注册"))
self.menu.setTitle(_translate("MainWindow", "注册页面 "))
注:这种自动生成的代码,不要去编辑,也不需要编辑,因为界面的修改,再次生成时,会自动覆盖原来的代码,所以我们另外写代码,不要在自动生成的代码里面去写。
2、PyCharm 配置 Pyuic工具
2.1 配置Pyuic工具
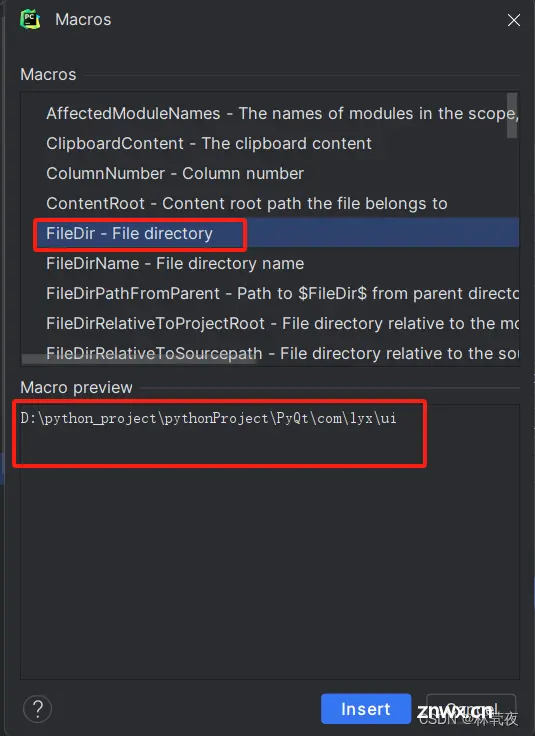
在 " File —> Settings —> Tools —> External Tools " 中点击 + 号,添加外部工具。Name 填写为 “Py_UIC”,这个名字可以随意填"Program"中填入 “python.exe” 的路径。“Arguments” 中填入 -m PyQt6.uic.pyuic $FileName$ -o $FileNameWithoutExtension$.py
说明:-m 参数就是 “将 库模块 作为脚本运行”,这里库模块是 PyQt6.uic.pyuic,-o 参数是输出文件名“Working directory” 中填入 $FileDir$
说明:$FileDir$为系统自定义宏参数( 点击 宏参数 时 可以实时显示对应当前工程 的 值 ),如下图所示:
所有配置如下图所示:

2.2 测试是否配置成功
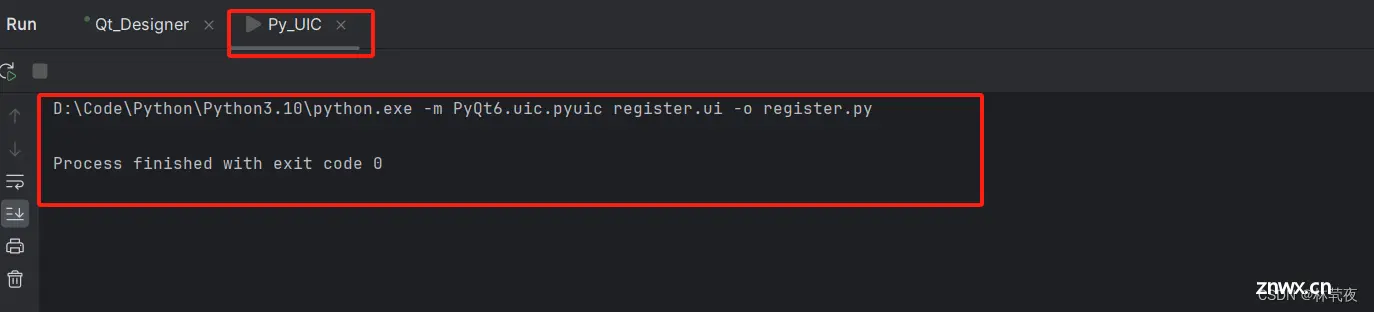
首先,先把刚才命令行生成的register.py文件删除接着,.ui文件 —> 右键 -> External Tools —> Py_UIC,即可自动生成 py 文件,如下图所示,配置成功:
五、运行ui文件所转的py文件
首先,在test包底下,新建一个register_test.py文件,代码如下:
<code>import sys
from PyQt6 import QtWidgets
from PyQt.com.lyx.ui.register import Ui_MainWindow
if __name__ == '__main__':
app = QtWidgets.QApplication(sys.argv) # 创建一个QApplication,也就是你要开发的应用程序
mainWindow = QtWidgets.QMainWindow() # 创建一个QMainWindow,用来装载你需要的各种组件、控件
ui = Ui_MainWindow() # ui是你创建的ui类的实例化对象,这里调用的便是刚才生成的register.py中的Ui_MainWindow类
ui.setupUi(mainWindow) # 执行类中的setupUi方法,方法的参数是第二步中创建的QMainWindow
mainWindow.show() # 执行QMainWindow的show()方法,显示这个QMainWindow
sys.exit(app.exec()) # 使用exit()或者点击关闭按钮退出QApplication
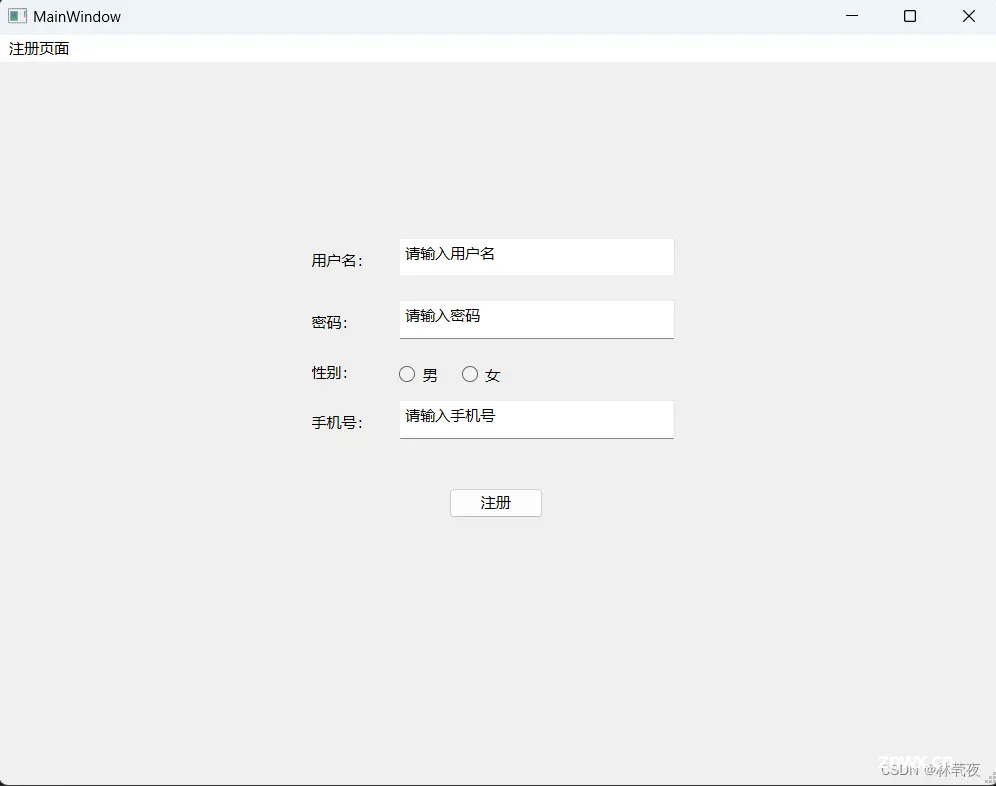
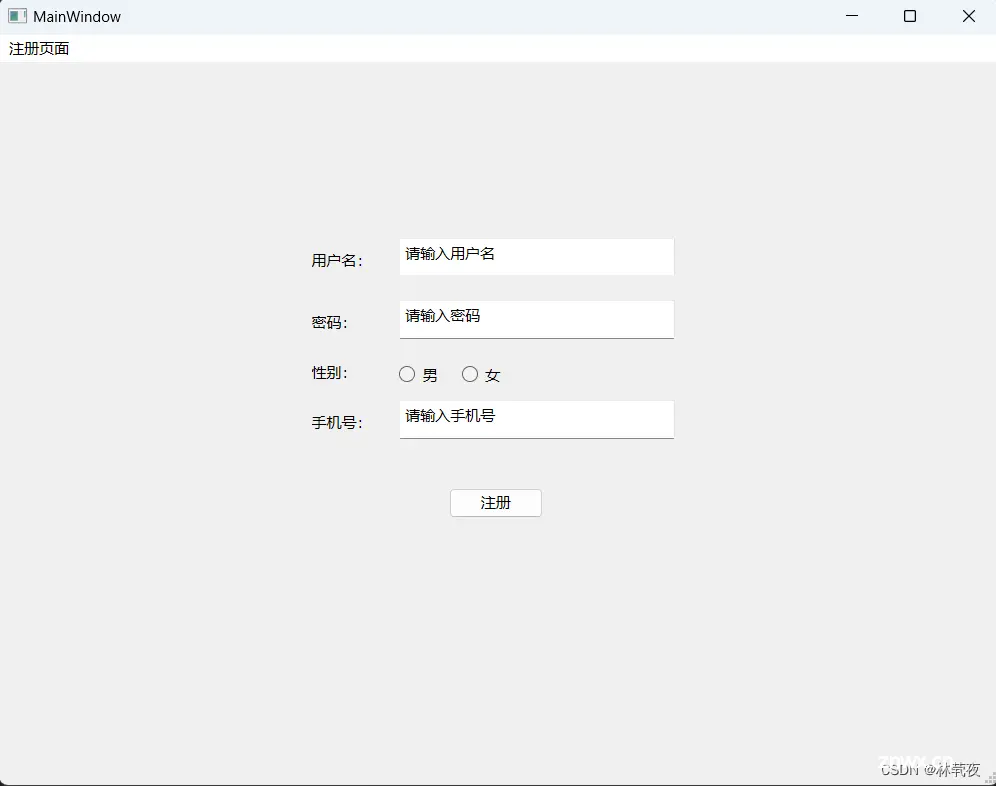
运行代码后,如下:
六、功能实现
1、编写代码
首先,在test包底下,新建一个my_window_test.py文件,重新写一个class来实现界面需要的逻辑,代码如下:
<code>import sys
from PyQt.com.lyx.ui.register import Ui_MainWindow
from PyQt6.QtWidgets import QMessageBox, QMainWindow, QApplication
# 自定义窗口类
# 参数1: QMainWindow 用来装载你需要的各种组件、控件
# 参数2: Ui_MainWindow 通过Qt设计师生成的register.py的窗口类
class MyWindow(QMainWindow, Ui_MainWindow):
def __init__(self, parent=None):
"""
子类的初始化方法,继承QMainWindow父类
:param parent:
"""
QMainWindow.__init__(self, parent=parent) # 初始化QMainWindow方法
self.setupUi(self) # 调用Ui_MainWindow类的setupUi方法,即register.py底下的setupUi方法,从中获取Ui界面
user_name = self.textEdit.toPlainText() # 获取UI底下的第一个文本框的名称,即用户名,作为参数点击按钮时传递过去
self.pushButton.clicked.connect(lambda: self.btnClicked(user_name)) # 注册按钮点击绑定事件,并调用btnClicked方法
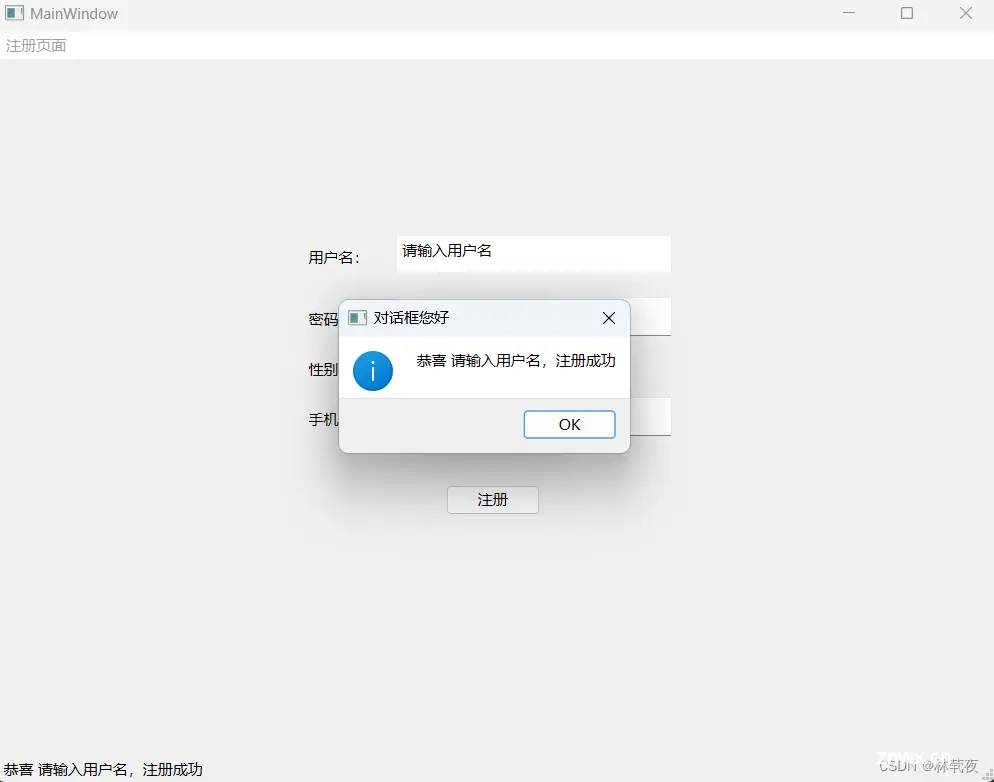
def btnClicked(self, user_name):
"""
点击注册按钮时触发事件
:param user_name: 用户名
:return: 显示一个对话框,展示用户名注册成功,对话框标题为对话框您好
"""
msg = f'恭喜 { user_name},注册成功' # 显示信息,参数变量由{}括起来
self.statusBar().showMessage(msg) # 对话框设置信息
QMessageBox.information(self, '对话框您好', msg) # 生成对话框
# main 主程序调用方法
if __name__ == '__main__':
app = QApplication(sys.argv) # 生成一个QApplication应用
MyWindow = MyWindow() # 实例化MyWindow对象
MyWindow.show() # 展示MyWindow对话框
sys.exit(app.exec()) # 使用exit()或者点击关闭按钮退出QApplication
2、运行代码
运行后,如下图所示:
接着点击注册按钮,效果如下:
以上内容仅供学习参考,写得不好,敬请见谅。
上一篇: 为什么说 Swoole 是 PHP 程序员技术水平的分水岭?
下一篇: Python logging库(python日志库)Logger(记录器、收集器、采集器)、Handler(处理器)、Formatter(格式化器)、Log Level(日志级别)
本文标签
声明
本文内容仅代表作者观点,或转载于其他网站,本站不以此文作为商业用途
如有涉及侵权,请联系本站进行删除
转载本站原创文章,请注明来源及作者。