【李宏毅-生成式 AI】Spring 2024, HW5:LLM Fine-tuning 实验记录
yubinCloud 2024-08-27 10:31:04 阅读 99
文章目录
1. Task Overview2. Overall Workflow3. Dataset 介绍4. 代码介绍4.1 环境介绍4.2 下载 dataset4.3 下载并加载模型4.2 Notebook 代码1)import 部分2)固定 seed3)加载 LLM4)加载 tokenizer5)设置解码参数6)⭐ LLM 和 tokenizer 使用示例7)generate_training_data 和 evaluate 函数8)demo examples9)Hyper Parameters10)model 的量化和 LoRA11)加载 dataset12)Trainer13)模型训练14)运行 test
5. 总结
这个实验主要是 fine-tune 一个 LLM,让一个 LLM 能够写唐诗。
相关链接:
Slides:Slides | Google DriveCode: colabDataset: GitHubVideo: Bilibili
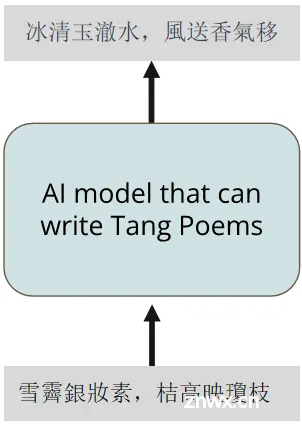
1. Task Overview
给 AI 一首唐诗的前两个 sentences,我们希望它能够完成剩下的部分:
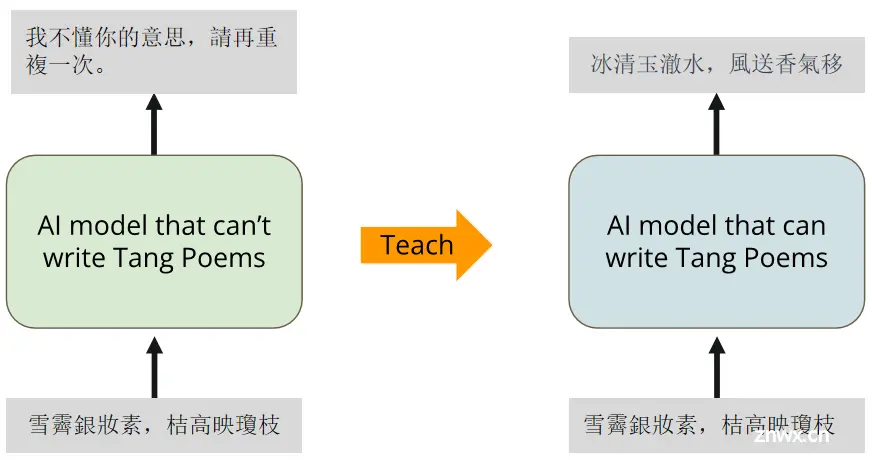
但是,原来的 LLM 可能并不具备这样的能力,我们希望经过 fine tune 之后,它能够最起码接一句像样的诗词:
2. Overall Workflow
LLM 使用 <code>MediaTek-Research/Breeze-7B-Instruct-v0_1:
MediaTek Research Breeze-7B (hereinafter referred to as Breeze-7B) is a language model family that builds on top of Mistral-7B, specifically intended for Traditional Chinese use.
数据集是一堆唐诗,一个 data point 的 example 如下:

总共有 5000 条数据。
微调的思路是:将一个 data point 的 instruction、input 和 output 填入 prompt template 中,形成一个 text,用来训练 LLM。
微调完成后,将 instruction、input 形成一个 prompt 输入给 LLM,让其完成剩下部分的唐诗。
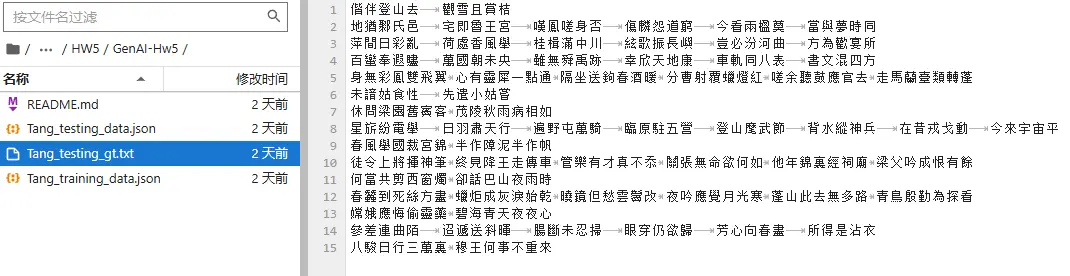
3. Dataset 介绍
dataset 主要包含两个 JSON 文件:
<code>Tang_testing_data.json:测试集,包含 15 条数据Tang_training_data.json:训练集,包含 5001 条数据
其中训练集每一条数据的格式都是前面 example 展示的,而测试集只包含 instruction 和 input 字段,答案在 Tang_testing_gt.txt 文件中:
4. 代码介绍
4.1 环境介绍
Python 3.10,torch 2.3.1
其他依赖如下:
<code>!pip install bitsandbytes==0.43.0
!pip install datasets==2.10.1
!pip install transformers==4.38.2
!pip install peft==0.9.0
!pip install sentencepiece==0.1.99
!pip install -U accelerate==0.28.0
!pip install colorama==0.4.6
具体的代码可以下载课程给的 notebook,并查看其中的代码。
4.2 下载 dataset
git clone https://github.com/CheeEn-Yu/GenAI-Hw5.git
4.3 下载并加载模型
由于从 HuggingFace 下载模型可能会失败,所以可以从镜像站先下载模型:
HuggingFace 镜像站:https://hf-mirror.com/
这里介绍如何使用 huggingface-cli 下载模型。
安装依赖:pip install -U huggingface_hub设置 mirror 环境变量:export HF_ENDPOINT=https://hf-mirror.com设置 huggingface 的缓存目录:export HF_HOME=/root/autodl-tmp/cache/下载模型:huggingface-cli download --resume-download MediaTek-Research/Breeze-7B-Instruct-v0_1
下载完成后,可以在目录中看到下载的预训练模型:

所在的目录就是 <code>${HF_HOME}/hub/ 中,之后代码需要从这个目录中加载模型。
4.2 Notebook 代码
1)import 部分
import os
import sys
import argparse
import json
import warnings
import logging
warnings.filterwarnings("ignore")
import torch
import torch.nn as nn
import bitsandbytes as bnb
from datasets import load_dataset, load_from_disk
import transformers, datasets
from peft import PeftModel
from colorama import *
from tqdm import tqdm
from transformers import AutoTokenizer, AutoConfig, AutoModelForCausalLM, BitsAndBytesConfig
from transformers import GenerationConfig
from peft import (
prepare_model_for_int8_training,
LoraConfig,
get_peft_model,
get_peft_model_state_dict,
prepare_model_for_kbit_training
)
2)固定 seed
固定住 seed 从而防止训练的不确定性:
seed = 42
torch.backends.cudnn.deterministic = True
torch.backends.cudnn.benchmark = False
torch.manual_seed(seed)
if torch.cuda.is_available():
torch.cuda.manual_seed_all(seed)
3)加载 LLM
这里使用 transformers 库的 AutoModelForCausalLM 来加载模型,并需要将 cache_dir 设置为下载的模型的目录。
cache_dir = "/root/autodl-tmp/cache/hub"
nf4_config = BitsAndBytesConfig(
load_in_4bit=True,
bnb_4bit_quant_type="nf4",code>
bnb_4bit_use_double_quant=True,
bnb_4bit_compute_dtype=torch.bfloat16
)
# 從指定的模型名稱或路徑載入預訓練的語言模型
model = AutoModelForCausalLM.from_pretrained(
model_name,
cache_dir=cache_dir,
quantization_config=nf4_config,
low_cpu_mem_usage = True
)
4)加载 tokenizer
加载 LLM 对应的 tokenizer:
# 創建 tokenizer 並設定結束符號 (eos_token)
logging.getLogger('transformers').setLevel(logging.ERROR)
tokenizer = AutoTokenizer.from_pretrained(
model_name,
add_eos_token=True,
cache_dir=cache_dir,
quantization_config=nf4_config
)
tokenizer.pad_token = tokenizer.eos_token
将 tokenizer 的 padding token 设定为 0:
tokenizer.pad_token_id = 0
5)设置解码参数
设置模型做 inference 时的 decoding 参数:
# 設定模型推理時需要用到的decoding parameters
max_len = 128
generation_config = GenerationConfig(
do_sample=True,
temperature=0.1,
num_beams=1,
top_p=0.3,
no_repeat_ngram_size=3,
pad_token_id=2,
)
6)⭐ LLM 和 tokenizer 使用示例
这里使用一个 data point example 来展示一下 LLM 和 tokenizer 的使用示例。
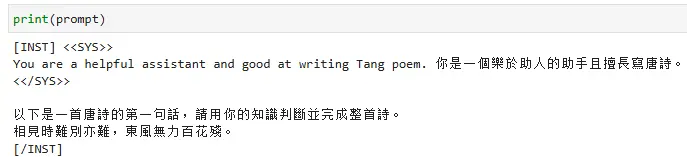
下面的代码使用 instruction 和 poem 组成一个 prompt:
instruction = '以下是一首唐詩的第一句話,請用你的知識判斷並完成整首詩。'
poem = '相見時難別亦難,東風無力百花殘。'
prompt = f"""\
[INST] <<SYS>>
You are a helpful assistant and good at writing Tang poem. 你是一個樂於助人的助手且擅長寫唐詩。
<</SYS>>
{ instruction}
{ poem}
[/INST]"""
组成的 prompt 如下:
然后使用 tokenizer 对 prompt 做分词,得到分词后的各个 token 的 token_id:
<code>inputs = tokenizer(prompt, return_tensors="pt")code>
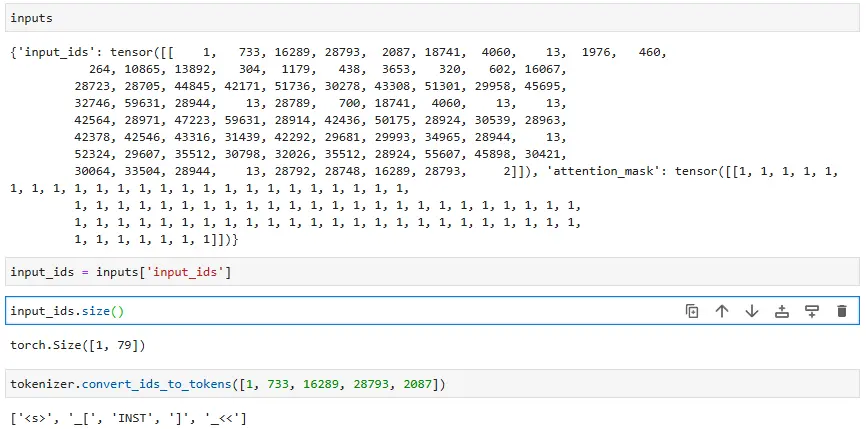
tokenizer 分词的结果 <code>inputs 包含两个字段:
input_ids:size 为 [batch,分词后 tokens 的个数],其中的每个元素是分词后的 token 在词表中的 token idattention_mask:size 与 input_ids 一样,元素值为 0/1,1 代表这个 token 有用,0 代表无用
为了验证一下,我们将 tokenizer 分词的结果中前面几个 token id 交给 tokenizer.convert_ids_to_token() 方法来将 token ids 转为字符串,可以看到这就是 prompt 的前几个字符。
attention_mask 的用处是:当 batch 大于 1 时,每一行元素的长度值是分词后字符数量最大的,比如两行 text 做分词,一行被分为 10 个 token,一行被分为 20 个 token,那么分词后的 input_ids 和 attention_mask 的 size 为 [2, 20],attention_mask[0] 就是前 10 个元素为 1,后 10 个为 0,attention_mask[1] 就是全部为 1。
现在我们可以把 input_ids 交给 LLM 做文本生成:
model_output = model.generate(
input_ids=input_ids,
generation_config=generation_config,
return_dict_in_generate=True,
output_scores=True,
max_new_tokens=max_len,
)
输出的结果也是一堆 token ids:
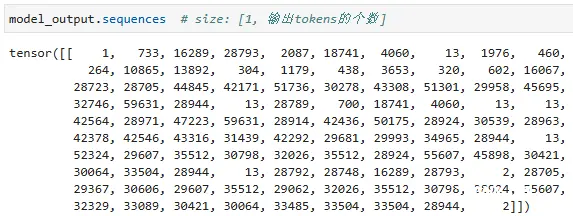
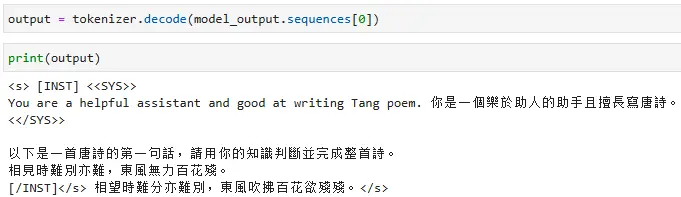
我们把这个 output 交给 tokenizer 做 decode 看一下结果:
7)generate_training_data 和 evaluate 函数
这里实现了两个重要的函数:
<code>generate_training_data():输入一个包含 instruction、input 和 output 三个字段的 data point,将他们组成 prompt 并使用 tokenizer 分词,输出包含 input_ids 和 attention_mask 字段的 dict,这样的 dict 可以作为 transformers 库的 Trainer 用来训练 CasualLM 的样本。evalute():输入 instruction、input、decoding params,输出 LLM 的响应
具体的代码实现上,就是使用上面示例的思路。代码的实现如下:
# 生成訓練資料
def generate_training_data(data_point):
"""
(1) Goal:
- This function is used to transform a data point (input and output texts) to tokens that our model can read
(2) Arguments:
- data_point: dict, with field "instruction", "input", and "output" which are all str
(3) Returns:
- a dict with model's input tokens, attention mask that make our model causal, and corresponding output targets
(3) Example:
- If you construct a dict, data_point_1, with field "instruction", "input", and "output" which are all str, you can use the function like this:
formulate_article(data_point_1)
"""
# construct full input prompt
prompt = f"""\
[INST] <<SYS>>
You are a helpful assistant and good at writing Tang poem. 你是一個樂於助人的助手且擅長寫唐詩。
<</SYS>>
{ data_point["instruction"]}
{ data_point["input"]}
[/INST]"""
# count the number of input tokens
len_user_prompt_tokens = (
len(
tokenizer(
prompt,
truncation=True,
max_length=CUTOFF_LEN + 1,
padding="max_length",code>
)["input_ids"]
) - 1
)
# transform input prompt into tokens
full_tokens = tokenizer(
prompt + " " + data_point["output"] + "</s>",
truncation=True,
max_length=CUTOFF_LEN + 1,
padding="max_length",code>
)["input_ids"][:-1]
return {
"input_ids": full_tokens,
"labels": [-100] * len_user_prompt_tokens
+ full_tokens[len_user_prompt_tokens:],
"attention_mask": [1] * (len(full_tokens)),
}
# 進行生成回覆的評估
def evaluate(instruction, generation_config, max_len, input="", verbose=True):code>
"""
(1) Goal:
- This function is used to get the model's output given input strings
(2) Arguments:
- instruction: str, description of what you want model to do
- generation_config: transformers.GenerationConfig object, to specify decoding parameters relating to model inference
- max_len: int, max length of model's output
- input: str, input string the model needs to solve the instruction, default is "" (no input)
- verbose: bool, whether to print the mode's output, default is True
(3) Returns:
- output: str, the mode's response according to the instruction and the input
(3) Example:
- If you the instruction is "ABC" and the input is "DEF" and you want model to give an answer under 128 tokens, you can use the function like this:
evaluate(instruction="ABC", generation_config=generation_config, max_len=128, input="DEF")code>
"""
# construct full input prompt
prompt = f"""\
[INST] <<SYS>>
You are a helpful assistant and good at writing Tang poem. 你是一個樂於助人的助手且擅長寫唐詩。
<</SYS>>
{ instruction}
{ input}
[/INST]"""
# 將提示文本轉換為模型所需的數字表示形式
inputs = tokenizer(prompt, return_tensors="pt")code>
input_ids = inputs["input_ids"].cuda() # 分词后的所有 tokens 的 ids,size:[1, tokens长度]
# 使用模型進行生成回覆
generation_output = model.generate(
input_ids=input_ids,
generation_config=generation_config,
return_dict_in_generate=True,
output_scores=True,
max_new_tokens=max_len,
)
# 將生成的回覆解碼並印出
for s in generation_output.sequences:
output = tokenizer.decode(s)
output = output.split("[/INST]")[1].replace("</s>", "").replace("<s>", "").replace("Assistant:", "").replace("Assistant", "").strip()
if (verbose):
print(output)
return output
8)demo examples
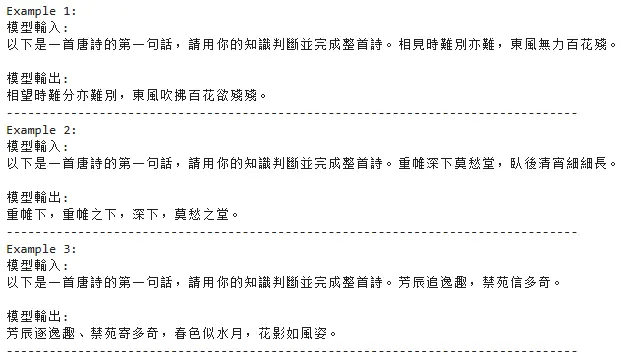
这里使用一些 demo examples 查看一下预训练的 LLM 在看到唐诗前两句后的输出结果:
""" It is recommmended NOT to change codes in this cell """
# demo examples
test_tang_list = ['相見時難別亦難,東風無力百花殘。', '重帷深下莫愁堂,臥後清宵細細長。', '芳辰追逸趣,禁苑信多奇。']
# get the model output for each examples
demo_before_finetune = []
for tang in test_tang_list:
demo_before_finetune.append(f'模型輸入:\n以下是一首唐詩的第一句話,請用你的知識判斷並完成整首詩。{ tang}\n\n模型輸出:\n'+evaluate('以下是一首唐詩的第一句話,請用你的知識判斷並完成整首詩。', generation_config, max_len, tang, verbose = False))
# print and store the output to text file
for idx in range(len(demo_before_finetune)):
print(f"Example { idx + 1}:")
print(demo_before_finetune[idx])
print("-" * 80)
9)Hyper Parameters
这里设置一些超参数。
Lab 建议修改的参数有:
<code>num_train_data = 1040 # 設定用來訓練的資料數量,可設置的最大值為5000。在大部分情況下會希望訓練資料盡量越多越好,這會讓模型看過更多樣化的詩句,進而提升生成品質,但是也會增加訓練的時間
# 使用預設參數(1040): fine-tuning大約需要25分鐘,完整跑完所有cell大約需要50分鐘
# 使用最大值(5000): fine-tuning大約需要100分鐘,完整跑完所有cell大約需要120分鐘
ckpt_dir = "./exp1" # 設定model checkpoint儲存目錄 (如果想要將model checkpoints存在其他目錄下可以修改這裡)
num_epoch = 1 # 設定訓練的總Epoch數 (數字越高,訓練越久,若使用免費版的colab需要注意訓練太久可能會斷線)
LEARNING_RATE = 3e-4 # 設定學習率
不建议修改的参数有(可以先不用细看):
cache_dir = "./cache" # 設定快取目錄路徑
from_ckpt = False # 是否從checkpoint載入模型的權重,預設為否
ckpt_name = None # 從特定checkpoint載入權重時使用的檔案名稱,預設為無
dataset_dir = "./GenAI-Hw5/Tang_training_data.json" # 設定資料集的目錄或檔案路徑
logging_steps = 20 # 定義訓練過程中每隔多少步驟輸出一次訓練誌
save_steps = 65 # 定義訓練過程中每隔多少步驟保存一次模型
save_total_limit = 3 # 控制最多保留幾個模型checkpoint
report_to = None # 設定上報實驗指標的目標,預設為無
MICRO_BATCH_SIZE = 4 # 定義微批次的大小
BATCH_SIZE = 16 # 定義一個批次的大小
GRADIENT_ACCUMULATION_STEPS = BATCH_SIZE // MICRO_BATCH_SIZE # 計算每個微批次累積的梯度步數
CUTOFF_LEN = 256 # 設定文本截斷的最大長度
LORA_R = 8 # 設定LORA(Layer-wise Random Attention)的R值
LORA_ALPHA = 16 # 設定LORA的Alpha值
LORA_DROPOUT = 0.05 # 設定LORA的Dropout率
VAL_SET_SIZE = 0 # 設定驗證集的大小,預設為無
TARGET_MODULES = ["q_proj", "up_proj", "o_proj", "k_proj", "down_proj", "gate_proj", "v_proj"] # 設定目標模組,這些模組的權重將被保存為checkpoint
device_map = "auto" # 設定設備映射,預設為"auto"
world_size = int(os.environ.get("WORLD_SIZE", 1)) # 獲取環境變數"WORLD_SIZE"的值,若未設定則預設為1
ddp = world_size != 1 # 根據world_size判斷是否使用分散式數據處理(DDP),若world_size為1則不使用DDP
if ddp:
device_map = { "": int(os.environ.get("LOCAL_RANK") or 0)}
GRADIENT_ACCUMULATION_STEPS = GRADIENT_ACCUMULATION_STEPS // world_size
10)model 的量化和 LoRA
将模型准备好,并使用 INT 8 来训练:
model = prepare_model_for_int8_training(model)
使用 LoraConfig 配置 LoRA 模型:
config = LoraConfig(
r=LORA_R,
lora_alpha=LORA_ALPHA,
target_modules=TARGET_MODULES,
lora_dropout=LORA_DROPOUT,
bias="none",code>
task_type="CAUSAL_LM",code>
)
model = get_peft_model(model, config)
11)加载 dataset
读取原数据集,并将所需要用到的数据写入到一个 tmp_dataset.json 文件中:
with open(dataset_dir, "r", encoding = "utf-8") as f:
data_json = json.load(f)
with open("tmp_dataset.json", "w", encoding = "utf-8") as f:
json.dump(data_json[:num_train_data], f, indent = 2, ensure_ascii = False)
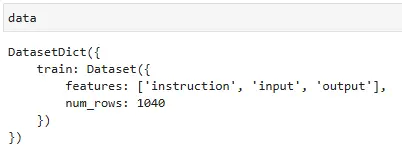
加载为 huggingface 的 Dataset 类型:
data = load_dataset('json', data_files="tmp_dataset.json", download_mode="force_redownload")code>
按照超参数的设置,将 dataset 分为 train-set 和 valid-set:
<code># 將訓練數據分為訓練集和驗證集(若 VAL_SET_SIZE 大於 0)
if VAL_SET_SIZE > 0:
train_val = data["train"].train_test_split(
test_size=VAL_SET_SIZE, shuffle=True, seed=42
)
train_data = train_val["train"].shuffle().map(generate_training_data)
val_data = train_val["test"].shuffle().map(generate_training_data)
else:
train_data = data['train'].shuffle().map(generate_training_data)
val_data = None
12)Trainer
使用 transformers 库的 Trainer 进行模型训练:
model.config.use_cachee = False
# 使用 Transformers Trainer 進行模型訓練
trainer = transformers.Trainer(
model=model,
train_dataset=train_data,
eval_dataset=val_data,
args=transformers.TrainingArguments(
per_device_train_batch_size=MICRO_BATCH_SIZE,
gradient_accumulation_steps=GRADIENT_ACCUMULATION_STEPS,
warmup_steps=50,
num_train_epochs=num_epoch,
learning_rate=LEARNING_RATE,
fp16=True, # 使用混合精度訓練
logging_steps=logging_steps,
save_strategy="steps",code>
save_steps=save_steps,
output_dir=ckpt_dir,
save_total_limit=save_total_limit,
ddp_find_unused_parameters=False if ddp else None, # 是否使用 DDP,控制梯度更新策略
report_to=report_to,
),
data_collator=transformers.DataCollatorForLanguageModeling(tokenizer, mlm=False),
)
13)模型训练
使用 trainer 进行模型训练,并保存预训练结果:
trainer.train()
model.save_pretrained(ckpt_dir)
14)运行 test
前面的训练过程保存了一系列 checkpoints(ckpt),这里展示所有可用的 ckpt:
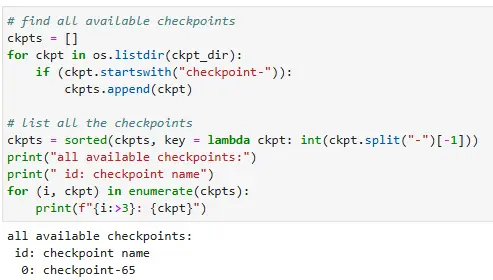
选择使用的 ckpt:
<code>id_of_ckpt_to_use = -1 # 要用來進行推理的checkpoint的id(對應上一個cell的輸出結果)
# 預設值-1指的是上列checkpoints中的"倒數"第一個,也就是最後一個checkpoint
# 如果想要選擇其他checkpoint,可以把-1改成有列出的checkpoint id中的其中一個
ckpt_name = os.path.join(ckpt_dir, ckpts[id_of_ckpt_to_use])
调整 decoding paramters:
# 你可以在這裡調整decoding parameter,decoding parameter的詳細解釋請見homework slides
max_len = 128 # 生成回復的最大長度
temperature = 0.1 # 設定生成回覆的隨機度,值越小生成的回覆越穩定
top_p = 0.3 # Top-p (nucleus) 抽樣的機率閾值,用於控制生成回覆的多樣性
# top_k = 5 # 調整Top-k值,以增加生成回覆的多樣性和避免生成重複的詞彙
从指定的 checkpoint 加载模型权重:
test_data_path = "GenAI-Hw5/Tang_testing_data.json"
output_dir = "./output" # 設定作業結果輸出目錄 (如果想要把作業結果存在其他目錄底下可以修改這裡,強烈建議存在預設值的子目錄下,也就是Google Drive裡)
output_path = os.path.join(output_dir, "results.txt")
cache_dir = "/root/autodl-tmp/cache/hub" # 設定快取目錄路徑
seed = 42 # 設定隨機種子,用於重現結果
no_repeat_ngram_size = 3 # 設定禁止重複 Ngram 的大小,用於避免生成重複片段
nf4_config = BitsAndBytesConfig(
load_in_4bit=True,
bnb_4bit_quant_type="nf4",code>
bnb_4bit_use_double_quant=True,
bnb_4bit_compute_dtype=torch.bfloat16
)
# 使用 tokenizer 將模型名稱轉換成模型可讀的數字表示形式
tokenizer = AutoTokenizer.from_pretrained(
model_name,
cache_dir=cache_dir,
quantization_config=nf4_config
)
# 從預訓練模型載入模型並設定為 8 位整數 (INT8) 模型
model = AutoModelForCausalLM.from_pretrained(
model_name,
quantization_config=nf4_config,
device_map={ '': 0}, # 設定使用的設備,此處指定為 GPU 0
cache_dir=cache_dir
)
# 從指定的 checkpoint 載入模型權重
model = PeftModel.from_pretrained(model, ckpt_name, device_map={ '': 0})
运行 test dataset:
results = []
# 設定生成配置,包括隨機度、束搜索等相關參數
generation_config = GenerationConfig(
do_sample=True,
temperature=temperature,
num_beams=1,
top_p=top_p,
# top_k=top_k,
no_repeat_ngram_size=no_repeat_ngram_size,
pad_token_id=2
)
# 讀取測試資料
with open(test_data_path, "r", encoding = "utf-8") as f:
test_datas = json.load(f)
# 對於每個測試資料進行預測,並存下結果
with open(output_path, "w", encoding = "utf-8") as f:
for (i, test_data) in enumerate(test_datas):
predict = evaluate(test_data["instruction"], generation_config, max_len, test_data["input"], verbose = False)
f.write(f"{ i+1}. "+test_data["input"]+predict+"\n")
print(f"{ i+1}. "+test_data["input"]+predict)
打印出的测试结果:
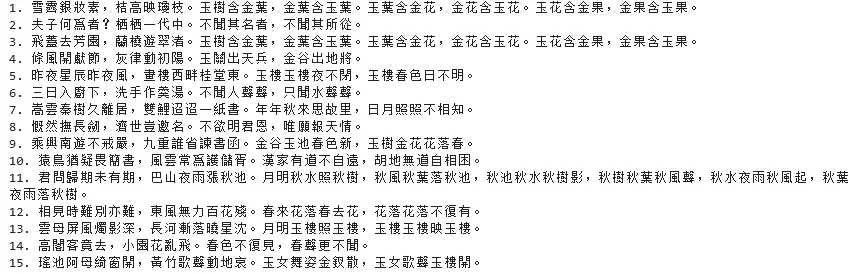
(很多还是很搞笑的)
5. 总结
以上代码展示了如何加载一个 LLM 并对其针对 specific task 做 fine tune,通过修改相应的 dataset 可以复用相关代码实现其他的特定任务微调。整个代码值得学习。
声明
本文内容仅代表作者观点,或转载于其他网站,本站不以此文作为商业用途
如有涉及侵权,请联系本站进行删除
转载本站原创文章,请注明来源及作者。