OpenCV与AI深度学习 | 如何使用YOLOv9检测图片和视频中的目标
双木的木 2024-07-08 12:01:02 阅读 100
本文来源公众号“OpenCV与AI深度学习”,仅用于学术分享,侵权删,干货满满。
原文链接:如何使用YOLOv9检测图片和视频中的目标
1 介绍
在之前的文章中,我们探索了使用 YOLOv8 进行对象检测。现在,我们很高兴能够深入研究最新的迭代——YOLOv9!这个新版本承诺在准确性、效率和适用性方面取得显著进步,使其成为各种计算机视觉任务的强大工具。
2 如何使用 YOLOv9 处理图像和视频
第 1 步:安装必要的库
<code>pip install opencv-python ultralytics
第 2 步:导入库
import cv2
from ultralytics import YOLO
第 3 步:选择模型
model = YOLO("yolov9c.pt")
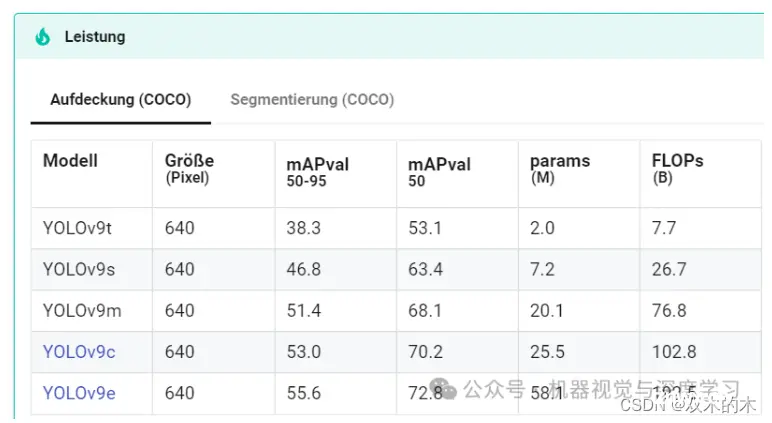
在下面网址中,您可以比较不同的型号并权衡各自的优缺点。在本例中,我们选择了 yolov9c.pt。
https://docs.ultralytics.com/de/models/yolov9/#impact-on-lightweight-models
第 4 步:编写一个函数来预测和检测图像和视频中的对象
<code>def predict(chosen_model, img, classes=[], conf=0.5):
if classes:
results = chosen_model.predict(img, classes=classes, conf=conf)
else:
results = chosen_model.predict(img, conf=conf)
return results
def predict_and_detect(chosen_model, img, classes=[], conf=0.5, rectangle_thickness=2, text_thickness=1):
results = predict(chosen_model, img, classes, conf=conf)
for result in results:
for box in result.boxes:
cv2.rectangle(img, (int(box.xyxy[0][0]), int(box.xyxy[0][1])),
(int(box.xyxy[0][2]), int(box.xyxy[0][3])), (255, 0, 0), rectangle_thickness)
cv2.putText(img, f"{result.names[int(box.cls[0])]}",
(int(box.xyxy[0][0]), int(box.xyxy[0][1]) - 10),
cv2.FONT_HERSHEY_PLAIN, 1, (255, 0, 0), text_thickness)
return img, results
predict()函数有三个参数:
chosen_model:用于预测的训练模型img:进行预测的图像classes:(可选)用于过滤预测的类名列表conf:(可选)要考虑的预测的最小置信度阈值
该函数首先检查是否classes提供了参数。如果是,则chosen_model.predict()使用参数调用该方法classes,该方法将预测仅过滤到这些类。否则,chosen_model.predict()将在不带参数的情况下调用该方法classes,这会返回所有预测。
该conf参数用于过滤掉置信度分数低于指定阈值的预测。这对于消除误报很有用。
该函数返回预测结果列表,其中每个结果包含以下信息:
name: 预测类别的名称conf:预测的置信度分数box:预测对象的边界框
predict_and_detect()函数:该函数采用与 函数相同的参数predict(),但除了预测结果之外,它还返回带注释的图像。
该函数首先调用该predict()函数来获取预测结果。然后,它迭代预测结果并在每个预测对象周围绘制一个边界框。预测类的名称也写在边界框上方。
该函数返回一个包含注释图像和预测结果的元组。
以下是两个函数之间差异的总结:
predict()函数仅返回预测结果,同时该predict_and_detect()函数还返回带注释的图像predict_and_detect()函数是函数的包装器predict(),这意味着它predict()在内部调用该函数。
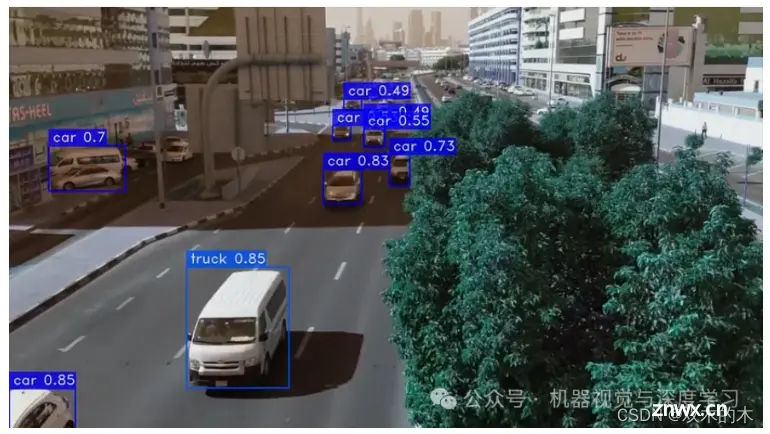
第 5 步:使用 YOLOv9 检测图像中的目标
# read the image
image = cv2.imread("YourImagePath")
result_img, _ = predict_and_detect(model, image, classes=[], conf=0.5)
如果想检测特定的类,可以在下面链接找到对应的类名,只需在类列表中写入对象的 ID 号即可。
https://github.com/ultralytics/ultralytics/blob/main/ultralytics/cfg/datasets/coco.yaml
第 6 步:保存并绘制结果图像
cv2.imshow("Image", result_img)
cv2.imwrite("YourSavePath", result_img)
cv2.waitKey(0)
第 7 步:使用 YOLOv9 检测视频中的目标
video_path = r"YourVideoPath"
cap = cv2.VideoCapture(video_path)
while True:
success, img = cap.read()
if not success:
break
result_img, _ = predict_and_detect(model, img, classes=[], conf=0.5)
cv2.imshow("Image", result_img)
cv2.waitKey(1)
第 8 步:保存结果视频
# defining function for creating a writer (for mp4 videos)
def create_video_writer(video_cap, output_filename):
# grab the width, height, and fps of the frames in the video stream.
frame_width = int(video_cap.get(cv2.CAP_PROP_FRAME_WIDTH))
frame_height = int(video_cap.get(cv2.CAP_PROP_FRAME_HEIGHT))
fps = int(video_cap.get(cv2.CAP_PROP_FPS))
# initialize the FourCC and a video writer object
fourcc = cv2.VideoWriter_fourcc(*'MP4V')
writer = cv2.VideoWriter(output_filename, fourcc, fps,
(frame_width, frame_height))
return writer
只需使用上面的函数和代码即可:
output_filename = "YourFilename"
writer = create_video_writer(cap, output_filename)
video_path = r"YourVideoPath"
cap = cv2.VideoCapture(video_path)
while True:
success, img = cap.read()
if not success:
break
result_img, _ = predict_and_detect(model, img, classes=[], conf=0.5)
writer.write(result_img)
cv2.imshow("Image", result_img)
cv2.waitKey(1)
writer.release()
THE END !
文章结束,感谢阅读。您的点赞,收藏,评论是我继续更新的动力。大家有推荐的公众号可以评论区留言,共同学习,一起进步。
声明
本文内容仅代表作者观点,或转载于其他网站,本站不以此文作为商业用途
如有涉及侵权,请联系本站进行删除
转载本站原创文章,请注明来源及作者。